
Sewing Room Furniture Ideas
This content contains affiliate links or sponsored elements, read our Disclosure Policy.
Getting sewing room furniture ideas can be daunting. I have to confess that this part stressed me out more than the floor and the paint (if that’s possible). It’s what went wrong with my previous space is the furniture. The room had SO MUCH furniture that it choked the space and made it feel so cluttered.
Long before I started thinking about paint and about flooring I was trolling the internet trying to figure out how I wanted my space to feel. I knew that I wanted a lot less furniture, I wanted my space feel a lot more open, and meant really cutting back on the furniture. It also meant maximizing storage and keeping it clean.
Here’s a few things I learned when it came to redoing the furniture in my craft room.
Hate The Ads?
This tutorial with video and step by step instructions is available in the Makers Studio. The Maker’s Studio is an ad free experience, no video ads, no forms, no zip files, just creating.

Sewing Room Furniture Ideas:
Step 1 – Have a Vision for your sewing room furniture
Know the specs of your room or space. I drafted the specs of my room in Adobe Illustrator so I could get an accurate idea of how the furniture would fit.
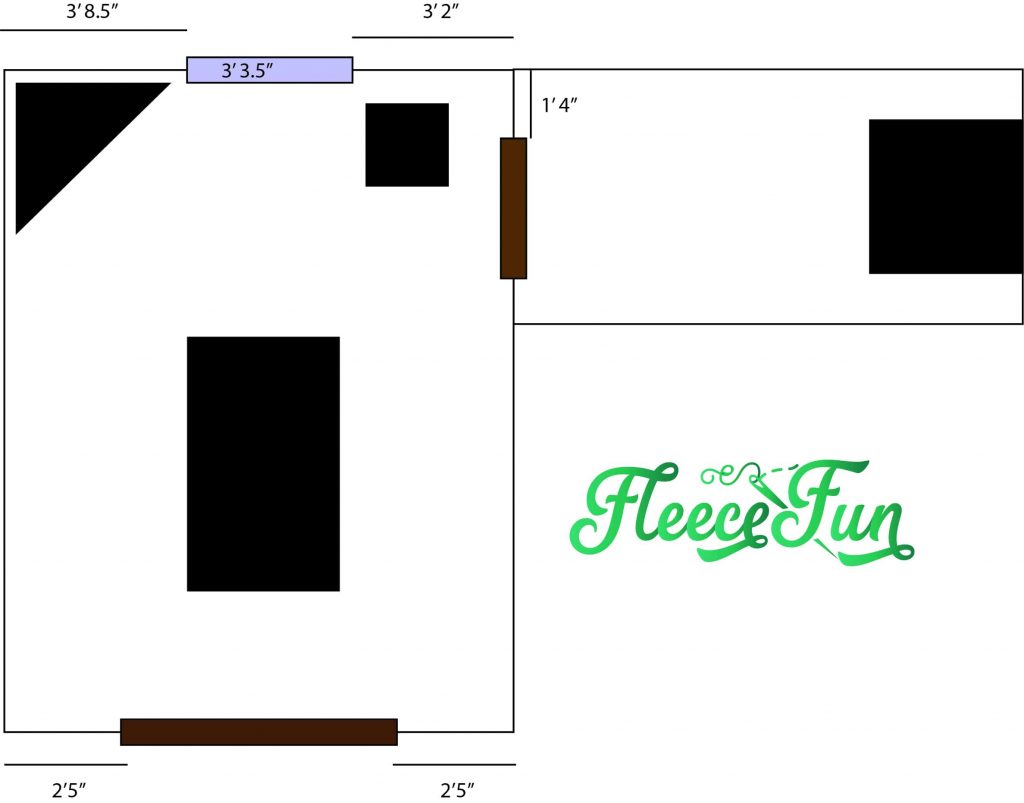
This way when I was looking at items (whether in the store or online, I could get a real idea of how it would fit.
Step 2 – Have a Centerpiece or Inspiration Piece
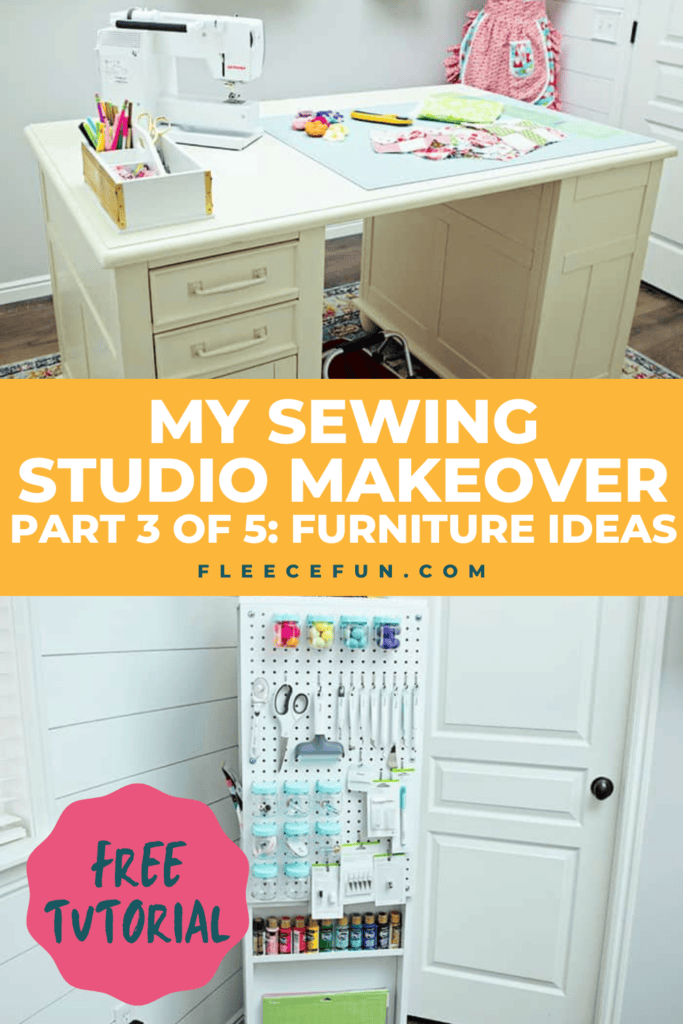
Building your sewing room around a single piece of furniture can make it easier to plan. I found my dream piece of furniture on Wayfair.com – This desk.
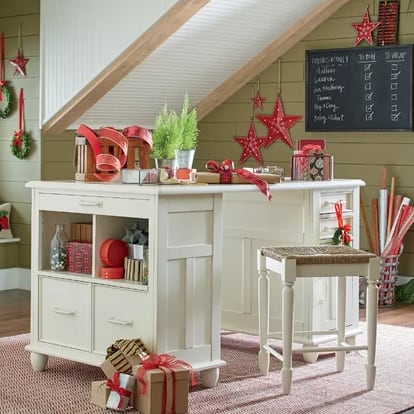
It was big, had traditional lines, was counter height, and perfect for what I wanted. I fell in love with this piece and would occasionally look at it in the app on phone and lust after it. When I planned on redoing my office, I knew that I wanted this to be the center of it. So I took the dimensions and plopped it into my layout to make sure it would fit. It was big enough to accommodate cutting and sewing- just what I wanted. From there I planned the other furniture in the room around the craft table.
The other items I knew that I wanted were a desk for my computer, and this craft tower.
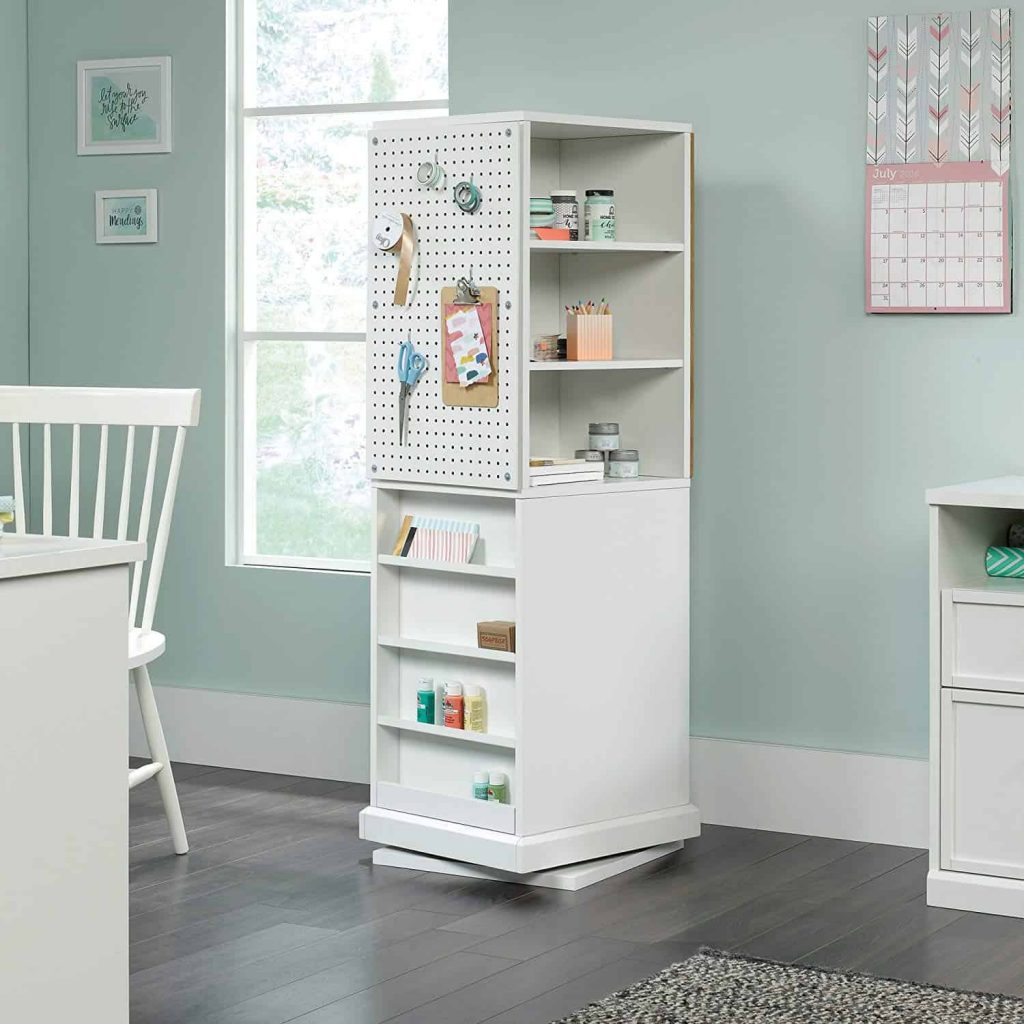
The craft tower is perfect for all my Cricut Supplies and mats.
Since I plan on filming in this space as well I knew that those three pieces are plenty so I have room to maneuver a tripod and other equipment.
Step 3 – Stalking Your Favorites Can Pay Off
The craft desk occasionally had sold out on Wayfair and I worried that when it was finally time to purchase my craft desk (and yes, it costs a very pretty penny) it wouldn’t be in stock. I really didn’t want to have to come up with more sewing room furniture ideas.
One day I check on it and it was out of stock (with a date that it should be in stock again). Bummed. I occasionally checked on it, one day low and behold – there it was offered as an “open box item” at a discount (cue happy dance). So, I purchased it immediately. I got my dream piece of furniture at a discount thanks to my obsessive stalking of it.
Part of my stalking was reading the reviews of the pieces of furniture that I bought. I knew that while they called the desk “distressed white” it was more of a cream/yellow color thanks to the reviews. I also got tips on how to put the furniture together that made it a lot easier. When buying online it can save you a lot of time and anguish if you just read the reviews by others.
Step 4 – One Man’s Trash is Another Man’s Treasure
Sometimes upcycling to better than anything your can buy new. After getting the craft desk and the tower, I didn’t want to spend too much more on furniture for my sewing room, but I needed a desk for my computer. I couldn’t find anything new that I liked. So turned to the local online classifieds to try and find something. After looking I decided that I wanted a computer armoire for my desktop so I could hide it away. After looking for a few weeks I came across this gem:
It was $75 and perfect! It’s an armoire that’s designed to tuck into a corner, and it has shelving and spaces for computer cords. I couldn’t believe my luck. At that price I didn’t mind putting a little time and paint into it.
I painted the exterior with Country Gray Rust-Oleum Chalk Paint
and painted the interior with Aged Gray.
I then sealed it.
It needed color so I put in contact paper to the interior (to make it bright and cheerful).
The edges looked a little unfinished to me. Plus it’s hard to get all of the contact paper to hang perfectly.
So I hot glued some furniture braiding to the it to finish it off. I love how this thing tucks into the corner and looks so clean and classy when it’s closed up and is so functional when it’s open. I LOVE this desk and am so happy that I found it in the classifieds.
Step 5 – Keep your sewing room favorites
I didn’t want give up my minibox. Thanks to my measurements and studying my room I figured out that it could fit in my closet! I didn’t have to give up the awesome storage it offers and was able to keep my rule about fitting most of stuff in my closet.
Now that I have the furniture ready, it’s time to get to the really fun part – decorating and the final reveal. That’s coming up!
love this sewing room furniture ideas? see More tutorials for Organizers!
- Origami Fabric Basket Tutorial
- DIY Sewing Room Décor
- Sewing Machine Mat Tutorial
- Ribbon Book Mark
- Craft Room Hanging Organizer Tutorial
- How to Make a Giant Pegboard for Your Craft Room
- How to Make a Pin Cushion Tutorial (Bracelet Style)
- Make Giant Buttons Wall Decor
- IKEA Fabric Stool
- Tips on How to Paint Stripes on Walls
- Painting a Chalkboard Wall – 5 Things to Know
- See all of our Organizer Tutorials
Love these Craft Room Makeovers and Decor Ideas!
- Craft Closet Organization: The Ultimate Guide
- Sewing Room Ideas: My Studio Makeover (Part 1 of the Makeover Series)
- How to Choose Colors for Your Sewing Studio (Part 2 of the Makeover Series)
- Cute Craft Room Decor Ideas (Part 4 of the Makeover Series)
- Craft Room Ideas: Makeover Final Reveal (Part 5 of the Makeover Series)
- Honest Craft Room Tour!
- See all Studio Space and Decor Tutorials!
I am loving that you are sharing this transformation with us all! Thanks for doing this. Can’t wait to see the final results. Looks great already!
Thanks Fran!
I thought you were ruining it by painting it. But really love the color and how it turned out. Lol. Beautiful.
I was nervous about it too! 🙂
I thought the same thing…it’s a beautiful piece….and now prettier than ever!
Great ideas. I see something different that I can do with my sewing room. Thanks for being so helpful and inspirational.🙏🏼🙂
Thank you for sharing. So exciting!
Really cute stuff! I love how it’s all turning out.
I wish I had a little helper like that when I have painting projects. Does he do kitchens?
Yes, but he gets bored easily and will leave projects unfinished! 🙂
Got a question. Re: Fun Fleece Pattern Hats. I just got done cutting nine hats (all different sizes). Right now I have a piece of tape (Scotch Green) with the size label on each hat. Once the hats are finished, I will wash them before being donated to charity. Any ideas on how to put a size label onto the hats while being washed and when they are distributed? Appreciate the help.
a piece of ribbon with the size written or embroidered on.