
How to make buttonholes for beginners
This content contains affiliate links or sponsored elements, read our Disclosure Policy.
I’ll be honest buttonholes are scary! They are a lot of work and they are usually the last thing you do on a sewing project – so if you mess it up your could ruin all your hard work. Never fear my hand how to make buttonholes for beginners guide will show you the basic construction of a buttonhole and I will reveal the two major factors that will make or break a buttonhole.
For Buttonholes you will need:
Marking pen
Button (for sizing)
Buttonhole Foot for your machine
Seam Ripper or Buttonhole Cutter
The two major factors that make or break buttonholes are tension and stabilizer. If you get these two things perfected then your will have a much easier time with those tricky buttonholes.
Stabilizer
There are a lot of aitches in a buttonhole. You don’t want the fabric to shift under the needle or get caught underneath it. By making the fabric a little more stiff (especially stretch fabrics like fleece) you will much more even stitching. It’s worth the time to iron on some stabilizer (like this one) to the back of the fabric you’re putting the buttonhole on. Most patterns will ask that you do this step – don’t skip it. It won’t save you time in the long run.
Tension
Tension is the amount of pull the machine has on thread as it passed through it. To much tension and things will pucker – too little and the stitches will be loose or not form properly.
So those are the two big factors when it comes to making a buttonhole. But how do you actually make a button hole? That varies from machine to machine. But on my trusty manual Bernina, it is a manual buttonhole, so I can show you each stage of it.
How to make a buttonhole for beginners
Step 1 – Prep the fabric
Make sure that have ironed on the stabilizer so it will cover the entire buttonhole. It’s also a good idea to test your tension on a scrap of fabric and stabilizer before you begin sewing on your project.
Step 2 – Mark the Buttonhole size (manual)
 Lay the button on the cloth where you need it to go. Mark the top and bottom with a line. Then remove the button and join the two lines to make and “I” shape. This is the size your buttonhole needs to be. Note: there are special feet, and machines that will calculate the size for you, but it’s a good idea to have the buttonhole marked on the cloth anyway.
Step 3 – Begin to sew the first bead.
 The first step is sewing down the left side of the button hole. This is basically a satin stitch. Sew it to the end of your “I”.
Step 4 – Reverse straight stitch.
 The next step the machine will move the needle to the right and then reverse straight stitch back to where you started the first bead.
Step 5 – Fold back the front and turn
 Now the machine will sew the first “bar tack” it’s the stitch that goes at the top of the button hole.
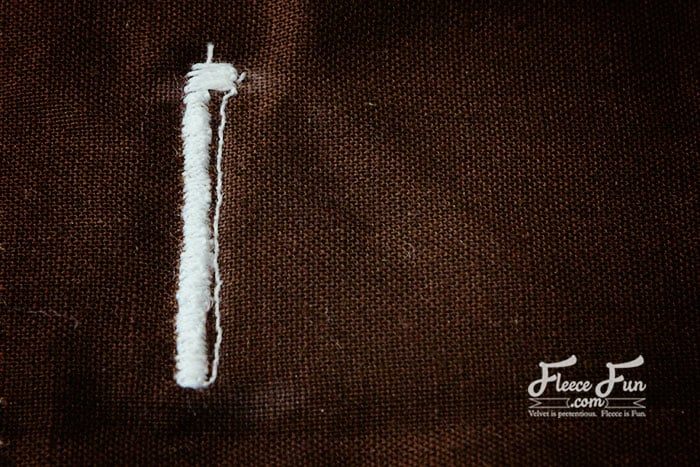
Step 6 – The second bead.
 Now that the top is sewn, The next set is the machine will sew down over the revers straight stitch it made, making the second bead using a satin stitch. You can see in the example how the tension was off on the first bead making it uneven.
Step 7 – Lower bar tack

Now both beads are secured on the bottom with the lower tack/
Step 8– Securing Stitches

The buttonhole is finished with a few securing stitches up the side of the first bead.
Step 9 – Opening the Buttonhole
 Use a seam ripper to open up the buttonhole. Take your time on this step if you’re not careful you can rip through all the stitches. A trick I like to use is to put a straight pin just before the bar tack stitches to keep me from ripping through them
Step 10 – Test the Buttonhole
 Test out your button hole and make sure that it works! Good job!
Check out the video to walk you through Making a Buttonhole here:
More How to Sew Lessons:
- How to get started sewing with a sewing machine
- How to Unpick a Seam
- How to Make a Button Hole
- What are the parts to a Sewing Machine?
- What is a Straight Stitch and How to Sew it
- What is a Basting Stitch?
- How to Make a Rolled Hem or a Baby Hem
- What to Look for a in a Good Sewing Machine
- What are the must have sewing tools?
- How to Choose a Sewing Machine
- 5 Easy Ways to Save Money on Crafts and Fabric
- You can see all the How to Sew Lessons Here
Working With Different Fabrics:
- Coral Fleece Vs. Polar Fleece what is the difference?
- What is the Anatomy of Fabric?
- 7 Things you need to know about sewing with Minky Fabric
- How to Sew with Faux Fur
- Which Fleece is Which? Your Quick Start Guide to Fleece

Hi! I was just wondering where can you find a buttonhole foot?
any sewing machine store will carry them. You can even go online to sewingmachinesplus and have ti shippeed to your door.