
DIY 18 Inch Doll Mermaid Costume Pattern by Cucicucicoo

Free sewing pattern: Adorable doll mermaid costume pattern! The FREE pattern comes with step by step instructions and is easy to sew. Perfect for dressing up my little one’s 18 inch doll. Fast to make, perfect gift for a little girl.
 Hey, everyone! My name is Lisa and I publish sewing tutorials, patterns and lessons at Cucicucicoo: Eco Sewing & Crafting (www.cucicucicoo.com). I’m a US expat living in southern Italy with my husband and two kiddos and I have a serious problem buying something when I know that I could make it myself. (I’ll bet a lot of you can relate!) So, when my daughter was young, I used to make her all sorts of simple playthings and accessories for her toys. That was when I developed my first doll mermaid costume pattern.
This is such an easy project to sew up, perfect for beginners. It only takes about 30 minutes maximum to make, so I often sew them as gifts, too! This mermaid outfit fits most 18” dolls, has two different fin shapes, and is easily adjustable for other sized dolls.
Let’s get started!
MATERIALS AND PREPARATION:
 Cucicucicoo doll mermaid costume pattern (Form at the end of the post)
 Cucicucicoo doll mermaid costume pattern (Form at the end of the post)
45 x 60 cm (height x width) fleece or other fabric
40 cm elastic (6mm)
2 pieces of ribbon 35 cm long each OR additional 30 cm elastic
Fleece (such as the red fabric above) is an excellent choice because it keeps it shape and doesn’t fray, however I will show a little trick after in case you want to use other fabrics that may fray (such as the blue fabrics above).
DIY 18 Inch Doll Mermaid Costume Pattern Tutorial:
 Print the 6-page pattern file without scaling. Trim the page margins and tape them together as shown above. Cut out the Body and Shell Bra pieces, and either Fin A or B.

- Cut out two bodies, two shell bras and two of the chosen fin shape.
SEWING THE BODY:

A fun detail is to sew scale shapes onto the body pieces. This will only show up on fleece or other thick, squishy fabrics. This step is totally optional.
- Draw scallop shapes with chalk, then sew over them. I suggest using a 3 mm stitch length.

Here is a closeup of what the “scales” look like.

- Pin the two body pieces together along the sides, right sides facing. Sew down the sides with a 1 cm (3/8”) seam allowance and trim the seam allowances. (left above)
- Make a casing by folding the top edge over by 1.5 cm and sew around with a 1 cm seam allowance. Make sure to leave an opening.
- Slip 40 cm of 6 mm elastic through the casing with a safety pin and tie the ends in a knot. (right above) Trim the excess elastic beyond the knot and sew the opening shut.
ADDING THE FINS:

- Place one fin piece on your surface, right side up and with the tips pointing up. Position the body (turned right side out) on the fin so that the straight edges line up. The fin’s edge will be slightly longer. (left above)
- Position the other fin piece, right side down, on top of the body piece, again lining up the straight edge and pinning in place. (right above)
- Sew across this straight edge with a 1 cm (3/8”) seam allowance.

- Flip the fin pieces down. Pin the curved edges of the two fin pieces together.

- Sew around the fin’s curved edges with a 1 cm (3/8”) seam allowance.
- Trim around the fin’s curved edges so that it lines up with the edge of the body.
SEWING NON-FLEECE FINS:

If you are not using fleece, you probably will want to turn and topstitch the fin to keep the edges cleaner. Follow the instructions up to step 7. Then pin up the curved edges of the fins, rolling up the body fabric inside. I used clips instead of pins around the curved edges to avoid accidently catching the body fabric with the pin tips.
Sew around the fin’s edges with a 1 cm (3/8”) seam allowance, leaving an opening along the straightest part of the outer curve (shown between the red arrows above).
Turn the mermaid tail right side out through the opening, flatten the fins, and topstitch around.
SEWING THE SHELL BRA:

Pin the Shell Bra pieces together, wrong sides facing. Slip the end of a ribbon between the layers at each outer side (leaving the other end free), or the end of one 30-cm-long piece of elastic at each outer side (so that both ends of the elastic are sewn). (top picture above)
Sew around the Shell Bra, close to the edges. Then sew down the center and from the bottom center of each shell to the scalloped tops, as shown by the dotted lines on the pattern. (bottom picture above)

And there you have it! Two very different, but equally cool, DIY doll mermaid costumes! My kids liked the shine of the blue velvet and faux-sequins, but in the end they agreed that they prefer the scale effect on the red fleece costume.
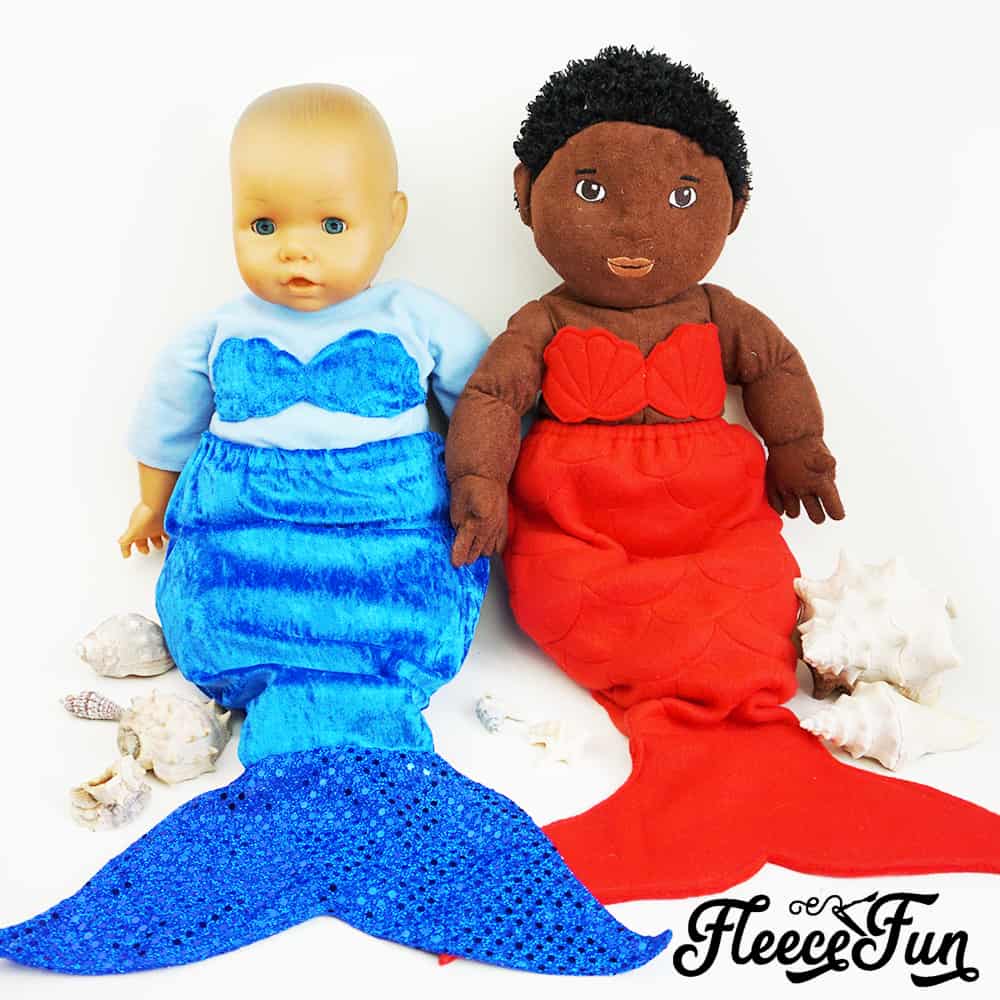
This doll mermaid costume pattern fits 18” dolls with a waist from 13.5 – 16” and, as you can see, both of these lovely gals look great in their costumes! The kids have such a good time changing these mermaid tails and bras, and matching them with clothes underneath.

Why yes, of course they’re wearing clothes underneath! You can see that this little girl is wearing a snuggly fleece doll diaper under her mermaid tail! This DIY doll diaper is incredibly easy to make; just cut out the fleece and sew on the Velcro! Get my tutorial and free doll diaper pattern here on Cucicucicoo !
 And if your kiddos are just so envious of their dolly’s cool mermaid get-up, why not sew them their own super snuggly and fun mermaid tail blankets? They are just as simple to sew as these doll mermaid tails, but stimulate their imagination much more. And they are just so wonderfully warm and cozy to wear when curled up on the couch with a great book, a purring cat, or your favorite movie. Get the mermaid tail blanket pattern here at Cucicucicoo Patterns!
I hope you’ve enjoyed this tutorial and pattern! If so, make sure you head on over to my online home, Cucicucicoo: Eco Sewing & Crafting , for loads of super fun and easy projects to create with your own two hands! I look forward to seeing you soon! J Lisa
GET THE FREE SEWING PATTERN BELOW:
More FREE American Girl Doll Patterns:
- Doll Peplum Coat
- Doll Fur Vest
- Doll Knit Joggers
- Cute Chambray Party Dress
- Pocket Tee for Dolly
- Fleece Ribbon Hat
- Leather Fringe Purse
- Button Front Skirt for Dolly
- 18″ Doll Sleeping Bag Tutorial
- Long Coat for 18″ Doll Pattern
- Cuffed Leggings for Dolly
- Doll Cardigan
- Tiered Ruffle Skirt
- Doll Robe
- Doll Sleeping Bag Pack
- Doll Basic Fleece Pants
- Doll Boutique Pants
- You can see all of the Free American Girl Doll Patterns here
