
Cowl Capelet Free Pattern
This content contains affiliate links or sponsored elements, read our Disclosure Policy.


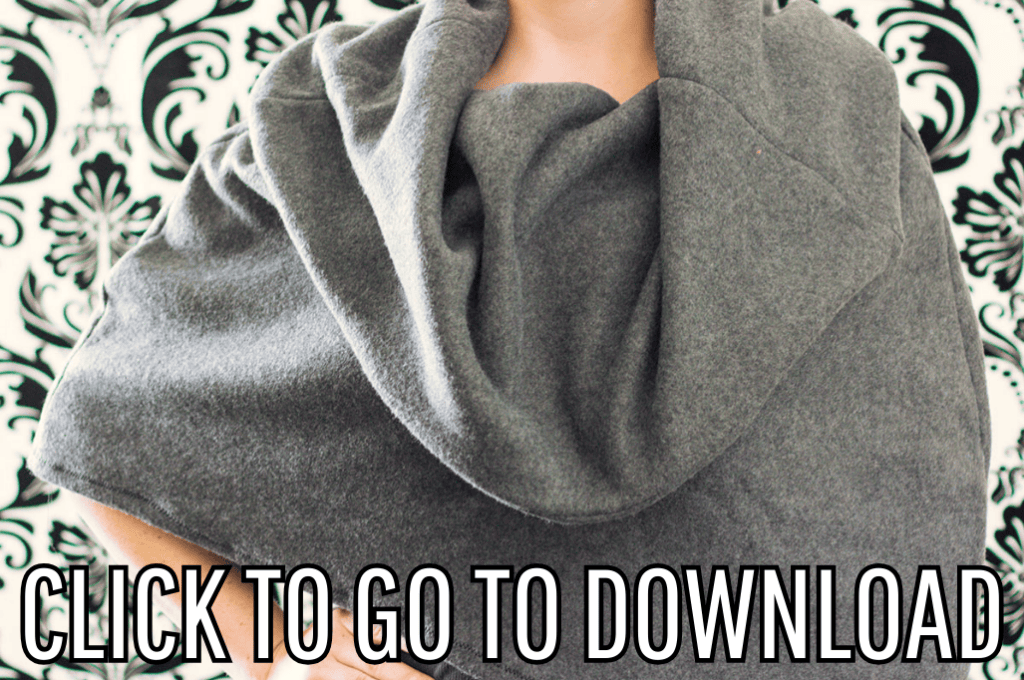
You can make a fashionable wardrobe staple with this cowl capelet free pattern and tutorial. This fashionable capelet can be made with an extra thick collar for warmth. This classic looking piece had and asymmetrical bottom and wonderfully over-sized collar. The pattern is fairly simple – an experienced sewer can make this under an hour easily.

Hate The Ads?
This pattern with video and printable instructions is available to members of the Maker’s Studio. The Maker’s Studio is an ad free experience, no video ads, no forms, no zip files, just creating.

YOU WILL NEED:
- 1 and 1/2 yards fleece (depending on size of pattern and if you double the collar or not)
- Thread
- Assembled printed pattern
- Sewing Essentials (scissors, pins, etc.)
- Get the free pattern here.
Get the video tutorial here, written instructions below:

Cowl Capelet Free Pattern Tutorial
note
Size small is a US 8 to 10
Size medium is a US 12 to 14
Size Large is a US 16 to 18
step 1 – Assemble and cut out the Pattern

You can find instructions on how to assemble the pattern here.
You will need to decide if you want to make a thick collar (double sided) or a thin collar (single sided) for the Cowl Capelet. The thick collar is good for late fall early winter, it can be quite warm. For early fall I recommend using only 1 layer for the collar.
(Double layered collar is pictured)
On folded cloth cut 2 the main capelet. Then take the pattern and trim it down to the dotted line. Then take one of the pieced you just cut out and pin the pattern guide back to it. Then trim down to match. You should now have one piece that it straight on top and one that has an inward curve.
Next, If you are cutting out a double sided collar cut 2 of front cowl (with curve). If you are making a single thickness collar just cut 1.
Then trim pattern to dotted line and cut 2 for back cowl (double thickness) or 1 (single thickness). You should have 1 front piece of the capelet (with inward curve on top), One back piece (with straight line across the top).
For the cowl you should have the front and back pieces to it (you with either have 1 or 2 pieces of each. depending if you are making a thick collar or not)
step 2 – Pin and sew cape section

With right sides together pin the front and back sections of the main cape section together at the sides leaving the top and bottom open (pin and sew yellow on diagram). Then sew together using a .5 seam allowance along the sides. Set piece aside.
step 3 – Begin to make the Cowl Capelet collar (double thick)

Double thick collar: for the extra thick collar place the front cowl pieces together and sew along the top using a .5 seam allowance. Do the same for the back pieces (see yellow line to the right).
Once you have sewn the front and back parts of the collar
With right sides Pin- matching up at the seam you just sewed, sew the front to the back of the cowl (see yellow line in diagram to the right). then sew the other side (green line) with right sides together. This should make a large tube.
Trim the bulkiest seam points (where they intersect) so cowl won’t be lumpy.
Then fold cowl in half – along the first seam you made (the one at the top of the pattern piece at the widest part of the collar). Wrong sides together, matching the curved edges. Basically doubling over on itself. Now there should only be right sides facing out and the only raw edge is along the bottom of the collar.
Baste the around the bottom of the collar using a .25 seam. This will help keep everything smooth when you place the cowl on the capelet.
step 3b – Begin to make the Collar (single thick)
For a collar with single thickness, with right sides together, sew the front and back cowl pieces to each other, using a .5 seam allowance. First the yellow line., then the green forming a tube.

Then turn under the top of the cowl .5 inches and sew using a zig zag stitch along the edge all the way around (starting at a seam point)
step 4 – Attach cowl to capelet
Attach the cowl bottom (green line) to the top of the capelet – yellow line) make sure the front of the cowl is with the front of the capelet (curve meets curve). Pin with right side to wrong side of fabric (the seam will be on the outside of the capelet and hidden by the cowl)Then sew cowl to capelet using a .5 seam allowance – take you time and be aware that you are dealing with many layers of thick fabric (especially if it’s a doubly thick collar)

Optional – Last step turn under the bottom of the capelet .5 inches and sew using a a zig zag stitch along the edge of the fabric to finish off the bottom.
Trim your threads and you’ve finished the Cowl Capelet!
Download the free Cowl Capelet pattern here. tutorial below!
You can get a free copy of Adobe reader here. By downloading you are agreeing to pattern terms of use. Click the image below to download the .pdf!
YOU MIGHT LIKE THESE CAPES/CLOAKS TUTORIALS:
- Long Hooded Cloak Pattern (Free)
- Fast Hooded Cape (with video)
- Easy Long Cape (Sew or No Sew)
- How to Make a Cloak in 20 Minutes
- The High Low Cape with Pixie Hood
- How to Make a Child Cape or Car Seat Poncho
- The Amazing Cape Secret on Fleece Fun
- See more of our Cape Patterns here
MORE CAPES FOR YOUR HALLOWEEN COSTUMES:
- Harry Potter Inspired Wizard Cloak
- The Red Riding Hood Cape (with video)
- Batman Cape Costume Tutorial
- Queen Elsa Cape Tutorial (Includes Jacket Warmth)
- The Snow Princess Cape (with video)
- Easy Superhero Cape Tutorial

For some reason, I’ve been having a hard time downloading this pattern in a size large. Would you be able to email it to me? Your site is adorable….just found it tonight and it’s my new favorite. I plan on making some of the ruffled boutique pants and this capelet this weekend!
I think there is a bit of code missing on the website for the large size–perhaps the <a before the link or the after the link?
The issue has been fixed. =)
Thank you so much for all your amazing patterns and all your hard work. It’s very much appreciated. This one will make a great Christmas gift for my mom.
having just had a mastectomy a week ago, I was very excited to see this pattern and downloaded it to find that it only came up to size 18. I know that I am not the only Plus size woman that would love this pattern. please consider adapting this to size 20-28 It would help so many to still be able to feel like a woman, and hide that fact that we no longer have our breasts.
Thank you
Sherry Marsh
Hi Angel,
I love your blog, i was planning to make some dresses for my daughter. I have stitched some tunics. Can you give tips on how to finish the ends of fleece, what tension ,thread length is best for zigzag ?
Thanks,
Serena Da Costa
Hi Serena!
Because there are so many different sewing machines, me telling the tension, length for a zigzag isn’t going to help much. What I do recommend is taking a scrap piece of fleece and trying some variations of the stitch until you find one on your machine that makes you happy, is even on the top and bottom, and gives a clean stitch. For finishing fleece I like to fold it under a half inch to an inch and sew a zigzag stitch along the edge. This gives a clean edge and keeps the fleece from stretching.
Best of Luck,
Angel
i love this cape, and will soon try to make it. But I’m a large girl so i want to know where to ad if it is to small?
You’ll keep the cowel and neck line the same – you’ll want to add to the poncho section.
I love your patterns and have made quite a few it would be fab f you could do a pattern for a boy simple cardigan/jacket as I think boys patterns are few and far between Many Thanks Carolyn
Hi,
Thank you so much for the patterns. I am excited to start the fleece cape. One question: do I click on “download” button or the picture of the folders? I recently got a virus on my computer so I am just making sure the “download” button is safe. 🙂 Thank you!!!
Steph
Hi Steph,
As it says you need to click on the picture of the pattern envelope. The big download button is and ad. All you need is Adobe pdf. Click on the pattern envelope. Some browersers have a hard time with pdf files I recommend suing Google chrome and clearing your internet cache if you are having trouble. =)
– Angel
Hi !
I really love this design and I think it’s a very great idea for fall ! I can’t wait to make this project, and it seems so easy to do ! 😀
I love the fact that your patterns are easy to use and free, so thank you very much ! 😀
You’re welcome!
I know that you are all about fleece and that is great! Is it possible to make this out of a different fabric? I get warm at the office and need a cooler option. How about corduroy or a heavier plaid fabric?
Hi Linda,
I would recommends a jersey knit as a lighter replacement for fleece.
I am looking forward to creating this capelet for a fall cruise up through New England. Since it could be rather cool in the evenings, I’m looking to create an upscale capelet. Do you think this pattern will lend itself to Minky?
Thank you for all the great patterns I have already made from you sight!
Jane
Yes I think it would be wonderful in minky.
Having tried multiple times to send link for receiving the cowl neck cape, No response. Would you send to email please. It is cold here in Central Mass and I want to make some of these. Love your patterns and have made several. Your instructions are clear and complete.
Thanks for putting all this together.