
Scraper Mitt Pattern
This content contains affiliate links or sponsored elements, read our Disclosure Policy.
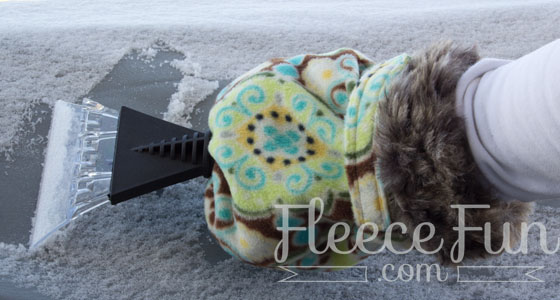
Function meets fashion with this Scraper mitt pattern. You can make a warm mitt that will protect your hand from winter’s chill while you scrape your windshield.
You’ll need:
1/3 yard fleece for small ( little less than 1/2 yard for large, and you could make several from this or a matching hat to go with it)
1/8 faux fur (optional)
4 -5 inches Sew on Velcro
1 inch d ring
Windshield scraper
Sewing Essentials (pins, scissors, etc.)
Video tutorial here, written directions below:

1 – Cut out pattern

Print up the pattern (you can get assembly instructions here)
Decide if you are making a mitt with a contrasting cuff or not.
For a mitt with a contrasting cuff you will need to cut:
2 of the liner
2 of the exterior
2 of the cuff
1 of the loop
2 of the amazing size adjuster
For a mitt with not contrasting cuff you will need to cut :
4 of the liner
1 of the loop
2 of the amazing size adjuster
1b – Cutting out a fur cuff

A couple of things you need to note when you cute out fake fur.
Be aware of the “nap” of the fur (which way the fur lies). You want your cuff to lie all in one direction.
Cut out the cuff two times instead of once on doubled up fur. you will get a cleaner lines this way.
Shake out the pieces once you have cut them outside – to minimize mess and have a lint roller handy. the faux fur looks great – but it’s a pain to clean up.
2 – Begin to sew the lining

With right sides together, sew each side seam of the lining using a .5 inch seam allowance, leaving the bottom and the top open.
Once you have sewn each side try slipping the scraper into the top of the mitt – to make sure that it fits, or you might want make the opening a little smaller to make a more snug fit around the scraper.
Turn right side out and set aside.
3- Prepare the amazing size adjuster

Taking the two pieces of the size adjuster place right sides together, and leaving the short straight side open , around using a .25 inch seam allowance.
Trim down excess and turn right side out. Make sure seams are well pushed out.
Then top stitch close to the edge (less than .25) all the way around.
Then taking 4 – 5 inches of velcro sew the hook on one side and the loop on the other, leaving a gap in between the two. Note that the Velcro is all on the same side. Set aside.
4 – Make the exterior with the cuff

If you aren’t making the cuff skip to the next step.
With right sides together take 1 of the exterior and 1 of the cuff. Pin and sew using a .5 seam allowance. Repeat with the other pieces.
5 – Make the exterior with the cuff

If you aren’t making the cuff skip to the next step.
With right sides together take 1 of the exterior and 1 of the cuff. Pin and sew using a .5 seam allowance. Repeat with the other pieces.
6 – Tack on the d ring, loop and size adjuster

Take the “loop” piece and fold each side in and sew a straight stitch down the middle to give it a nice finish. Slip the D ring on the loop and fold in half (the loop is to secure the D ring onto the mitt).
Take one side of the exterior (whether you have made one with a cuff or not) and sew the D ring and loop onto one side and the amazing size adjuster to the other (see points on diagram). Note: The Velcro should be facing up when you sew on one end the adjuster (the curved end should be loose, the straight end should be sewn to the mitt)
7 – Bring the exterior together

Like you did with the lining, sew each side using a .5 inch seam allowance. Taking care to go slow over the section that you sew the d – ring and adjuster as the there is a lot of thick material). Leave the top and the bottom open.
8- Add the lining

Take the lining and stuff it inside the exterior, so right sides are touching. Line up the seams and the bottoms. Pin the bottoms of the lining and the exterior together. Sew all the way around the bottom using a .5 inch seam allowance
9 – Finishing up

Turn right side out using the opening at the top ( work with a it a little as it is a squeze). Once turned right side out, stuff the lining of the mitt into place, and insert the scraper, thread the adjuster through the d ring and finished!
10 – Finishing the fur cuff

This is a picky thing but it makes the fur cuff look really nice. Take a pin and pull the fur that get caught in the seam out. – if make the side seams practically invisible and looks professionally finished.
Download the free pattern here, tutorial below.
You can get a free copy of Adobe reader here. By downloading you are agreeing to pattern terms of use. Click the picture below and fill up the form to download the free pattern .pdf !
I wish I could pin this for future use before winter! 🙂 It won’t allow me to and I don’t see a ‘Pin It’ button!
Hi Courtney,
I’ve fixed it so you can pin the image – thanks for letting me know!
I bought one of these for my sisters christmas stocking last year at Eddie Bauyer for around ten dollars. I just made two out of remnants i got on sale. Total cost for two ….FIVE DOLLARS!!!!! And enough fabric left over to make my baby a hat. Love all your stuff. Thanks!!!
I made it for a christmas present and my friend was very happy ! Thank you for the idea and the pattern (and sorry for my english, I’m a poor french girl !)
You can see mine there :
http://zouzoubricole.wordpress.com/2012/12/27/la-mouffle-grattounette/
Hi, as it snowed here yesterday and my fingers were frozen when I had to scrap my car’s windows, I decided to follow your example and pattern, and it is both simple and quick to realise (all right, as I used double-sided fleece, I didn’t see an intern mitten, and a press sturd intead of velcro). It’s really worth it. I have added some pictures on my blog (http://sewingpot.blogspot.fr) ! See you soon !
Hello, I love this, I wanted to make one for my husband who has to go out soon to work and feel the ice in his hands, but by clicking on the image of the envelope of the pattern nothing happens. You can check it out or send me the pattern?, thank you. I love your jobs and they’re fun. Greetings Esther
Hmm, just checked it and it’s working for me.
I’m trying to download the pdf and nothing happens when I click on the pattern envelope. Not sure if I’m doing something wrong, but I’d like to make a few of these. I’d appreciate if you could advise. Thank you.
My guess is that you brower is preventing pop ups/ opening a new window