
Pinwheel Quilt Block Pillowcase tutorial
This content contains affiliate links or sponsored elements, read our Disclosure Policy.

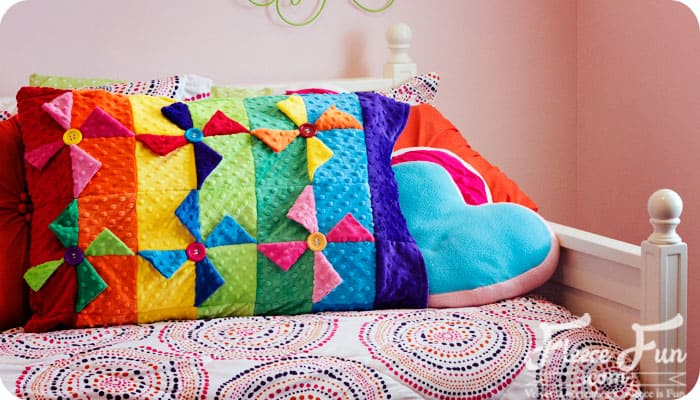
This Pinwheel quilt block is perfect for a quilt or pillowcase. It’s versatile shape can be used in many projects. Each block is made from six squares and it’s easy to put together.
For this project you will need:
3 Very Vibrant Cuddle Charm Kits from Shannon Fabrics (Be sure to enter Shannon Fabrics giveaway below)
21 by 28 inches of coordinating cuddle fabric for the back
Six large 1.25 to 1.5 inch buttons in coordinating colors.
Thread
Iron
Pressing cloth
Sewing Essentials (pins, scissors, etc.)
Walking foot
Ball point needle
Sewing machine
Video tutorial here:

Pinwheel Quilt Block Pillowcase tutorial:
1. Get an idea of the whole piece
This pillow case is made up of six of these pinwheel blocks. Each block is made up of six 5 inch squares. First decide how you want your entire pillow case to look like. Each block has four squares as the base and four “blades” (each blade is half a square) of the pinwheel. Now that you know how you want it laid out. Let’s make each block.
2. The basic block
Take the two squares that will make the four blades of the pinwheel and cut in them in half, diagonally. You should now have four triangles . Then using an iron son low heat fold the triangles in half (with wrong sides together) and press ( you might want to use a pressing cloth for this).
3. The Basic Block Continued
Layout your pinwheel. Place one blade on each block with the longest side of the triangle lining up with the edge of the square it’s sitting on. Make sure all the blades are pointing in the same direction. Note: On of the exposed edges of the blade will be raw – since we are working with a knit fabric it’s fine. Pin and bste each blade to the square it sits on using a slightly less than .5 inch seam allowance. Then using a .5 inch seam allowance, sew two of the squares together to form a row, twice, then sew the two rows together to sew a block. Trim seam bulk in the center, and making sure blades are laying in the correct direction, sew on the center button. Repeat five more times to make a total of six blocks. Sew the blocks together.
Note: I know someone is going to ask this – so I will just address this now. You could place the triangle between two squares and sew – eliminating the step where you baste it into place. You are welcome to attempt this if you are familiar with cuddle, and understand that you’re working with four layers of this slippery fabric. If you are new to cuddle fabric or sewing – I would really stick to the directions that include the basting stitch.
4. Bringing it all together to make a pillowcase
Two block isn’t quite wide enough for a pillow so we need to take six squares and cut them in half to add a little width to each side of the pillow. Take the half blocks and sew them into two rows to match your pattern. Add one two to the top and bottom of your pinwheel blocks.
To make the pillowcase long enough we will add a column of squares to the end. This will be four blocks tall with a half block on each end. Sew the squares together. Taking the long column take the edge that will be end of the pillowcase and turn on edge under .5 inch. Sew onto the end of your pinwheel blocks.
Out of you solid back you will need to cut a rectangle that is 21 by 28 inches. Turn under the end of the pillowcase .5 inches and sew using a straight stitch.
With right sides together, Sew the solid back to the pillowcase front using a .5 inch seam allowance. Trim your threads!
Other Beginner Quilting Tutorials for you to enjoy:
- How to Make a Rag Quilt for Beginners
- Quilt As you Go, Stitch N Flip Quilt
- How to Sew a Quilt the Easy Way
- Summer Table Topper Quilt Tutorial
- Quilted Christmas Table Topper Tutorial
More Pillow Tutorials!
- All Americana Stars Pillow
- Easy Ribbon Pillow
- Lego Brick Pillow
- Valentine’s Day Fleece Pillow Slipcover
- Ruched Pillow
- Seeing Stars Pillow
- Cozy Christmas Tall Tree Pillow
- Heart Pillow
- Chenille Heart Pillow
- Faux Fur Pillow
- Easy Block Pillow
Best pillow I have ever seen!
This pillowcase is adorable! Yoyos might be a good change up instead of buttons. No chance of getting hair caught or wrapped around buttons while little ones are sleeping. Don’t ask me how I know this!
This is very cute. I would probably make fabric buttons to stitch in so my daughter would just feel a soft pillow. She loves it too.
What a great pillowcase. The 3D and the colors are perfect.. Another GREAT project.
Great idea. I took this project and expanded it into a baby quilt. I did 4 blocks by 4 blocks and used cotton quilting fabric for the block but kept the pinwheel part minky. I used felt buttons too because I was worried about the regular buttons being a possible chocking hazard. I also put a 1 inch black border around each block. I debated this because I liked the quilt without it but I felt the pinwheels needed to be more defined. I finished it up with a 5 inch boarder around the whole things. I quilted in the ditch of the black block border. I can’t wait for someone to have a baby so I can give this to them.