
Washable Duster Tutorial (Free Pattern)
This content contains affiliate links or sponsored elements, read our Disclosure Policy.


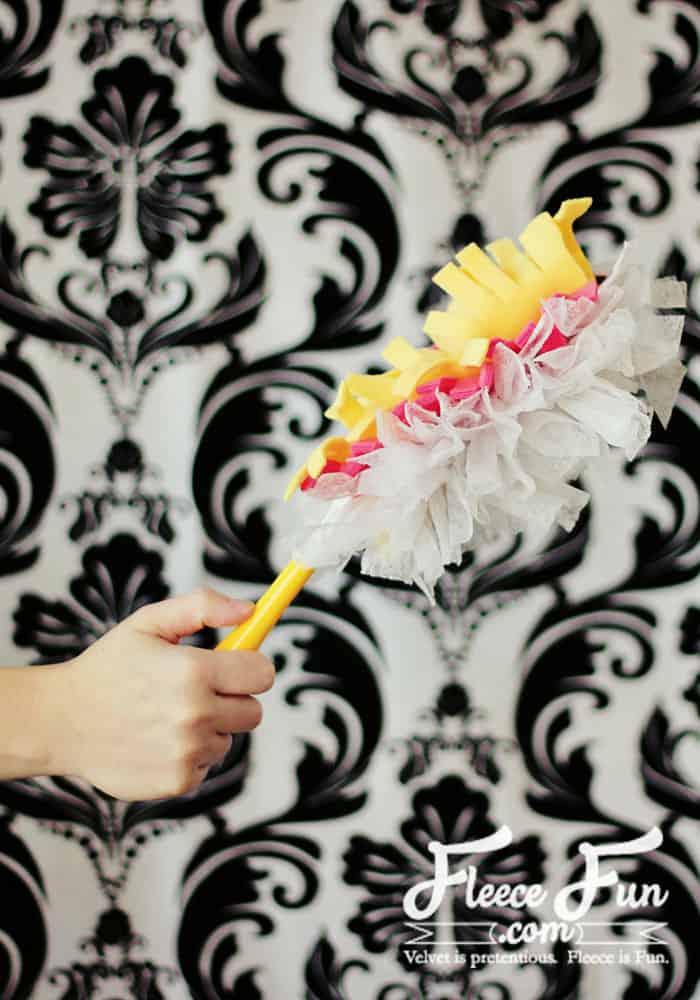
You can make a washable duster that can fit on a Swiffer or a dowel! This easy to sew washable duster Tutorial uses used dryer sheets to give a little extra cleaning and gathering power – plus it’s upcycling materials! Win, win!
You will need:
A printed out version of the .pdf pattern
Fleece Scraps
thread
needle
used dryer sheets
sewing machine
Sewing Essentials (pins, scissors, etc.)
You may also like:
Video for Washable Duster tutorial here, written below:
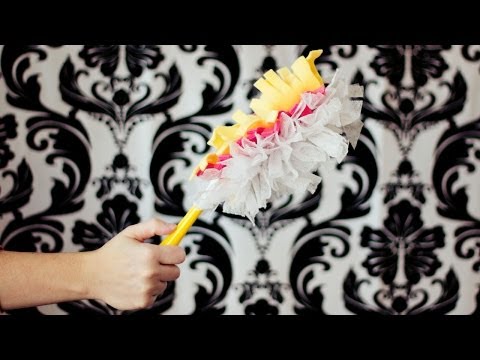
Washable Duster Tutorial:
Step 1 – Assemble the pattern and cut out pieces

Print up the pattern. Assembly is not necessary for this pattern – pieces are to scale.
Cut out 1 of the bottom, 1 of the middle , and one of the center. Cut the strips to the line on the pattern.
Cut two small long strips (pattern is rough guide – but it doesn’t have to be followed exactly)
Step 2 – Begin to sew the fleece

Stack the pieces one on top of the other. Then using a straight stitch sew down the center of the top piece.
Step 3 – Make the casing for the handle

Fold the top piece fringe back and keeping the fleece straight sew along the edge of the fringe from on end to the other. repeat on the other side. (This will make the casing that will fit a Swiffer duster handle.
You can stop here and use it to dust, but if you want to give your duster even more dust busting power continue on the the next steps.
Step 4 – Prep for dryer sheets.

Folding the center back lay one of the skinny pieces along the duster. Cut the appropriate length, either with a machine or by hand tack down the strip in two or three places. Making sections that are not attached to the duster. (you should be able to stick you finger under these loops – see next step if confused)
Step 5 – Add used dryer sheets

Stack used dryer sheets and cut into 1 inch sections. tie onto the duster using a basic knot on the loops that were just created. Trim if desired.
Step 6 – Add the Handle

This fits a Swiffer Handle, but you can also take a .5 inch dowel and use it as a handle too.You are finished! You’ll be able to wash it with the dryer sheets a few times, but after a few washings the dryer sheets will need to be replaced.
Download the free pattern here:
You can get a free copy of Adobe reader here. By downloading you are agreeing to pattern terms of use. Click the picture below and fill up the form to download the free pattern .pdf !

More Fleece Sewing Projects:
- Hooded Fleece Blanket
- Bow Ear Warmer Headband
- Headband with Ear Flaps
- Fleece Scarf with Pockets
- Red Riding Hood Cape
- Scraper Mitts
- Warm Mittens
- Easy Fleece Blanket
- Quick Sew Hobo
- Child’s Fleece Robe
- Child’s Fleece Pants
- Fleece Vest Tummies and Tails
- Fleece Vest Monster Legs
- Children’s Boutique Style Pants
- Fleece Ribbon Throw
- Fast Fleece Tie
More Fleece Projects!
- Basic Hat with Horns
- Basic Hat with Bear Ears
- Fleece Unicorn Hat
- Fleece Frog Hat
- Simple Fleece Slouchy Beanie
- Basic Hat with Ribbon
- Women’s Fleece Vest
- Fun Facts about Fleece
I was wondering if it would work (instead of sewing the dryer sheets in place) to attache them with a few Velcro dots instead.
Oops, I mistyped my email. Correction is with this reply. Thanks.
Hi Joey!
In the tutorial is mentions you just tie on the dryer sheets which is a cheaper and I think easier solution. Since they are tied on they can be switched out after a few used and new ones replaced. =)
I have tried many different times to print the pattern for the Washable Duster, all unsuccessfully.
Is there a way to have this pattern on screen in plain word text so anyone can print it off, without having to have a ‘converter’?
Thanks, Sharon Cowley
Hi Sharon,
All you need to do is download the .pdf by clicking on the pattern envelope that has the picture of the duster on it. If it still isn’t working for you, let me know and I’ll get it to you.
– Angel
The pattern prints fine but the instructions on each of your patterns I have tried to print done print right. All the stuff on the side of the page overlaps the instructions making them un-readable. Please advise.
Copy and paste into a word doc for easier reading.
– Angel
Hi! I made tons of these last year for the men in our family. I used their favorite team fleece and/or colors for the sports nuts, and used camo fleece for the veterans and outdoorsmen. I also made a few for the tweens who are now expected to keep their rooms clean. My niece loves animals so hers was out of zebra print. The other girls were in pinks, purples and/or princess prints. I did not know of the dryer-sheet possibility so I may have to update for my new daughter-in-law and my friend who has a new place.
I did mine a little differently, using measurements and no pattern. I sewed the channels for the handle first, then cut the “feathers”. These were so easy, inexpensive (buy the remnants) and fun.
I really like the upcycle of the dryer sheets, Thanks!
I am wondering if there is a specific reason for the dryer sheets. I think this would work without them. I don’t use dryer sheets with my laundry due to skin allergies in my family.
I am sure it would. The dryer sheets are for extra “pick up” ability. But I have seen these online made out of just fleece.
I don’t have dryer sheets. Don’t use them. They clogged up my dryer years ago,
Have never used them since!
I’m thinking that instead of tying a bunch of these around the loops that I will take and make a stack of them, slip the stack through and then stick across the stack close to the top. When they are used up just snip across the top of the stacks and voila’ ready for the next batch. I also think I will include at least one new sheet each time. This should increase the gathering of dust ability and also decrease the amount of static electricity generated by dusting and dry air. Just my thoughts!!
Thanks for the tip. Now will try with t shirt material
Wow, how great. I love this idea.
I do not understand why there is a “center” piece and a “middle” piece. “Center” means “middle” and “middle” means “center”. Obviously, the “bottom” piece goes on the bottom, but which piece goes in the middle, and which piece is the top?
Hi Melanie,
Sorry for the confusion. To clarify the Middle piece is sandwiched in between the center and the bottom piece. The Center is on top.
– Angel
Perhaps using ‘top’ instead of ‘center’ would help with that confusion. Then you would center all the pieces before making that first seam down the middle.
For myself, I am confused about how you make the channels for the Swiffer handle or dowel when adding the strip to tie on the dryer sheet pieces. Do you make the channels using only the top and middle pieces of fabric? Which leaves the bottom piece free for sewing on the strip for tying on the dryer sheets. Or is the bottom piece not cut as deeply as the other pieces so the strip can be added? In which case it might be a good idea to add that strip before sewing the pieces together by tacking it in place aligned with the cut lines. That would offset the dryer sheet strips from the fleece, giving a different grabbing area.
Answered part of my own question after playing in my drawing software. The bottom piece is cut shorter than the middle piece. My apologies.
Great tutorials! Thanks ; )
You’re Welcome Joy!
I saved up a couple of dozen swiffer dusters, hand washed them and hung them to dry. I think they work even better now because they are fluffier.
There’s something to be said for being cheap.
Awesome idea. Thanks!
Thank you so much for this wonderful pattern! So appreciated! 🙂