
How to Sew Easter Bunny Dolls
This content contains affiliate links or sponsored elements, read our Disclosure Policy.

Every year around Easter I get the urge to make something handmade for the holiday — something soft and sweet that feels special in a way that store-bought just doesn’t. These Easter Bunny Dolls are exactly that. They’re adorable, they’re fun to make, and they’re the kind of thing that ends up becoming a keepsake rather than something that gets tossed after the holiday is over. The pattern for these little bunnies is exclusive to the Maker’s Studio — that’s where I keep all my favorite projects. If you’re already a member, head on over and you’ll find it waiting for you! If you’re not in yet, come join me — I’d love to have you.
The Finished Bunnies
These dolls are genuinely charming. You can make them with long floppy ears or short perky ears, dress them in a little gathered dress or a pair of overalls with a teeny pocket, and give them whatever face expression feels right to you. I made a boy bunny and a girl bunny, but the beauty of this pattern is that you can mix and match absolutely however you want — different ear lengths, different outfits, different colors. Each one ends up with its own personality. They’re the perfect size for tucking into an Easter basket, sitting on a spring mantle, or gifting to someone who appreciates handmade things.

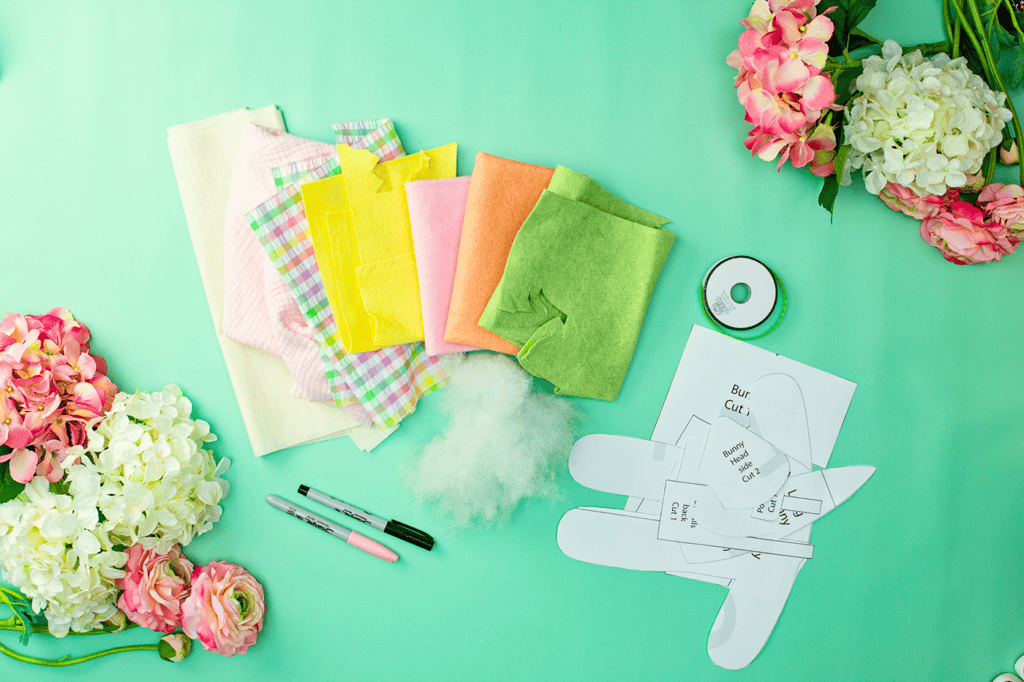
What You’ll Need
- Felt in a few different spring colors (about a quarter yard)
- Muslin, half a yard (for the head and ears)
- Light pink fabric, quarter yard (for the inner ears)
- Woven fabric for the dress, or felt for the overalls
- Fiberfill for stuffing
- Ribbon (for bows and dress details)
- Black marker and pink marker (for the face)
- Sharp fabric scissors or a rotary blade and mat
- Basic sewing machine and hand-sewing needle
- Optional: Cricut machine with a fabric grip mat if you’d like to cut pieces digitally
- The Easter Bunny Dolls pattern from the Maker’s Studio
How This Project Comes Together
Step 1: Cut Your Pieces
You’ll start by printing the pattern and cutting all your fabric pieces. This is where you make your first big decision — long ears or short ears — and then cut accordingly. You’ll also decide here whether your bunny is getting the dress or the overalls. There are even optional little extras in the pattern: flowers, carrots, and bows you can add if you want to go the extra mile. Laying all the pieces out before you start sewing gives you a satisfying preview of what your bunny is about to become.
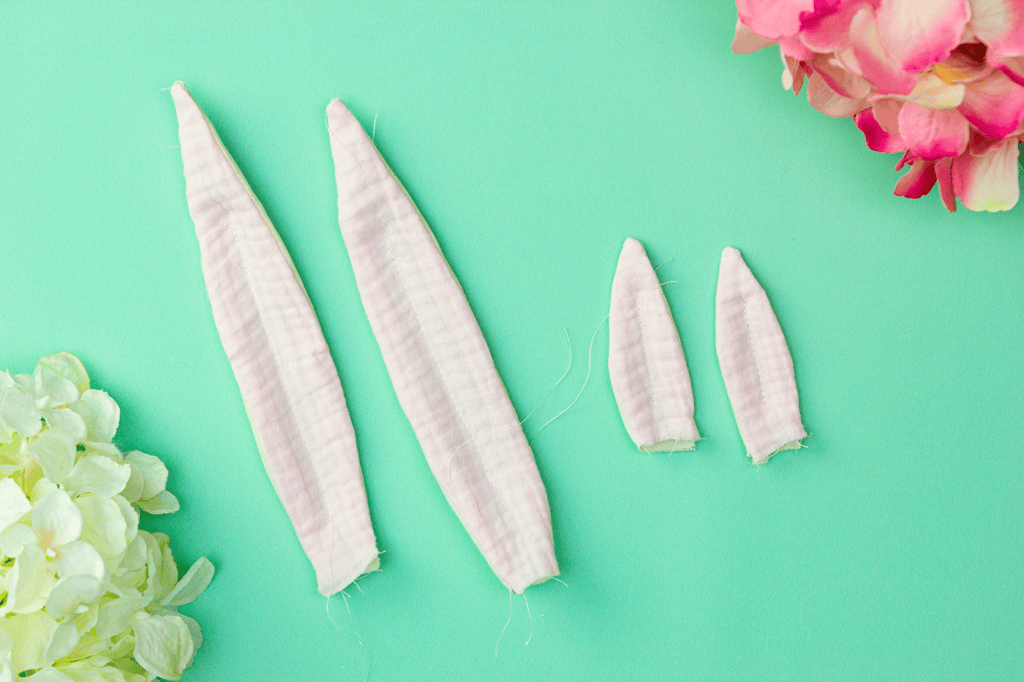
Step 2: Make the Ears
The ears are the first thing you sew, and they’re a great warm-up for the project. You’ll sew the ear pieces together, carefully trim and clip so they turn out beautifully, then flip them right side out and topstitch down the center for structure and a polished finish. The key thing to watch here is that your two ears are mirror images of each other — you don’t want a bunny with two left ears!
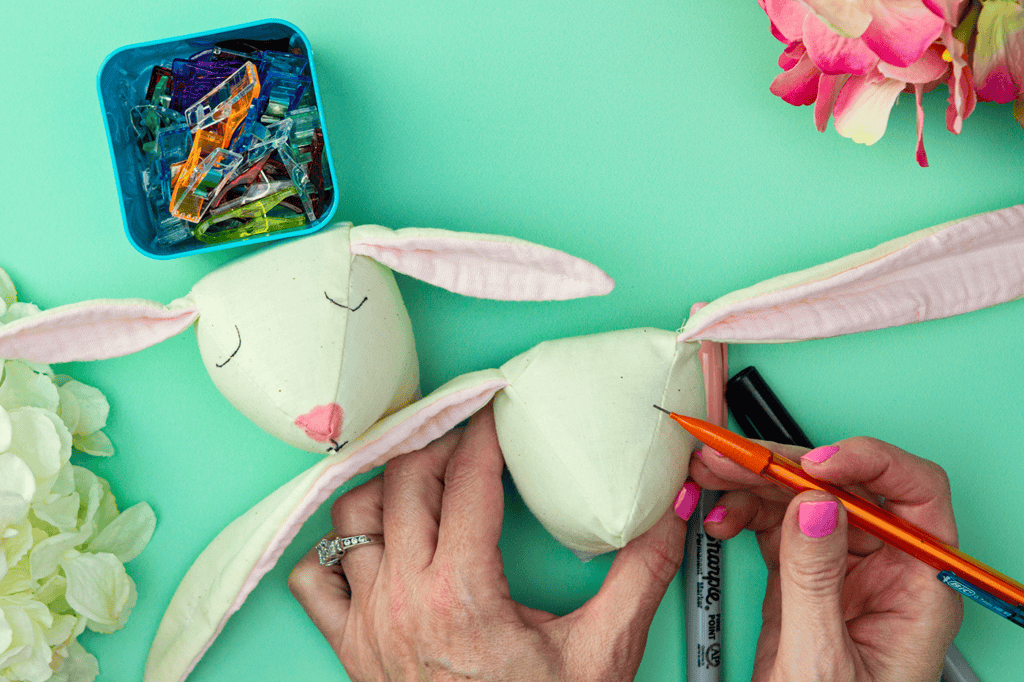
Step 3: Assemble the Head
This is the step that always amazes people — you’re building a three-dimensional bunny head out of flat fabric pieces, and it works like magic. You’ll sandwich the ears into the head as you sew, which means they’re securely sewn in place rather than attached afterward. Once the head is assembled and the curves are clipped, you turn it right side out and stuff it firmly with fiberfill. At this point it starts looking like a real bunny, which is very exciting.
Step 4: Draw the Face
This might be my favorite step because it’s where your bunny gets a personality. You’ll sketch the eyes, nose, and mouth lightly with pencil first, then go over them with markers. There’s no one right way to do it — every face ends up looking a little different, and that’s what makes each bunny feel unique and handmade in the best possible way.
Step 5: Sew the Body and Attach the Head
The body comes together quickly. You’ll sew the pieces, clip the curves around the arms and legs so everything lays smooth, and stuff it to your preferred firmness. Then comes the hand-stitching part — attaching the head to the body. I’ll be completely honest with you: hand sewing is not my strong suit. But here’s what I’ve learned — if the seam isn’t perfect, just tie a bow around the bunny’s neck and suddenly it looks completely intentional. Problem solved.
For the price of a single pattern you can have access to 100’s of tutorials!
Click below to learn all about the maker’s studio!
Step 6: Add the Tail
The tail is optional, but it is very cute and I highly recommend it. You’ll gather a small circle of fabric, tuck some fiberfill into the center, sew it shut into a little puff, and hand stitch it securely to the bunny’s bum. It’s a small detail that makes a big difference in the finished look.
Step 7: Sew the Overalls
If you’re going the overalls route, you’ll topstitch a little pocket onto the front — perfect for a tiny felt carrot if you want to add one — then sew the legs and assemble everything into a miniature pair of pants. You’ll leave a small gap in the back for the tail if you added one. The overalls give the bunny such a sweet, storybook look.

Step 8: Sew the Dress
The dress is actually the faster of the two clothing options, which makes it a great choice if you want to finish quickly. A little tip from my experience: the woven fabric I used was fraying like crazy, so I ran it through the serger before sewing. If you don’t have a serger, a zigzag stitch around the edges does the same job perfectly. The dress gets a ribbon threaded through the top casing, and you can add little fabric flowers to the front if you want an extra flourish.
A Bunny for Everyone
What I love most about this pattern is how much room there is to make it your own. You can go soft and pastel, bright and bold, or anywhere in between. Mix and match the ear lengths and outfits across multiple bunnies and suddenly you have a whole little family. They also make beautiful handmade gifts — the kind that people hold onto long after Easter is over.

Ready to Make Yours?
The full Easter Bunny Dolls pattern — with all the pieces, sizing, and complete step-by-step instructions — is inside the Maker’s Studio. Come sew with me.
If you’ve been thinking about joining the Studio, this is a really lovely project to start with. Inside you’ll find the Easter Bunny Dolls pattern plus a whole library of other exclusive designs — sewing patterns, SVGs, and projects you won’t find anywhere else on Fleece Fun. I’d love to see what your bunnies turn out like. Come join me.
see More patterns you may enjoy!
- Easy Fleece Robe Pattern
- Paper Bows with Cricut
- Quilted Coat Sewing Pattern
- Heart Potholder Sewing Tutorial
- Lantern Village SVG Collection
- Pocket Apron Sewing Pattern
- Family Pajama Pants Pattern
- Child T-Shirt Sewing Pattern
- Kooky Witch Skirt – Halloween Sewing Pattern
- Easy Woven Blouse Pattern for Women