Ladies Kimono Robe Tutorial (free pattern)
This content contains affiliate links or sponsored elements, read our Disclosure Policy.
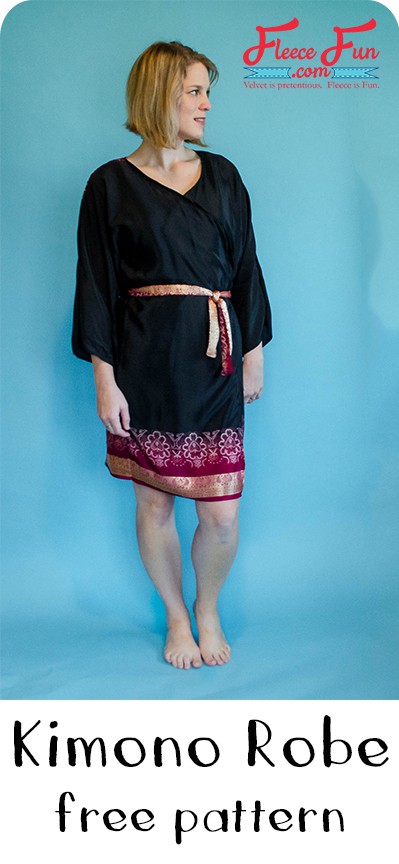
This comfortable ladies kimono robe is perfect for a selfish sewing project. Make yourself a little something that is beautiful, comfortable, and easy to wear. This robe is only a few simple seams and can be easily completed in an afternoon.
Quite a few years ago, my sister gifted me a large length of fabric that a friend brought back from India. The beautiful black, burgundy, and gold border print is designed to be sewn into a sari, but I wouldn’t have anywhere to wear a sari, so the fabric sat in my sewing space for quite a few years.

One day, I had the perfect idea: a kimono style gown! I’m often up in the night with kids, and having something light that I can quickly throw on is very convenient. The beautiful silky fabric also feels wonderful against my skin, and wearing something pretty always makes me feel better — even when I’m up at midnight with my baby!
The pattern is drafted with an overlapping front and kimono, or cut on, sleeves. The sash ties at the waist and is threaded through belt loops so that it doesn’t get lost. I’ve drafted the pattern for a ‘one size fits many’, and will fit approximately sizes 4-14. If you are not lucky enough to have a length of sari fabric, it can also be made out of any lightweight fabric. You could use a lightweight breathable cotton voile for summer, or a semi-sheer silk for some attractive lingerie!
YOU WILL NEED:
- 2 1/4 yards lightweight woven fabric, 60″ wide
- Sewing Essentials (scissors, pins, etc.)
- Get the free sewing pattern here.
Ladies Kimono Robe Tutorial:
Step 1 – Cut Out The Free Pattern
You will need to assemble the free pattern. For instructions on how to assemble the sewing pattern click here.
Cut 1 Back on fold and 2 Fronts (mirror images). The Front and Back are on the same pattern piece to conserve paper. You can trace them off separately, print off two copies, or just fold the front part out of the way while you cut the back, and vice versa.
Cut 2 Belt Loops.
You will also need 1 strip of fabric, 4″ high and long enough to go around your waist and tie.
Step 2 – Begin to Sew
All seam allowances are 1/2″. Finish off raw edges of seams with a zigzag stitch or a serger.
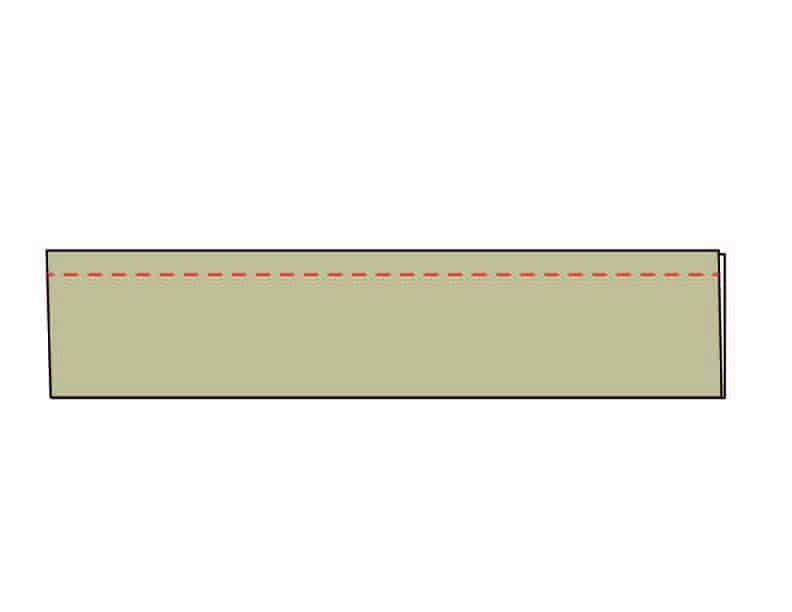
Make belt loops by folding the piece right sides together so that the long edges touch. Stitch.
Turn right-side out with a safety pin.
Step 3 – Add the loops for your ladies kimono robe
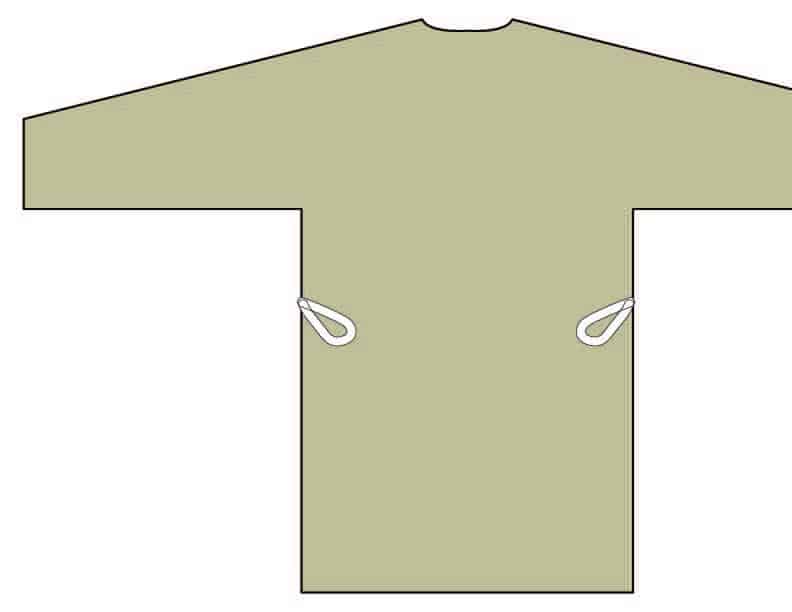
Baste raw edges to the right side of the Back as shown. A notch on the pattern indicates the placement.
Step 4 – Sew the sides and finish the edges

Sew shoulder seams, right sides together.
Sew underarm seams, right sides together. Clip to the seam at underarm.
Fold neckline and front edge 1/4″ to the wrong side, then 1/4″ again. Press. Topstitch hem in place.
Fold bottom edge to the wrong side by 1/4″, then 1″. Press. Topstitch hem in place.
To create a belt, fold long strip in half, right sides together. Stitch.
Turn right side out. Finish raw edge by folding under short end by 1/4″ and 1/4″ again, then topstitching.
And that’s it — your lovely ladies’ kimono robe is all finished!
Get the Free Sewing Pattern Below:
You can get a free copy of Adobe reader here. By downloading you are agreeing to pattern terms of use. Click the picture below and fill up the form to download the free sewing pattern .pdf !

Fun Sewing Projects for Summer!:
- Free Shorts Pattern for Toddlers
- Baby Knit Sundress Tutorial
- Girl’s Skirt Pattern
- How to Make a Towel Wrap Tutorial
Love this ladies kimono robe? see More Projects for Women!
- Convert Prom Dress to Skirt Tutorial
- Easy Women’s Skirt Sewing Tutorial
- Half Circle Skirt Pattern for Women
- Braided Fleece Ear Warmer
- All of the Skirt Patterns on Fleece Fun
Other Projects You’ll Love!
- Women’s Fleece Vest Pattern
- Circle Skirt Pattern for Girls
- Fall Cape for Girls
- Shorts Pattern for Kids (Sizes 5–14)
- How to Make Kids’ Shorts (Free Pattern)
- All of Fleece Fun’s Adult Patterns