
Fall Cape for Girls Free Pattern and Tutorial
This content contains affiliate links or sponsored elements, read our Disclosure Policy.


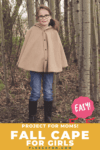


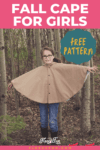


This fall cape for girls, with free pattern and tutorial, is perfect for layering outfits. Fall can sometimes be tricky to dress for and this cape adds just enough warmth without being too much. Comfortable and allows plenty of movement – this cape is sure to be your little girl’s favorite.

YOU WILL NEED:
- Medium weight woven fabric for outer layer (eg, corduroy, wool or wool blends, twill, denim)
- Lightweight woven fabric for lining (eg, quilting cotton, flannel, polyester lining)
- Fusible interfacing
- Sewing Essentials (pins, scissors, etc.)
- 4 buttons or snaps
- Get the free pattern here.

You may also like:
Fall Cape for Girls Free Pattern and Tutorial
Step 1 – Cut Out FALL CAPE Pieces and Add Interfacing
You will need to assemble the free pattern. For instructions on how to assemble the pattern click here.
Seam allowances are 3/8″ / 1 cm.
Cut 1″ strips of interfacing and fuse to center fronts of the outer fabric, 3/8″ from the raw edge. This will stabilize the buttonholes or snaps.
Step 2 – Sew the Main Body OF THE FALL CAPE Together
Sew center back seam, right sides together.
Step 3 – Sew the Hood for the GIRL’S Cape
Sew center back hood seam, right sides together. Clip the curve.
Step 4 – Attach the Hood and Repeat
Sew hood to the neckline of the cape, right sides together. Repeats steps 2 and 3 with the lining pieces.
Step 5 – Add the Lining and Turn the GIRL’S Cape
Pin the outer edges of the lining and outer cap, right sides together. Stitch around the outer edge, leaving a 4″ opening along the bottom for turning.
Step 6 – Topstich and add snaps- FINISH THE FALL CAPE FOR GIRLS TUTORIAL
Turn right side out, press, and topstitch along edge, closing the opening at the same time.
Sew buttonholes and buttons, or apply snaps as marked on the center front.
Download the Free Girls’ Cape Pattern Below:
You can get a free copy of Adobe reader here. By downloading you are agreeing to pattern terms of use. Click the picture of the pattern envelope to download the .pdf !

MORE GIRL PATTERNS:
- Fall Cardigan for Girls
- The Simple Pencil Skirt
- Fingerless Gloves Pattern
- Flannel Nightgown Pattern
- Fall Fairy Costume DIY
- The Fun and Frilly Skirt
- Holiday Bow Tie Headband Free Pattern Handmade Gift Idea
- Cute Drawstring Backpack Tutorial (Beginner Friendly)
- Pocket Tee Shirt for 18″ Doll Free Pattern
- Upcycled Sweater Skirt
- Apron for Teens and Tweens
- Child Apron Tutorial!
- You Can See all of my Cape Patterns Here
More Fall Projects:
- Pin the Tail on the turkey game DIY
- Patchwork Fabric Pumpkin
- Thankful Apron Free Pattern
- Hostess Apron Tutorial
- Autumn Leaves Pillow
- See more Fall Sewing Projects here!
More Projects for Women!
- Convert Prom Dress to Skirt Tutorial
- How to Make a Flower Fascinator
- Easy Women’s Skirt Sewing Tutorial
- Half Circle Skirt Pattern for Women
- Ladies’ Kimono Robe Tutorial
- Braided Fleece Ear Warmer
- All of the Skirt Patterns on Fleece Fun