
No Sew Baby Car Seat Canopy tent how to
This content contains affiliate links or sponsored elements, read our Disclosure Policy.

Oh yes my non-sewing friends it is possible! You too can make a cute baby car seat cover, without having to sew a stitch! Please note that there are two versions of the no sew baby car seat canopy pattern.
You will need the following:
A printed out version of the Free Fleece Fun Baby Car Seat Canopy PDF.
1 and 1/3 yards fleece
2/3 yard of 2.5 inch ribbon (or wider)
4 inches Iron On Velcro
Fusible interfacing
Washable cloth marking pen or pencil
Scissors
Iron
Hot Glue gun
extra buttons, ribbon for decorating
No Sew Baby Car Seat Canopy tent how to
1 – Cut out Pattern

Assemble the pattern. You can find assembly directions on this page. Please note there are two versions of this pattern. There is a picture in the download as a reference guide.
2 – Cut out the pattern pieces

Placing the line on the fold pin and cut out the pattern.
Then trim off the “fringe zone” section of the pattern and pin back onto cloth as pictured below.
3 – Mark the fringe “cut to” line

Tracing the pattern draw a line all the way around it. This is your reference line.
One the wrong side of the cloth mark the four corners of where the interfacing will go and the slits will go on each side.
If you want you can skip this step and just leave the pattern on the cloth and go to step four.
4 – Cut the Fringe

Cutting to the line or outside of the pattern, snip the fringe. I like it between a half-inch and an inch wide between cuts. It doesn’t have to be perfect, just try to keep the cuts straight. Snip all the way around the pattern.
5 – Add the interfacing

Using the guides you marked, on the wrong side of the fabric iron on the interfacing. (I know you’re tempted to skip this step, but it’s really important to reinforce the fleece so it doesn’t stretch out, especially since you’re not putting any stitches in to the fabric.)
Tip: The placement of these are approximate, all baby car seats are different. If you have access to the car seat you are making this for I suggest you sit the fabric on it to get the placement just right.
6 – Tie the fringe

I like to do this while watching a movie. Tie each individual strand in a half knot. Go all the way around the blanket.
You will notice that the edge gathers a little – it’s supposed to. It helps fit a little more snugly on the car seat.
7 – Make the straps

Cut two strands of ribbon into 10 inch lengths. Finish the ends with a lighter. Turn over each end 1 inch once and then 1 inch again (folding in toward the wrong side of the ribbon.
Note: I used wire ribbon and it worked great!
8 – Add the Velcro
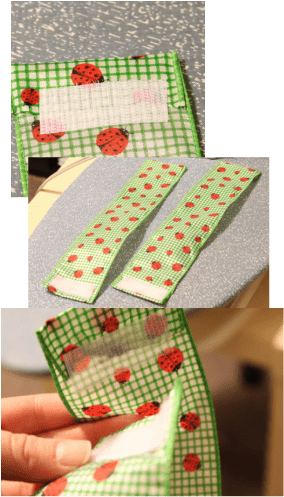
Iron on the hook side to the wrong side of the ribbon. Place it over where you turned under the ribbon so it will hold down the fold. Iron on using a press cloth to protect the ribbon.
Place the loop on the right side of the ribbon and iron on using a press cloth. You should now be able make a circle when you attach the Velcro.
9 – Finishing up

Using a hot glue gun secure the other end of the ribbon that you folded in. Glue on any accessories you would like to add to the front of the straps (on the right side of the ribbon) – I like buttons and ribbon.Tutorial here.
Cut the slits in the fleece that you marked.
Slits should only be half and inch wide – the ribbon will scrunch and the fleece will stretch. A small slit is better in this case.
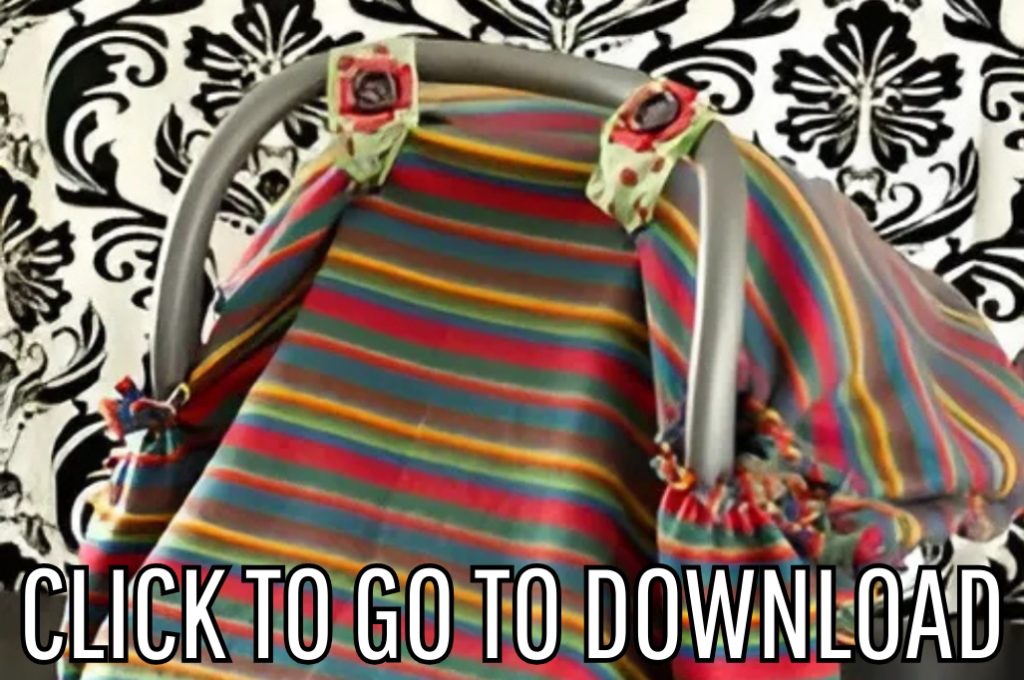
Thread the straps through and put on the car seat. The pattern is designed to envelope over the baby – you can tie the fringe on each side together so there aren’t any gaps on the side.Note: If you don’t want to tie the sides together, you could also use some iron on Velcro.
You could easily make this a double layered cover (great for cold climates) and just tie the two layers together, and thread the straps through both.
Download the free pattern here, tutorial below.
You can get a free copy of Adobe reader here. By downloading you are agreeing to pattern terms of use. Click the picture below and fill up the form to download the .pdf !
More No Sew Projects:
- No Sew Blanket Tutorial (with flannel!)
- How to Make a No Sew Fleece Tie Blanket (better method with templates!)
- How to use the Tie Blanket Ruler!
- How to Make a No Sew Tie Quilt
- No Sew Hobo purse
- Printable Pinwheels for Spring!
- Satin Flower hair clip
- No Sew Fleece Flower
- No Sew Art Smock
- Ragged Tassels ( Cute for decorating)
- The Lucet Scarf
- No sew cape
- See all of FleeceFun’s No Sew Projects!
More Baby Car Seat Covers and Canopies Patterns:
- Baby Car Seat Canopy Tent Cover How-To
- Stretchy Baby Car Seat Cover Pattern (Free)
- Baby Car Seat Cover or Tent with Window How-To
- Traditional Basic Fleece Baby Car Seat Cover or Tent Tutorial (DIY)
This is a really nice , simple pattern, thank you for sharing.
can we print out the pattern on a regular printer? because thats all i have:/
Yes all the patterns are designed to work with a basic at home printer. =)
Yes all the patterns are designed to work with a basic at home printer. =)
Hi, I am wondering how you cut the strips when you come to the corners where it leads up the the slit? Thank you
Hi Cindy,
the stips on the corners won’t be perfectly straight, they’ll be a wedge shape.
Hope that helps!
Hi! I’m excited to do this project but do not have any experience with making items out of fabric and afraid I might mess up. Just wondering if there is a video for instructions and how it will open and close for baby. Thanks
I am so thankful that you posted a no sew canopy pattern! I saw the “peek-a-boo” pattern too in the no sew version, but could you post a pattern for the “slit front” canopy cover also in a no sew please? I would like to make one for my first sweet baby girl that will be here in about 6 weeks 🙂
Thanks so much!!
Hi Sara! Congrats on your coming little one. I am sorry but I don’t have plans to post such a pattern at this time.