
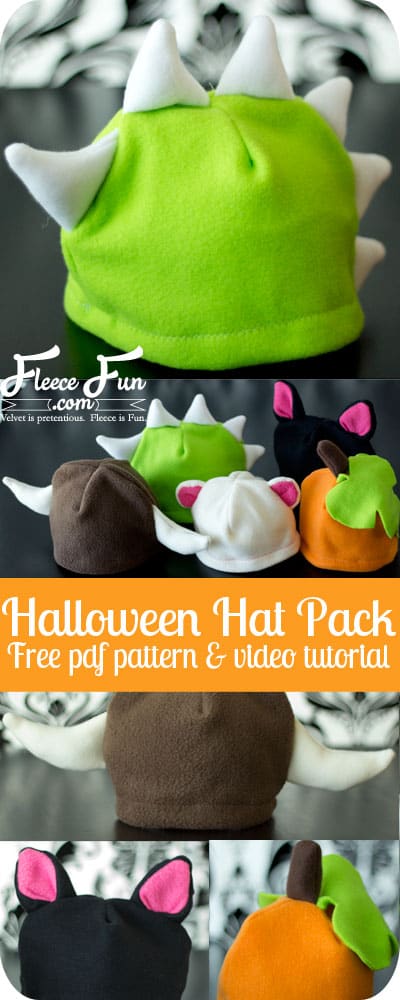
Halloween Hat Pack – free fleece hat pattern of Dinosaur Cat Bear
This content contains affiliate links or sponsored elements, read our Disclosure Policy.
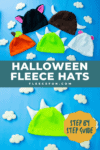


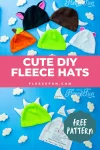
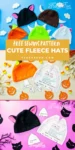


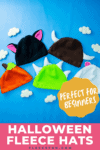


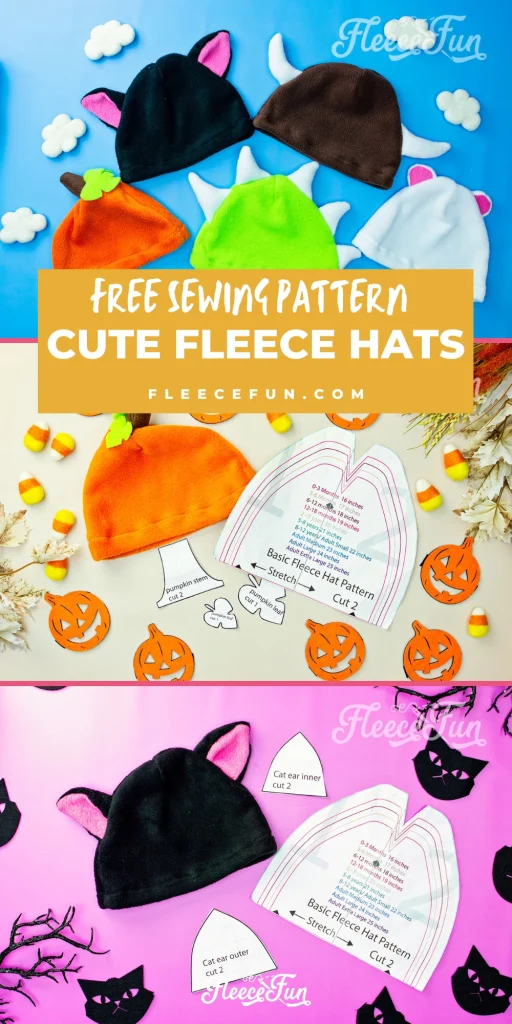
These free fleece animal hat patterns have something for everyone! The variations includes a dragon/ dinosaur hat, Viking hat, bear ears, cat ears, pumpkin, and apple. Comes in sizes Baby to adult.

Are you ready to add a touch of whimsy and warmth to your Halloween costume this year? Look no further than our spooktacular Halloween Hat Pack! Whether you want to transform into a ferocious Dinosaur, a mysterious Cat, or an adorable Bear, we’ve got you covered with our free fleece hat patterns.
Get creative and get cozy as we dive into the world of DIY costume accessories that are sure to make heads turn (and be envy-inducing) at every Halloween party. So grab your scissors and sewing machine – it’s time to unleash your inner crafter and give your costume that extra roar-factor!
The measurements are for the circumference of the head. So the measurement you would get if you too a measuring tape and wrapped in around a person’s head. Please note that fleece can have varying amounts of stretch to it.
Hate The Ads?
This pattern with video and printable instructions is available to members of the Maker’s Studio. The Maker’s Studio is an ad free experience, no video ads, no forms, no zip files, just creating.

Be sure to check out the fleece vest that perfectly compliments this free fleece animal hat pattern. You can get the FREE vest pattern here.
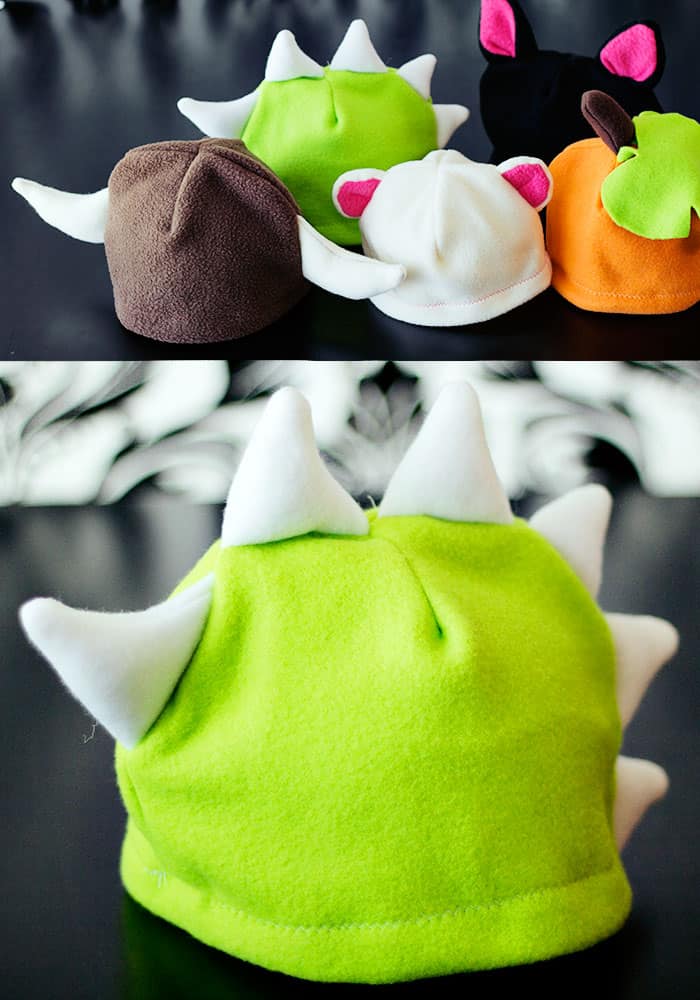
This pattern makes 6 different variations. click the version you want to go to the tutorial. They are:
YOU WILL NEED:
While all of these hats looks different the items needed to make them are the same. Please note that these patterns are designed for fleece. They WILL NOT work with woven fabrics that don’t have stretch (like cotton).
- 1/3 yard fleece
- 1/8 yard contrasting materials for pieces (might need 2 colors)
- Sewing Essentials (scissors, pins, etc.)
- Get the Free Pattern here.
Free Fleece Animal Hat Patterns Video Tutorial:

Free Fleece Hat Patterns Tutorials:
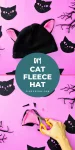
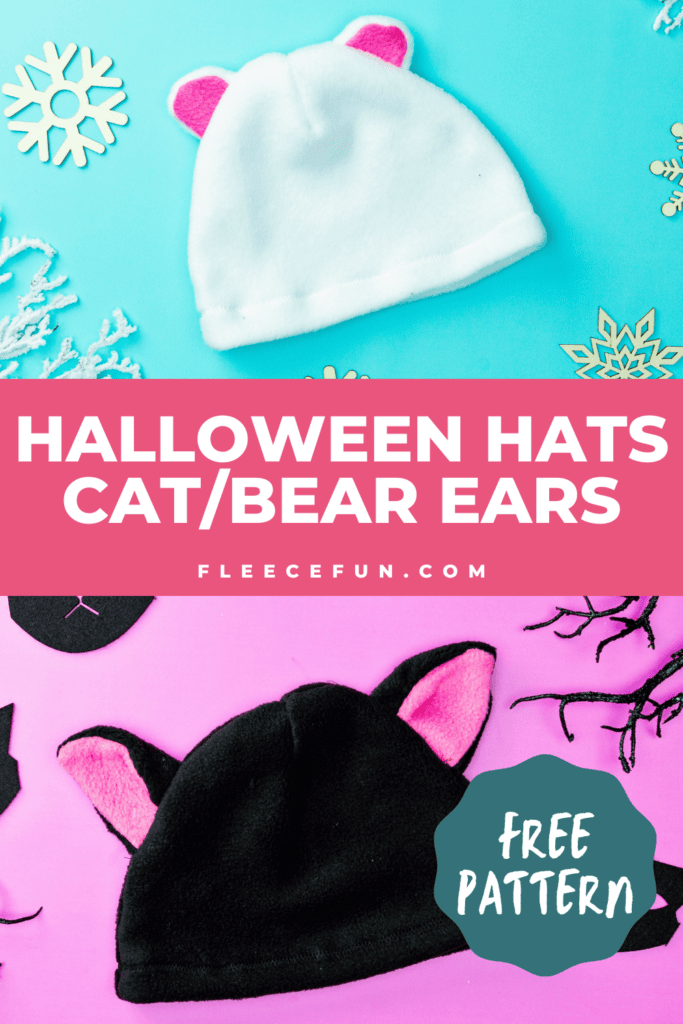
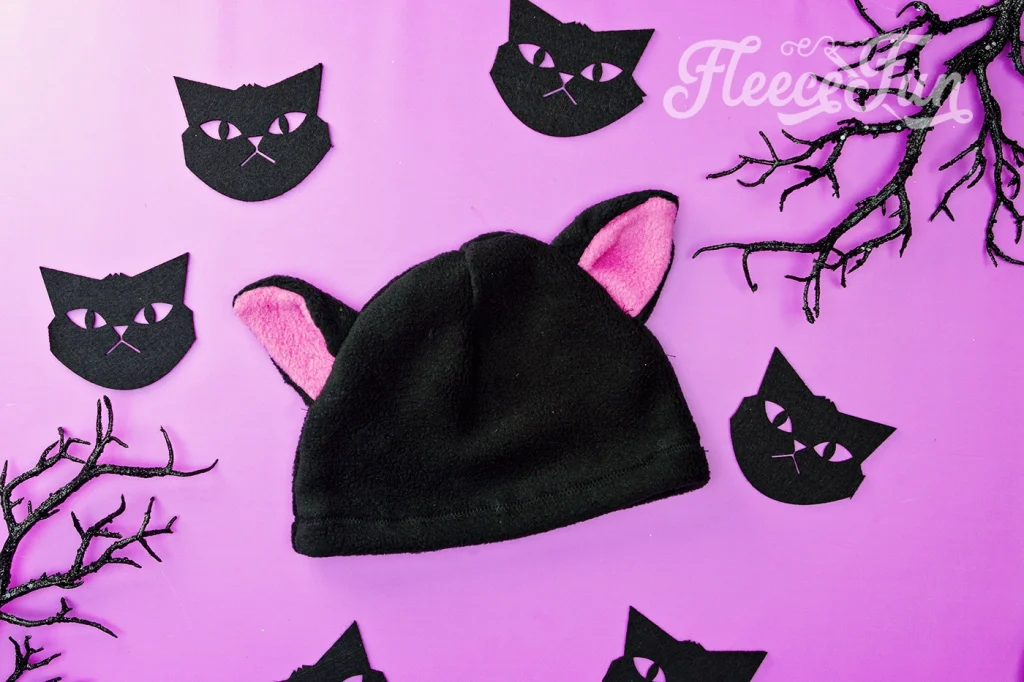
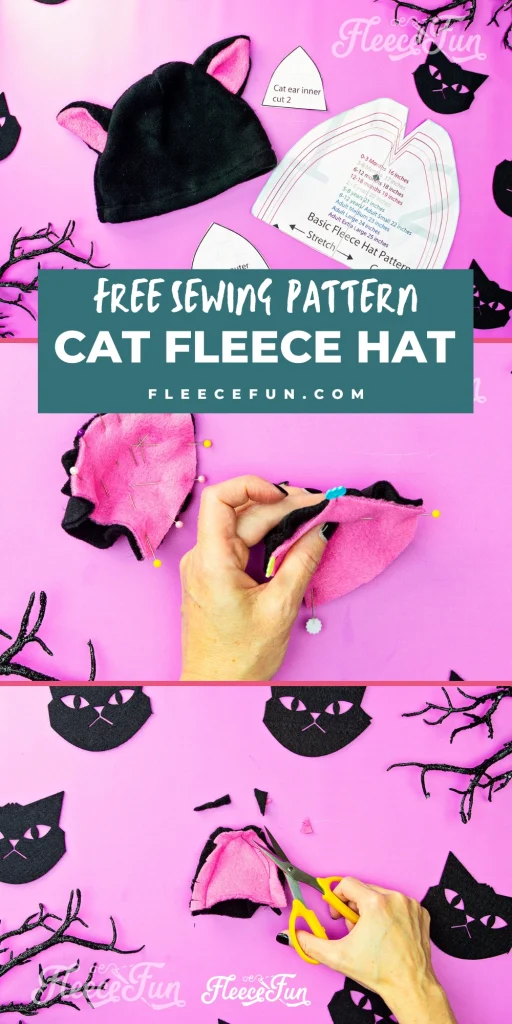
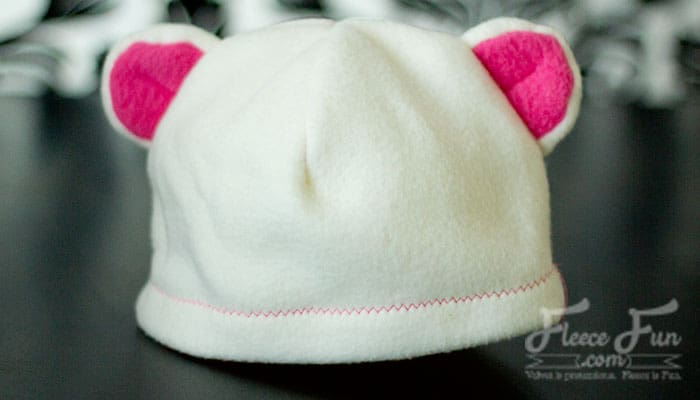
How to Make a Fleece Hat with Cat Ears and Bear Ears
You will need to assemble the free fleece hat pattern. For instructions on how to assemble the free sewing pattern click here.
These two patterns may look different but assembly is mostly the same. For detailed pictures of the bear hat see this tutorial.
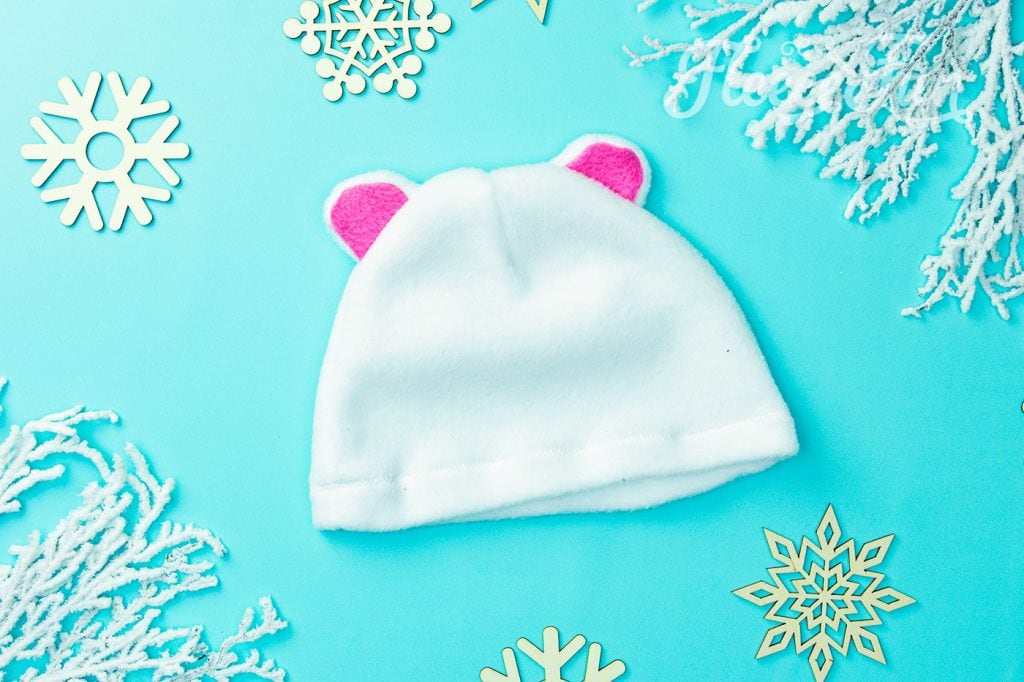
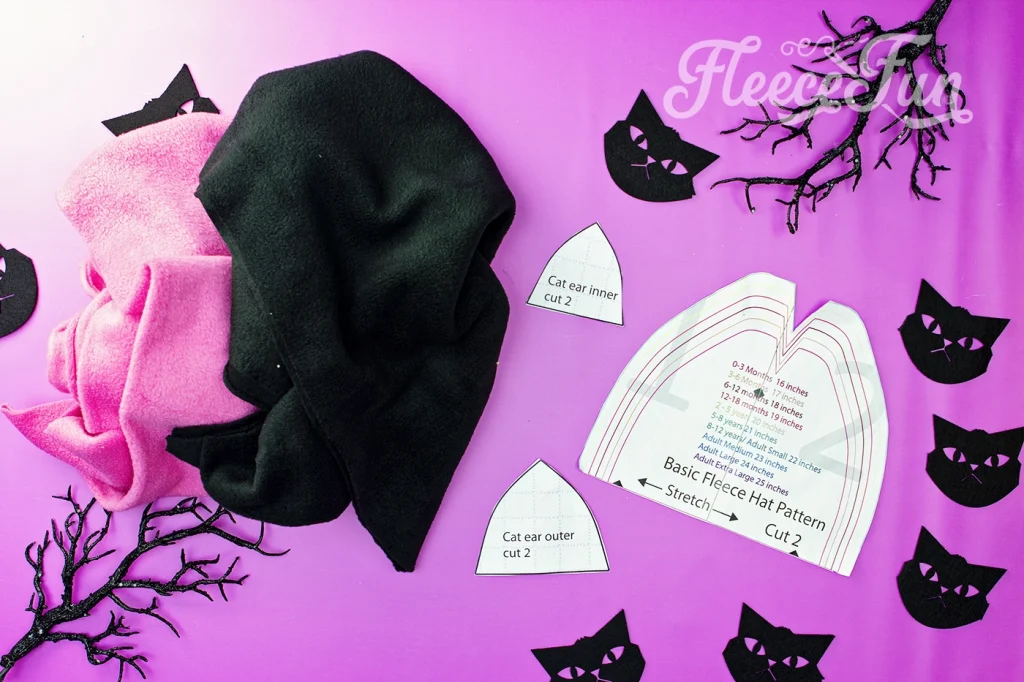
This pattern you will need the hat pattern and the outer and inner ear patterns. You will want contrasting fleece for the inner ear to make it pop.
Step 1- Assemble and cut out the free fleece hat Pattern
Pattern assembly instructions can be found here.
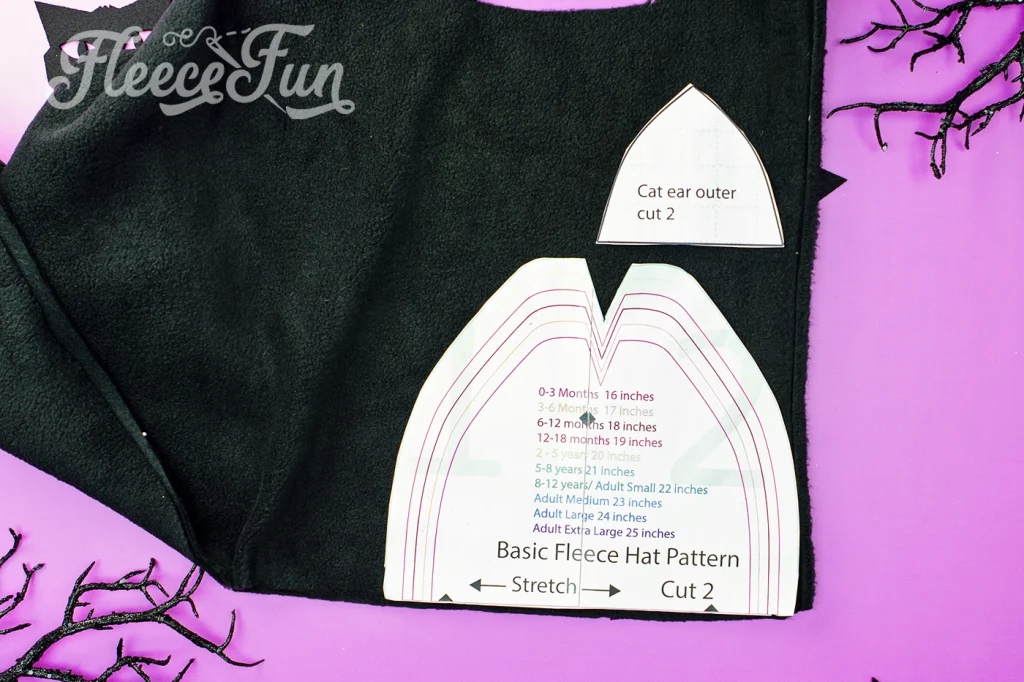
Cut out 2 of the fleece hat pattern in the desired size. Then cut out 2 of the outer ear from the same fabric.
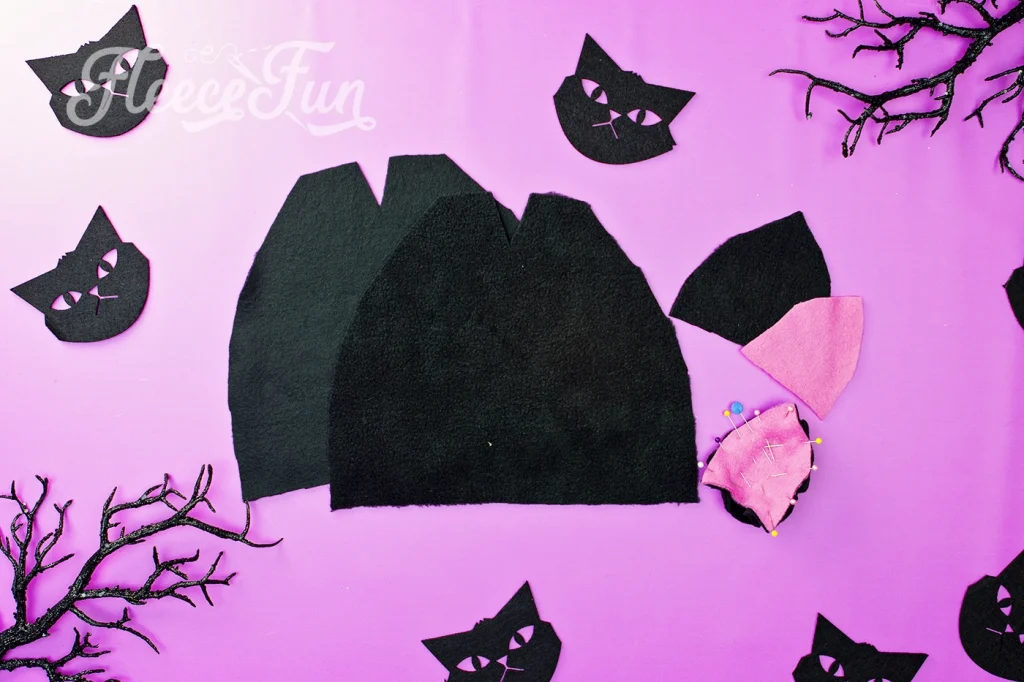
Then cut out 2 of the inner ear in contracting fabric, in the example I chose pink.
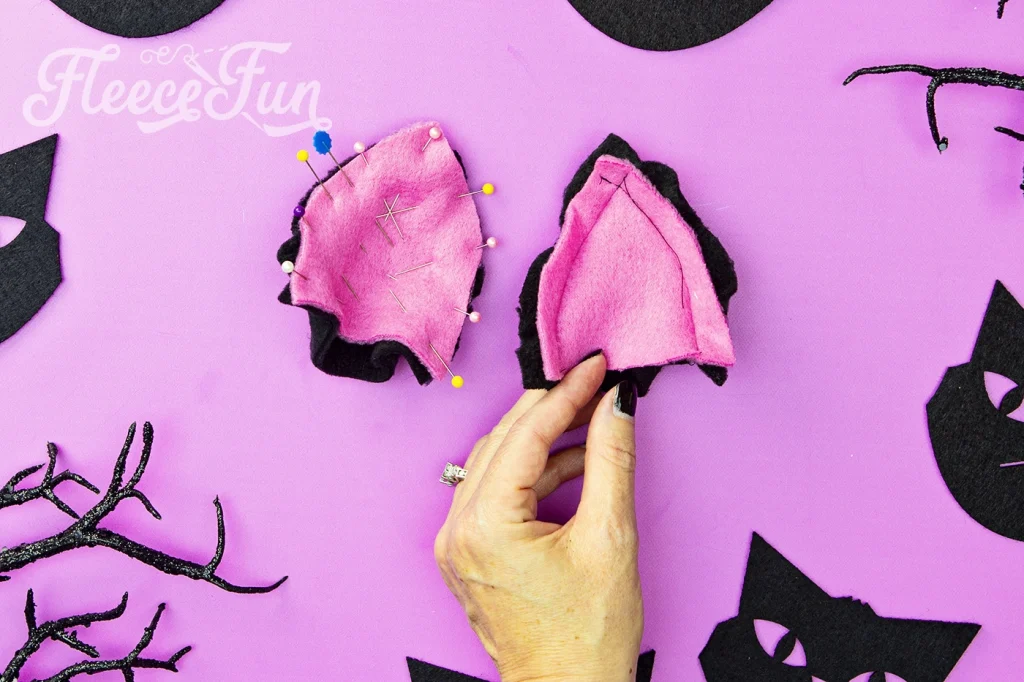
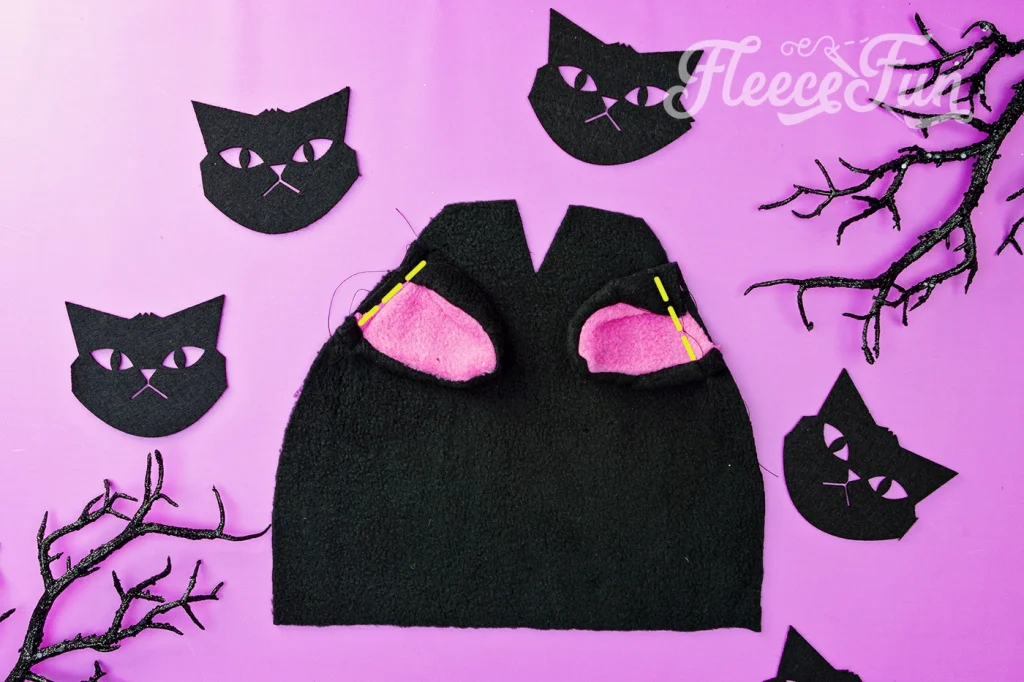
Step 2 – pin and sew the ears
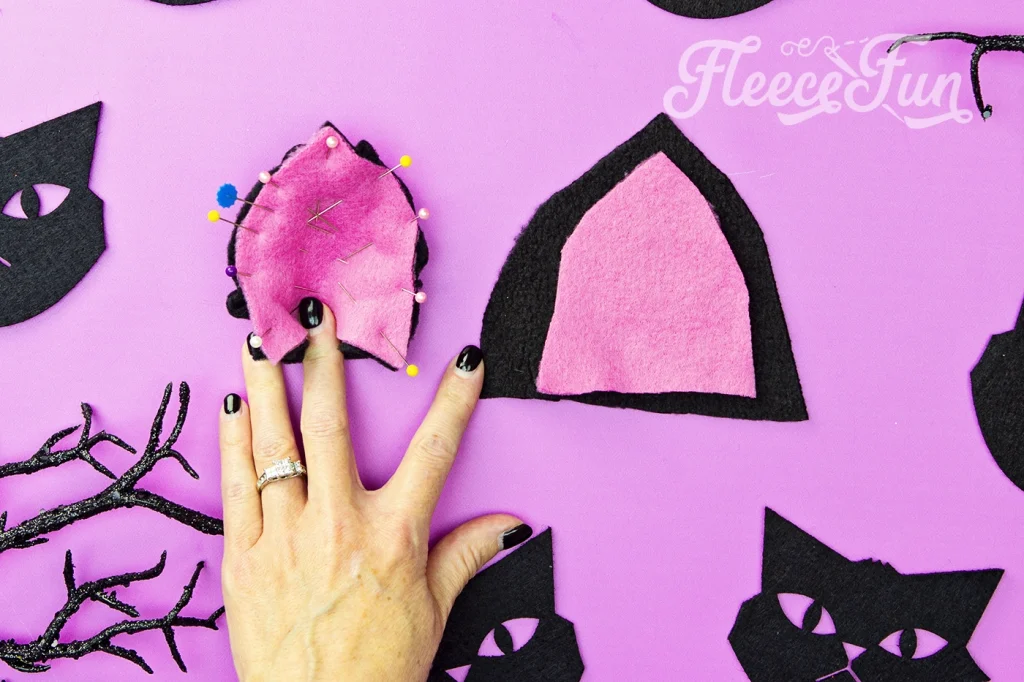
This is the trickiest part of the pattern. Taking and exterior and interior ear piece, put right sides together.
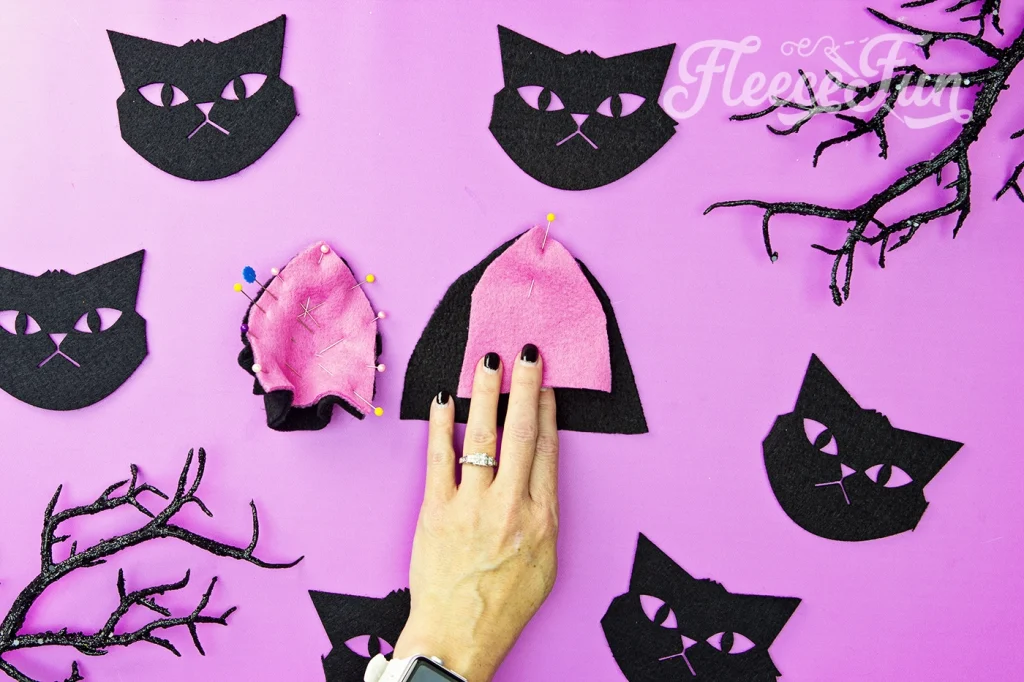
Line up the top center of the two pieces. The exterior is larger than the interior by design so your ear will have a nice outline.
Next line up the exterior bottom corners of the piece and pin (this will cause the back to bubble).
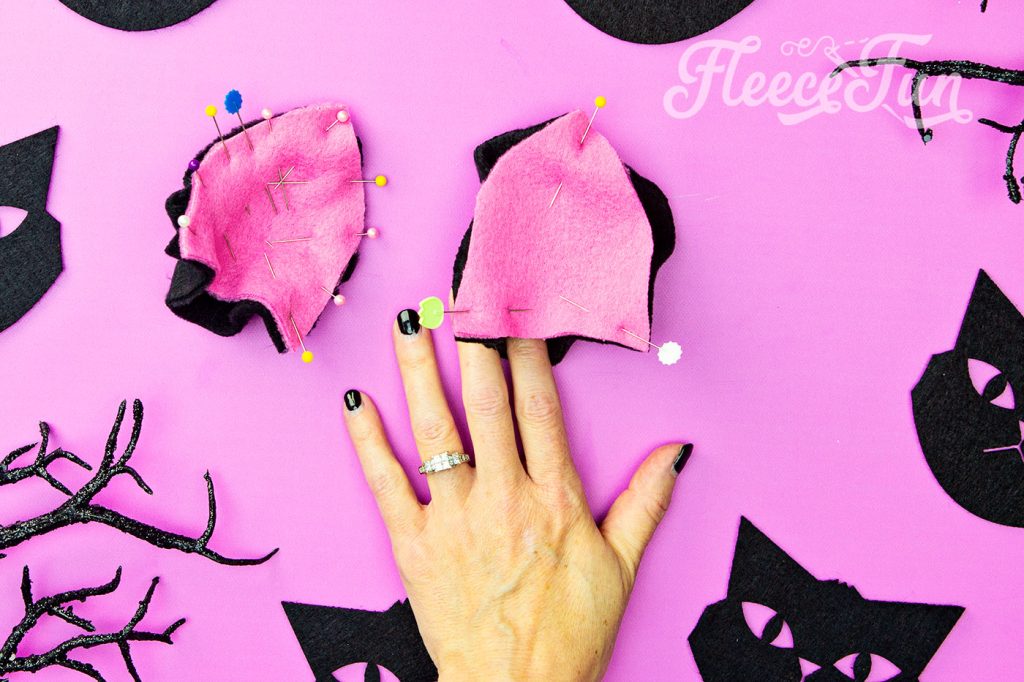
I like to use a lot of pins to get this right. Now pin half way between the top pin and the bottom pin.

Finally pin half way between the middle pin and top, and pin again between the middle and bottom for a total of 9 pins.
This is how it will look on the front and back.
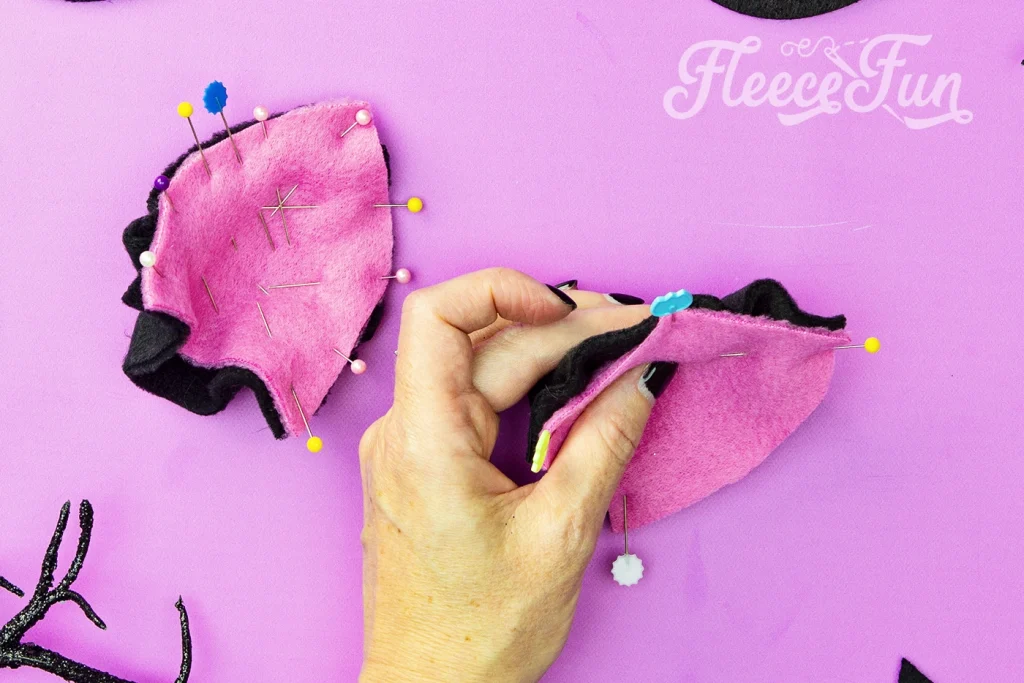
Sew the ears together leaving the bottom open for turning. For a baby hat use a .5 inch seam, for a child or adult hat use a .25 inch seam. Repeat for the second ear.
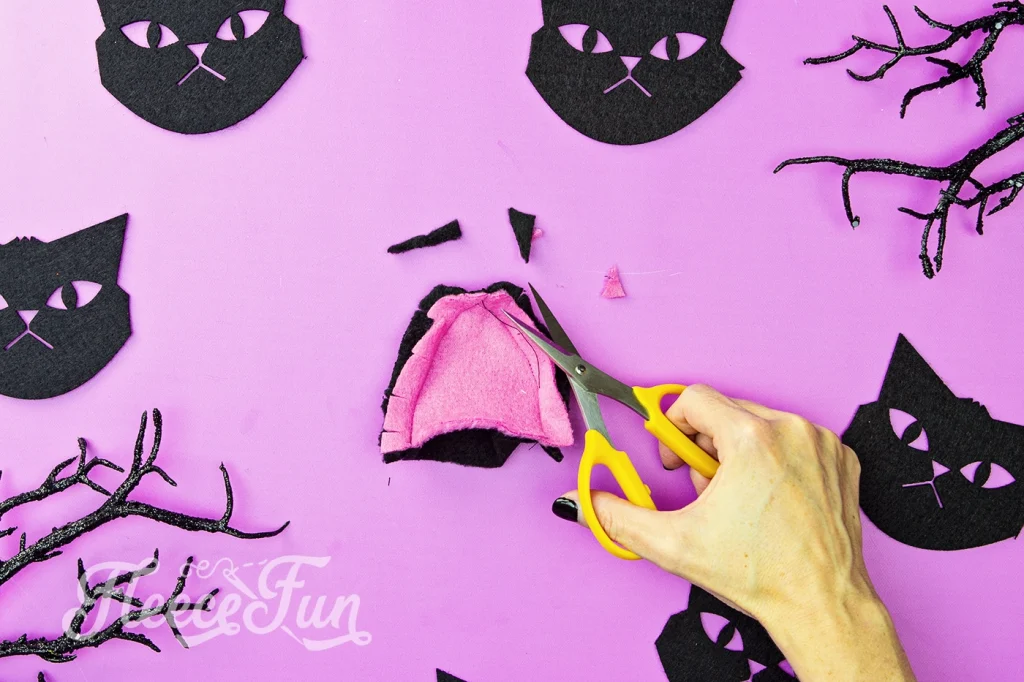
Trim the top points of the ears so it will turn nicely, snip slits in the side seam allowance to help with turning also.
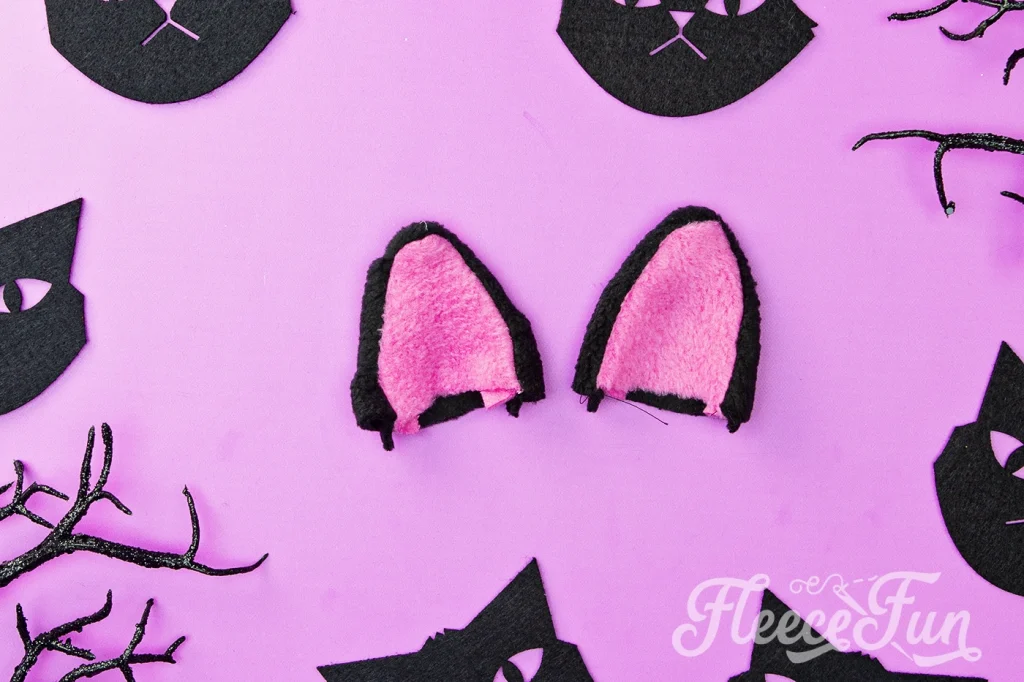
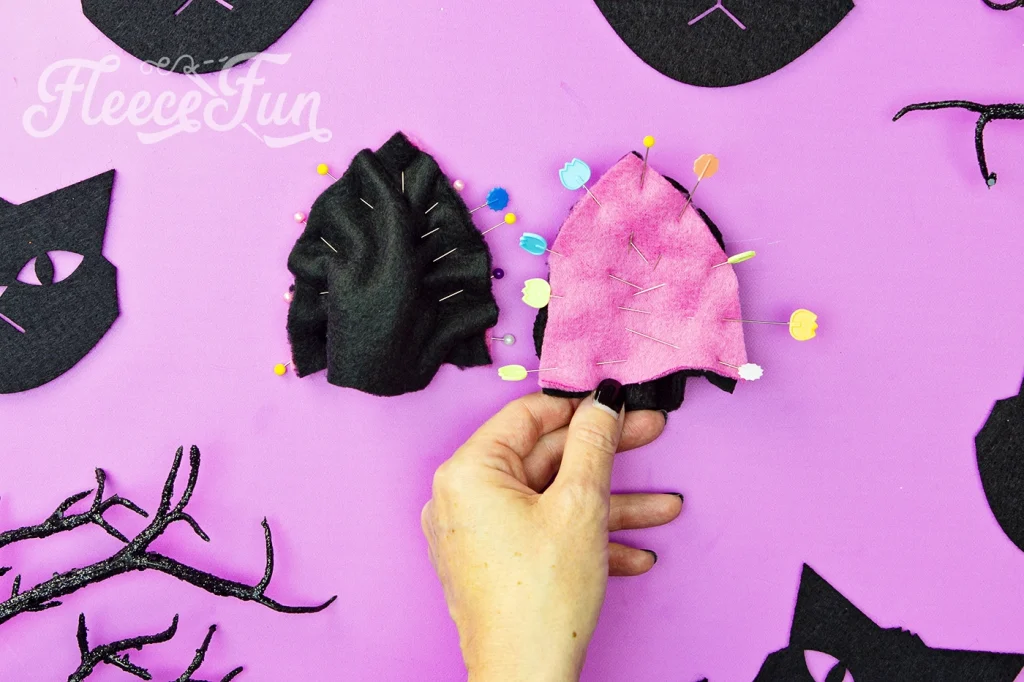
Turn right side out. For Bear ear: Sew top stitch seam on ear if desired.
For Cat Ear: Turn each bottom corner into center of ear, pin and baste stitch down.

Or you can just turn in part of the ear – it’s your hat you decide.
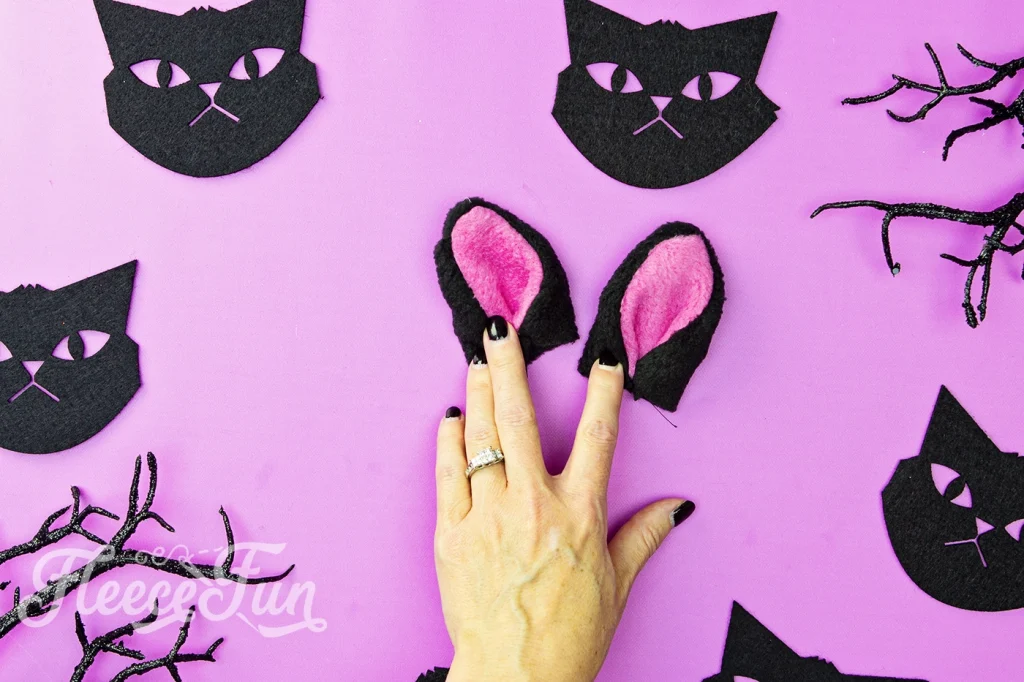
Step 3 – Place the ears and complete the Fleece hat.
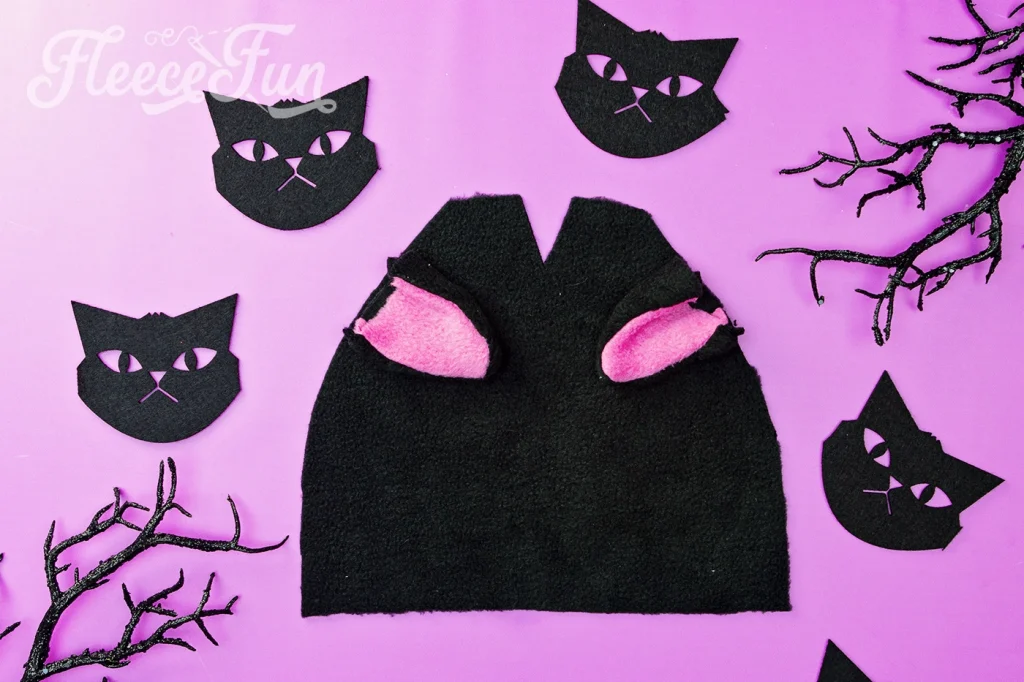
Place and pin the ears where you would like them to be on the fleece hat (a third of the way down seams to work well).
Since it’s several layers of fleece to sew through, I’ve found it’s easier to baste / sew on the ears before sewing the hat together.
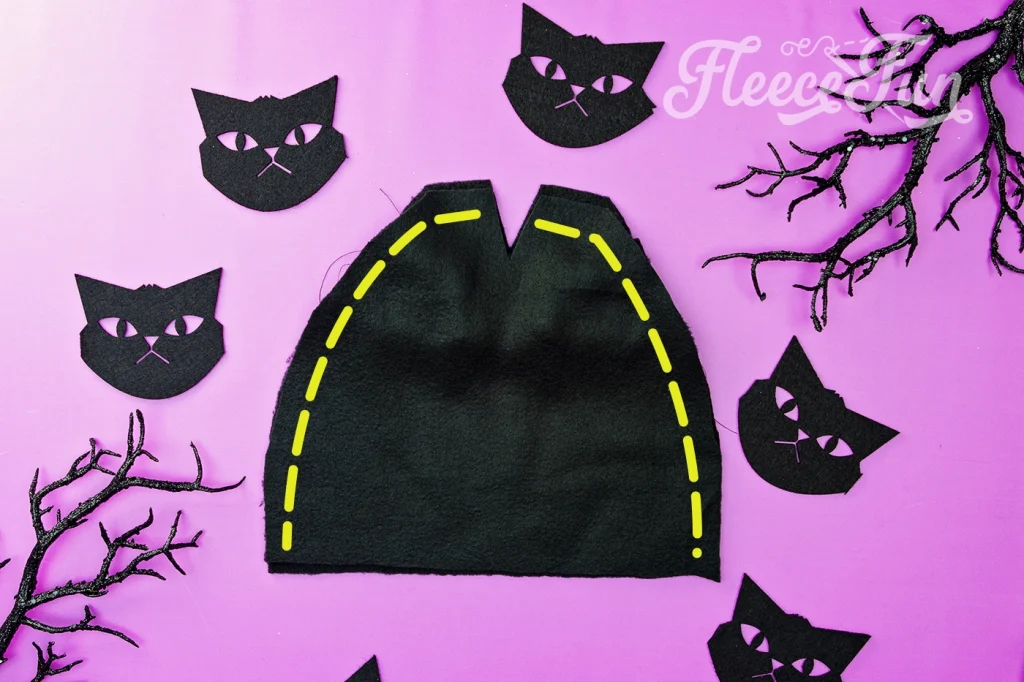
Now that the ears are basted on, sew each side of the hat, using a .5 inch seam allowance. Proceed to finish the hat as shown here.
Just so you know…
Go slow when sewing through several layers and lengthen your stitch so your machine won’t skip stitches.

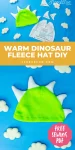
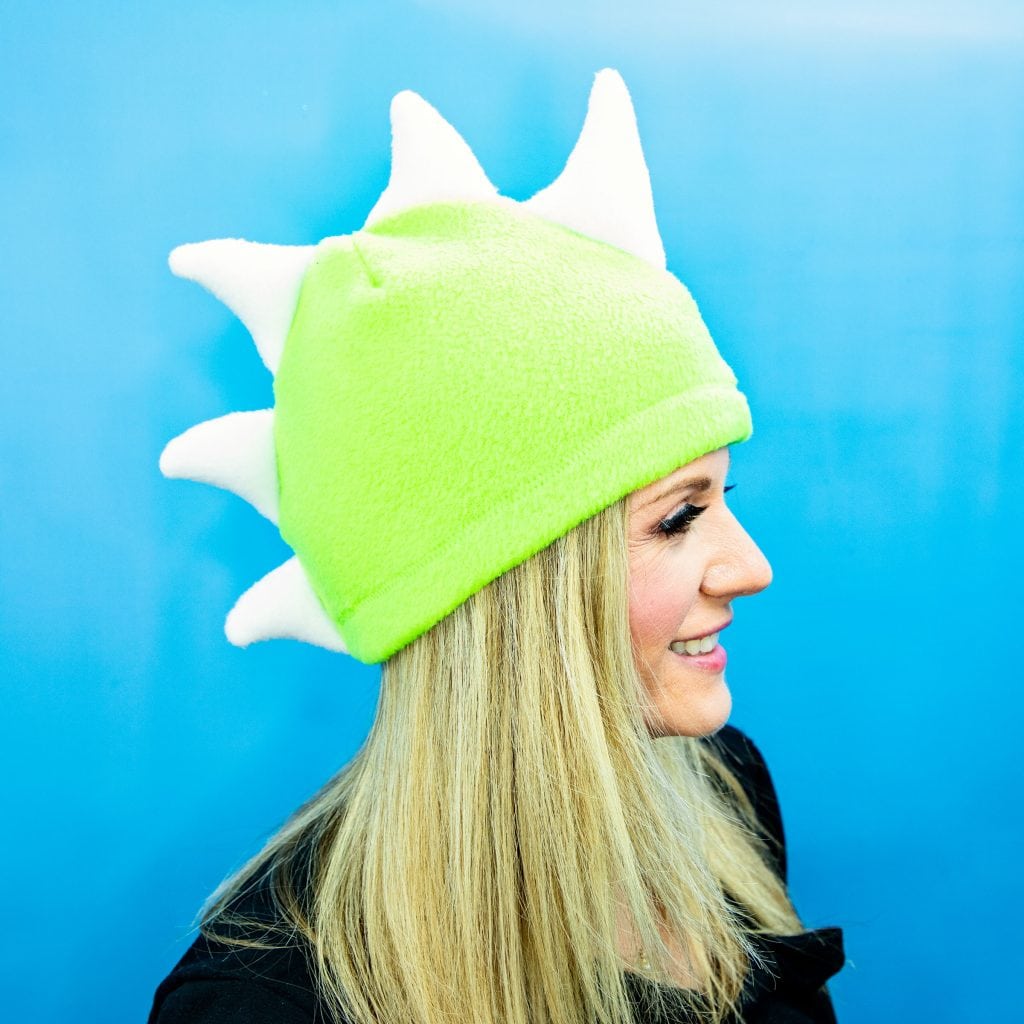
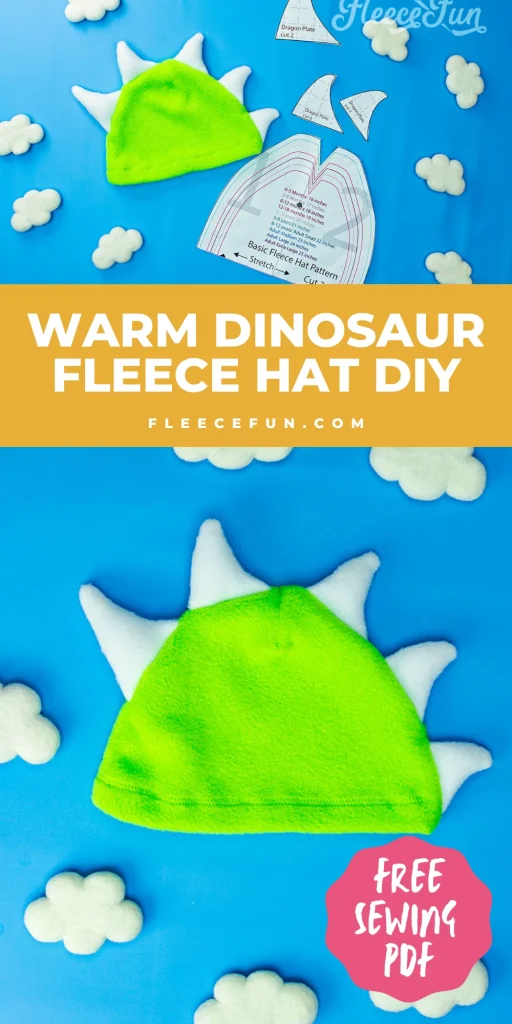
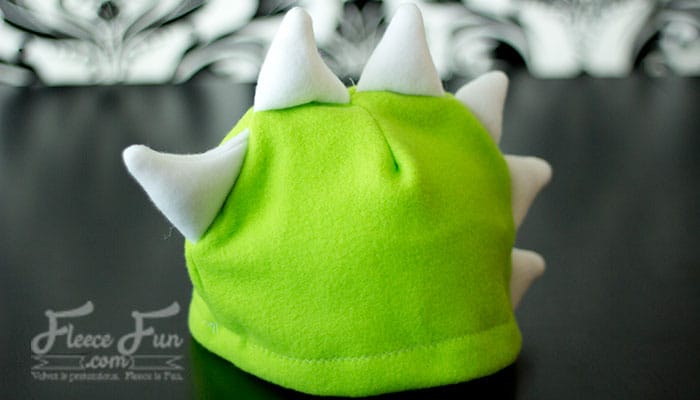
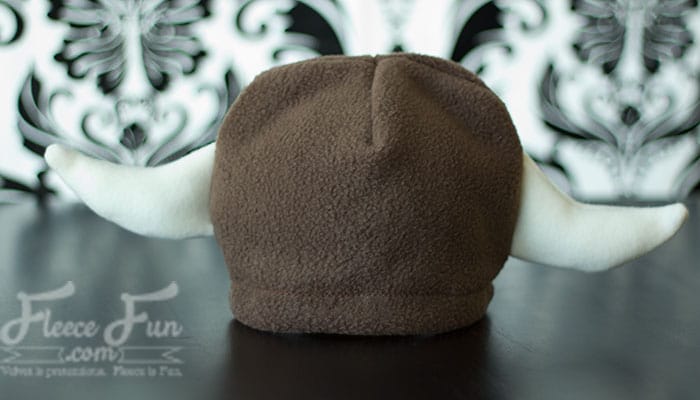
Dragon/ Dinosaur Fleece Hat and Viking Fleece Hat Tutorial:
What little boy wouldn’t want to run around in this hat all winter?
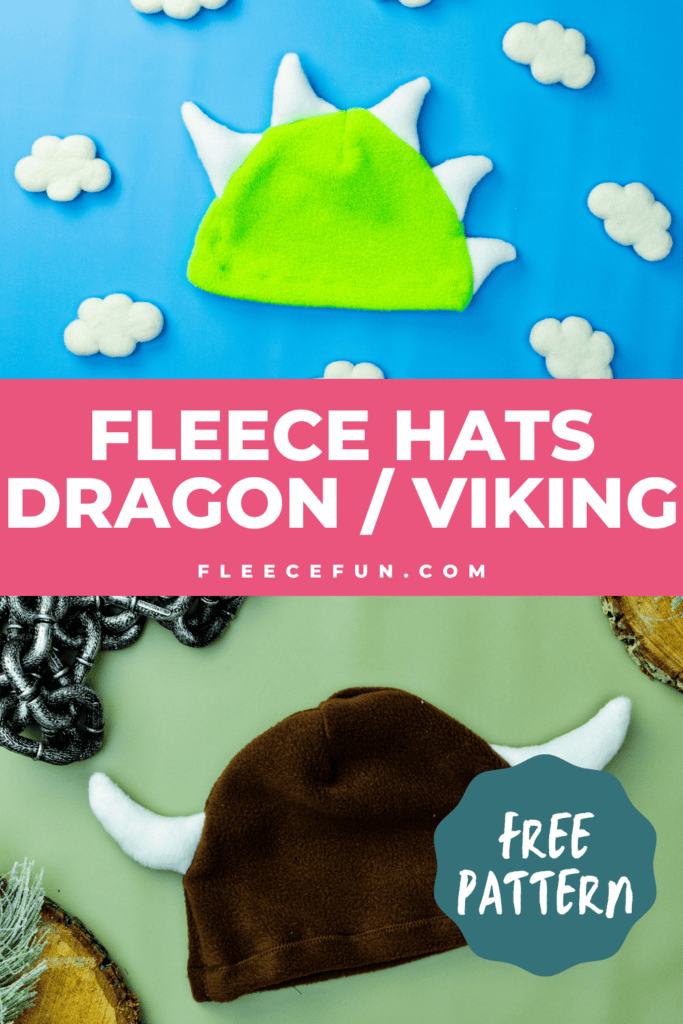
These two free fleece animal hat patterns are similar in their assembly.
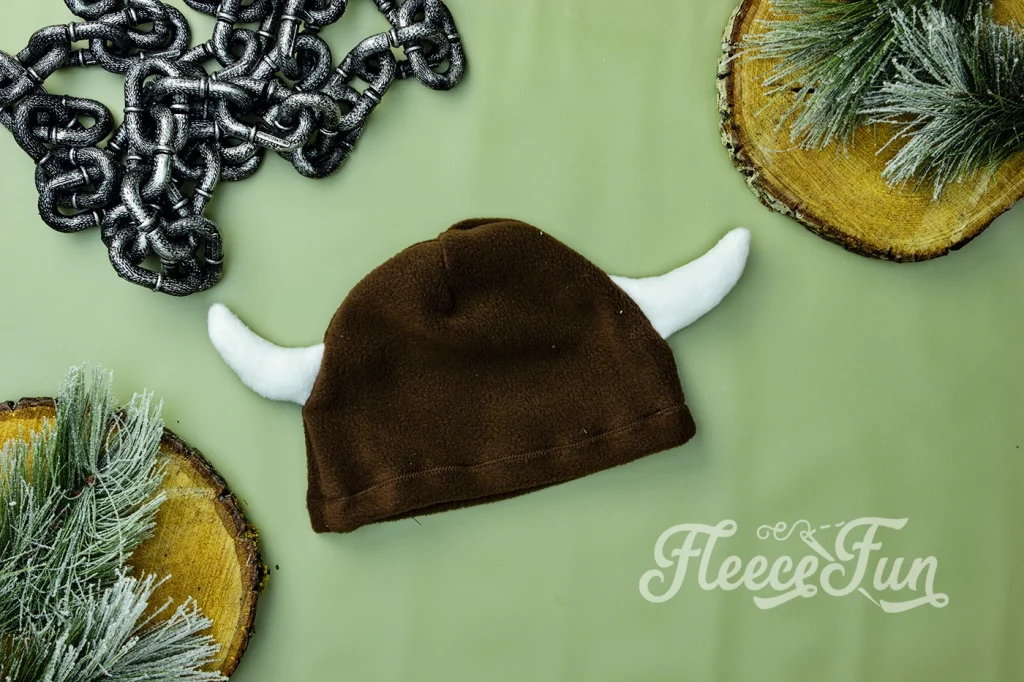
You can see detailed Viking hat instructions here.
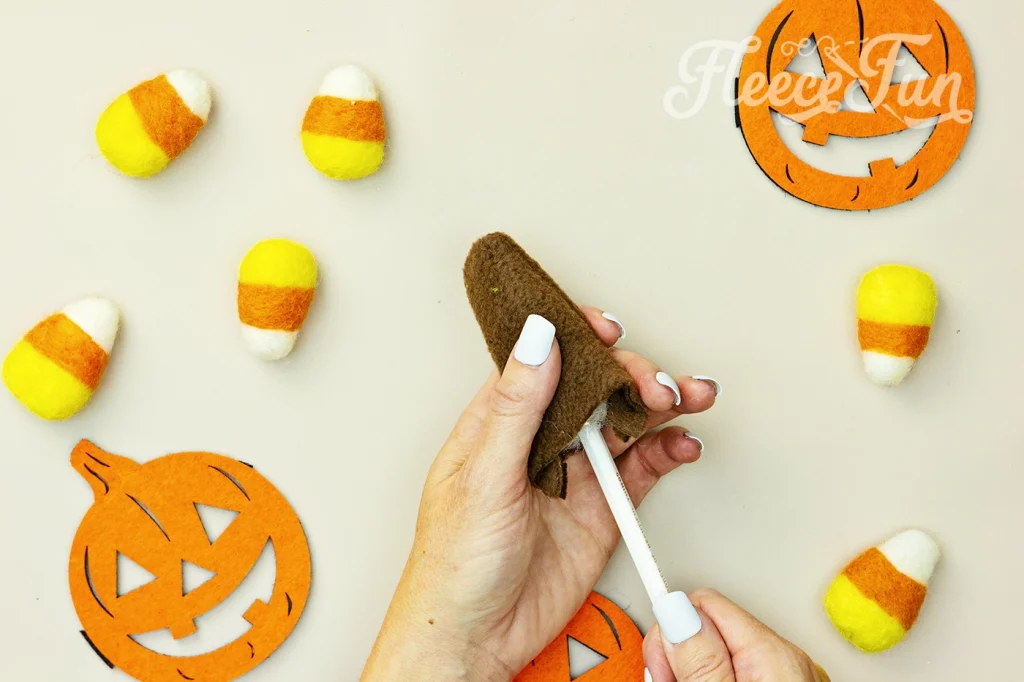
In addition to fleece for the horns and hat, you will need a small of amount of poly fill to stuff the horns.
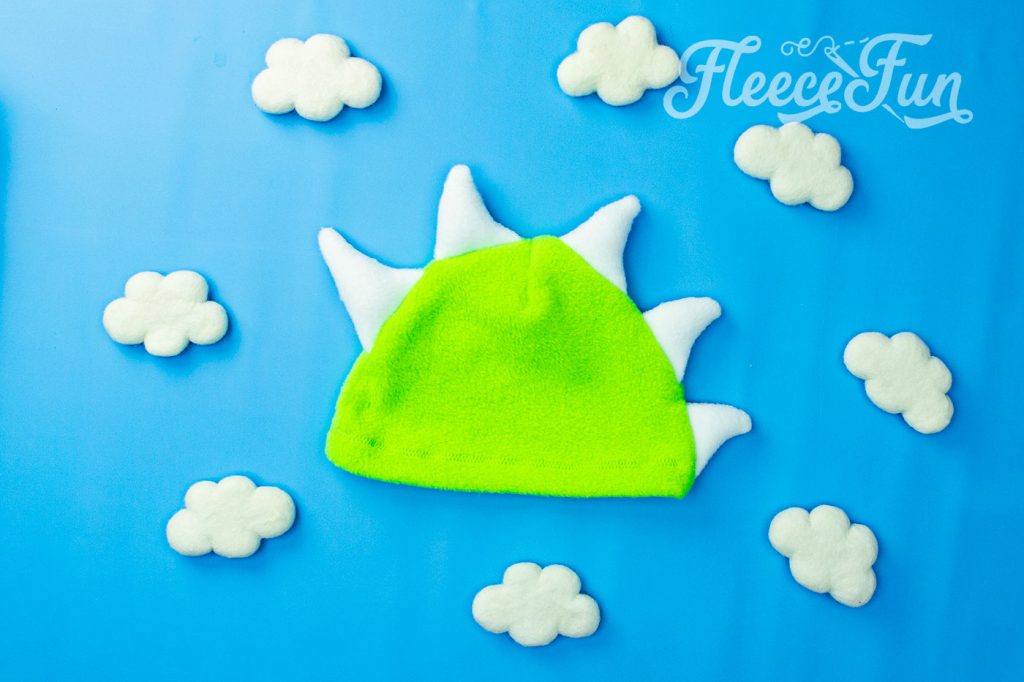
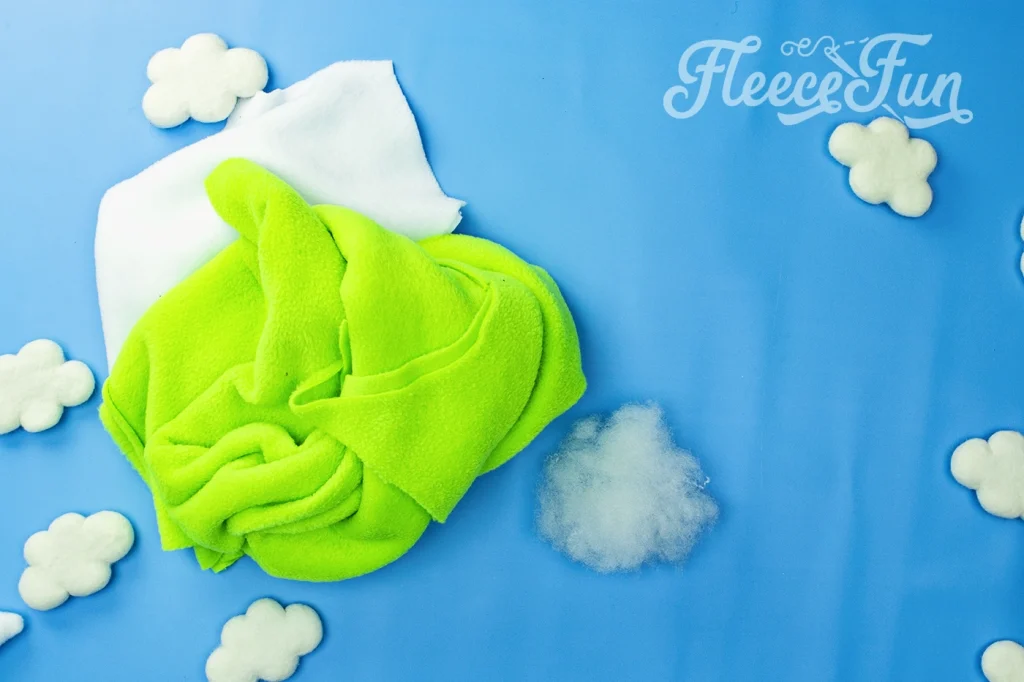
Step 1 – Cut out pattern pieces to the fleece Dinosaur Hat
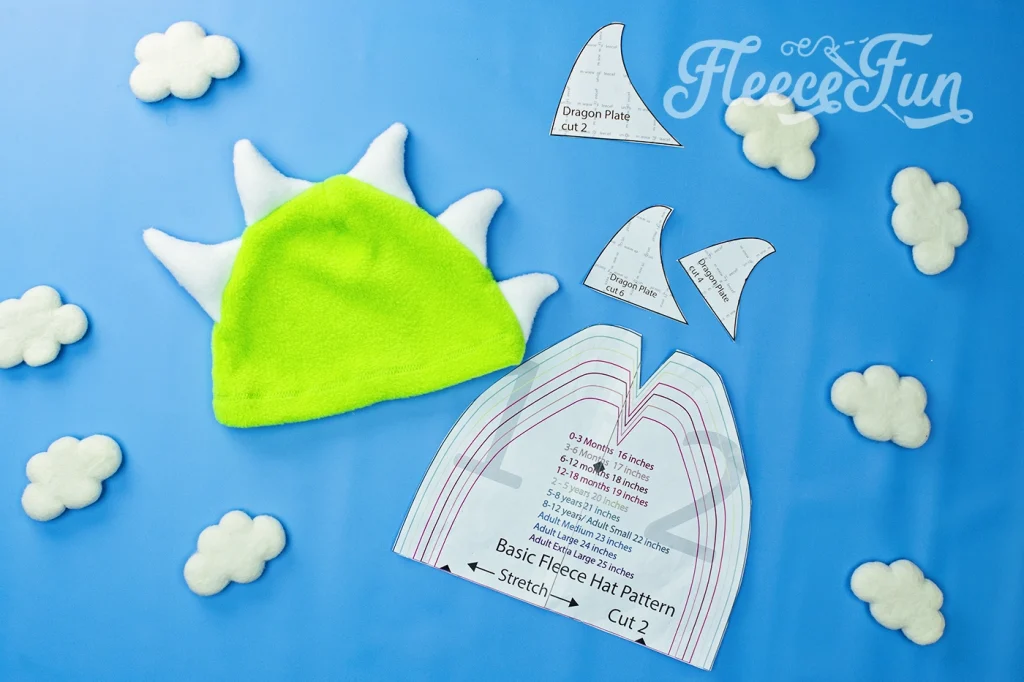
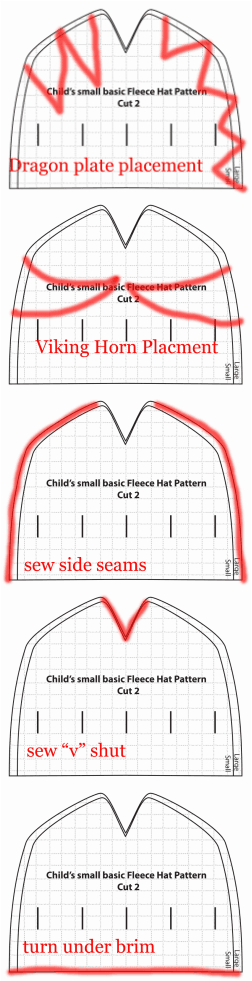
The pattern pieces needed for this hat are the basic hat template and the 3 dragon or dinosaur plates.
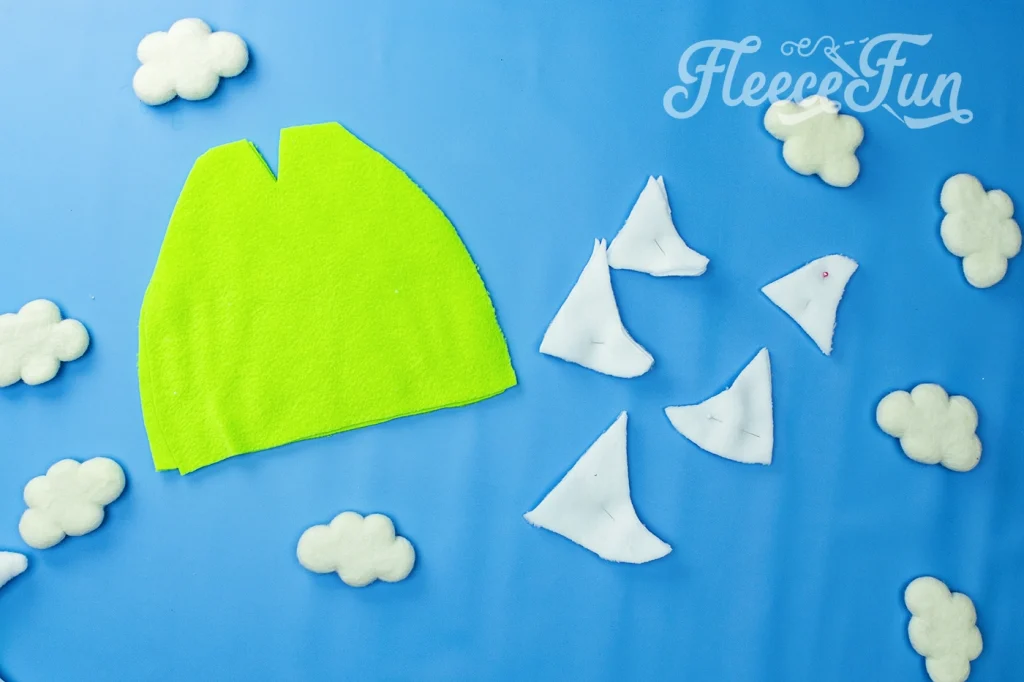
Cut out both of the pattern pieces for the desired size fleece hat. Dragon hat: To get the right amount of Dragon “plates” for your hat, take the pattern pieces and set them on top of the hat pattern to make sure the amount you need is correct.
Step 2 – Sew the spikes to the dragon Hat

Sew each horn together. For baby fleece hats use a .5 inch seam. For children and adult hats use a .25 inch seam. Sew two sides of the horn, leaving the bottom open for turning.
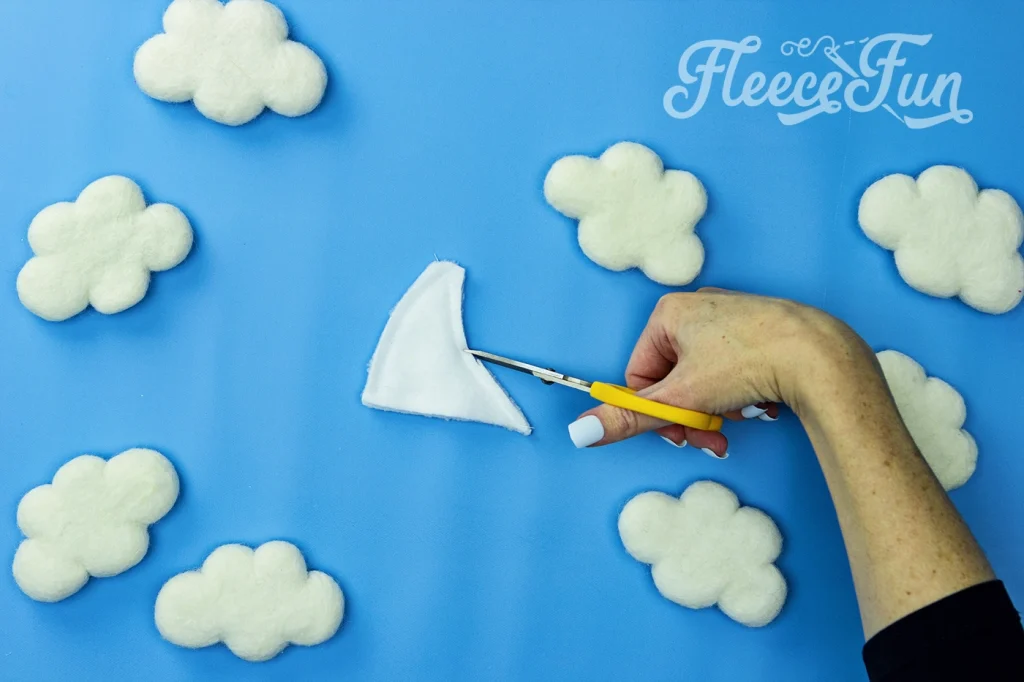
Trim with scissors close to the top point of the horn (this will give it a nice point when turned).
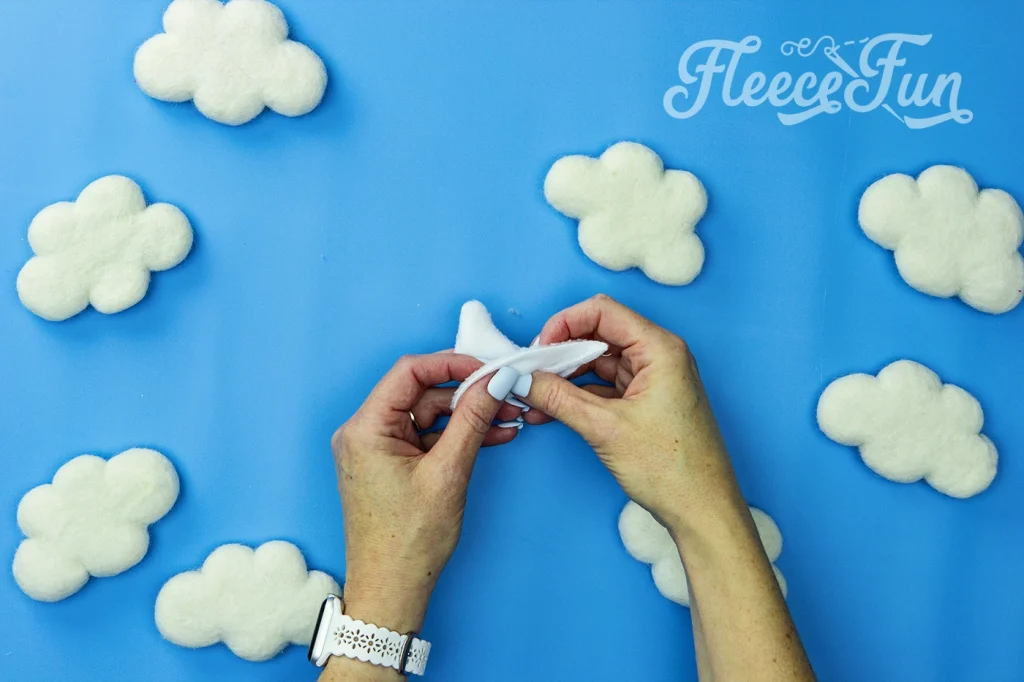
Turn horn right side out,
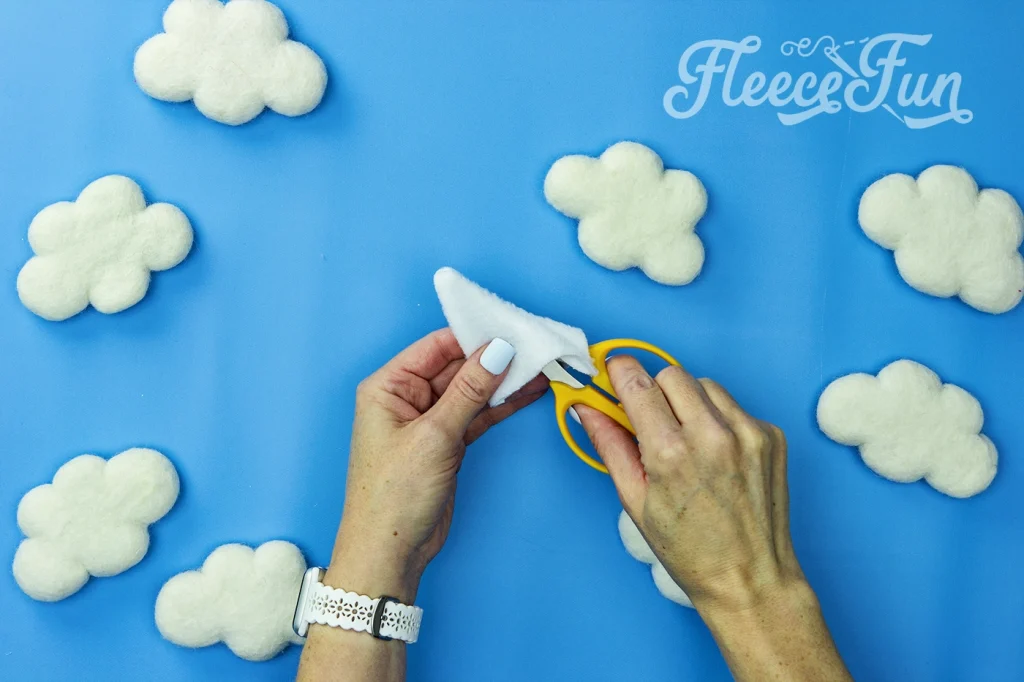
pushing the fabric so you will have a nice point at the top of your horn.
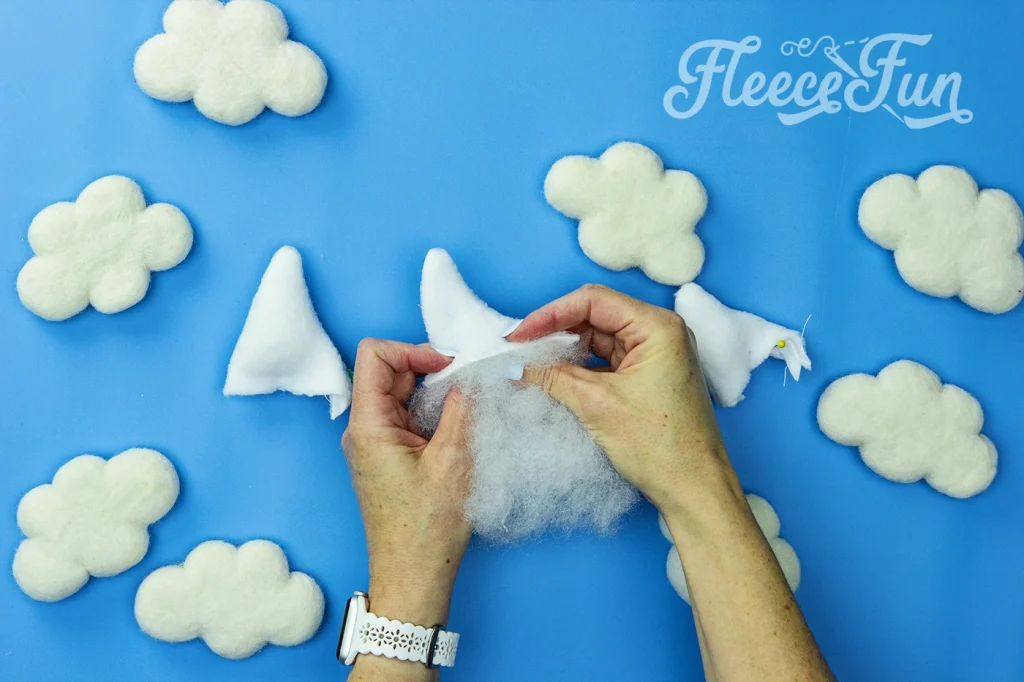
Stuff each horn with a little bit of poly fill or fleece scraps, making sure that there is a finger width’s of space at the bottom with no filling.
Step 3 – Finish Assembling the free fleece animal hat
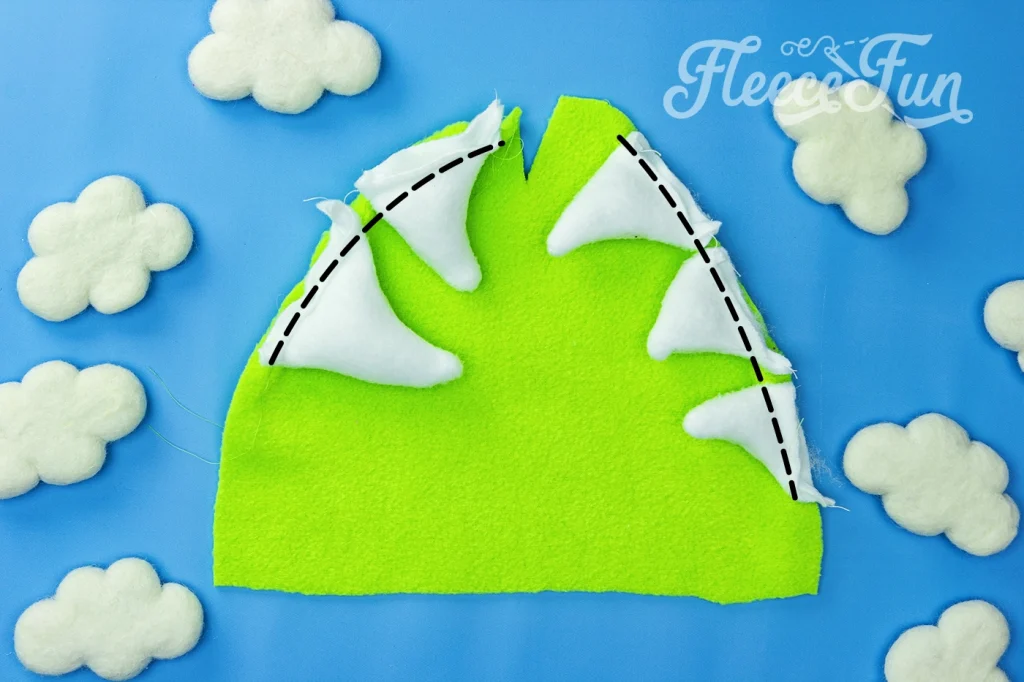
Place horns on right side of fabric as pictured. Pin in place. Then baste in place (this will make it easier to sew together.) For the Dragon Plates be sure that you leave a .5 space before and after the “v” to make sewing the hat shut easier.
Place other side of hat right side facing in on top, sandwiching the horns.
Quick Tip
Be sure the horns are facing inward.
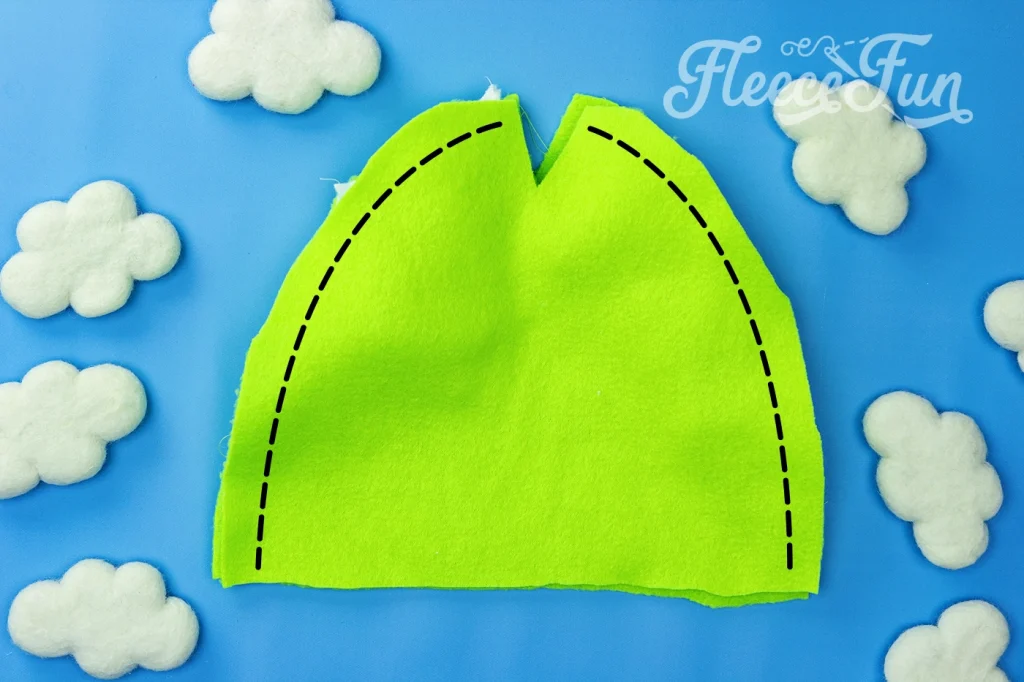
Using a 1/2 inch seam allowance sew each side of the hat (the long curved side to the point before it dips into a “V”.) Be sure to leave the bottom (the brim) open.
Now that you’ve sewn the sides of the hat it’s time to close the top. Finish using the instructions here.
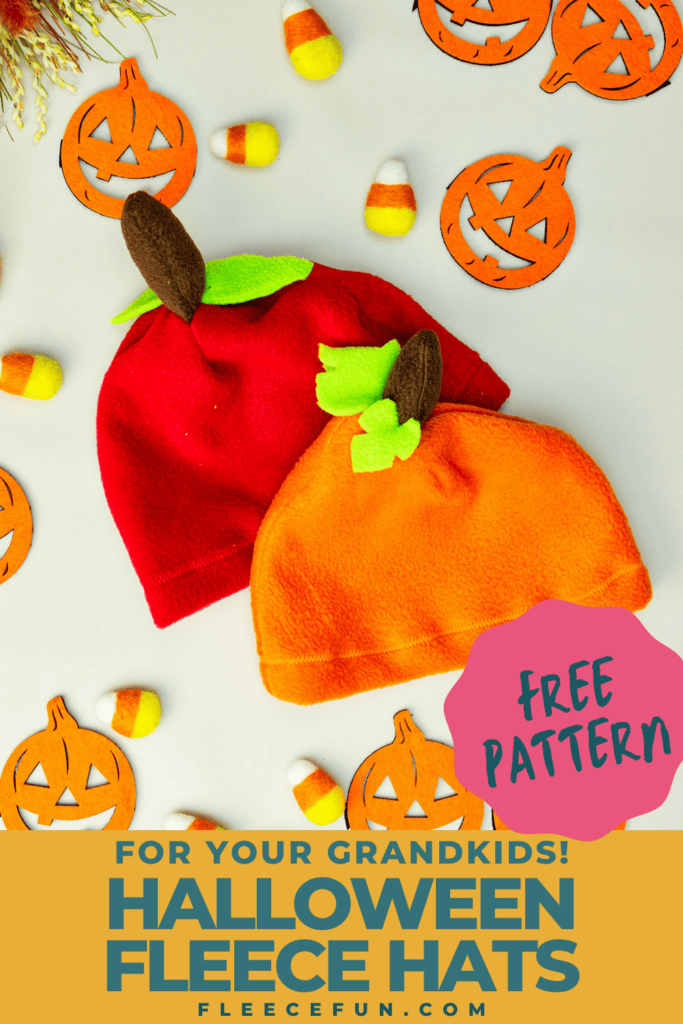
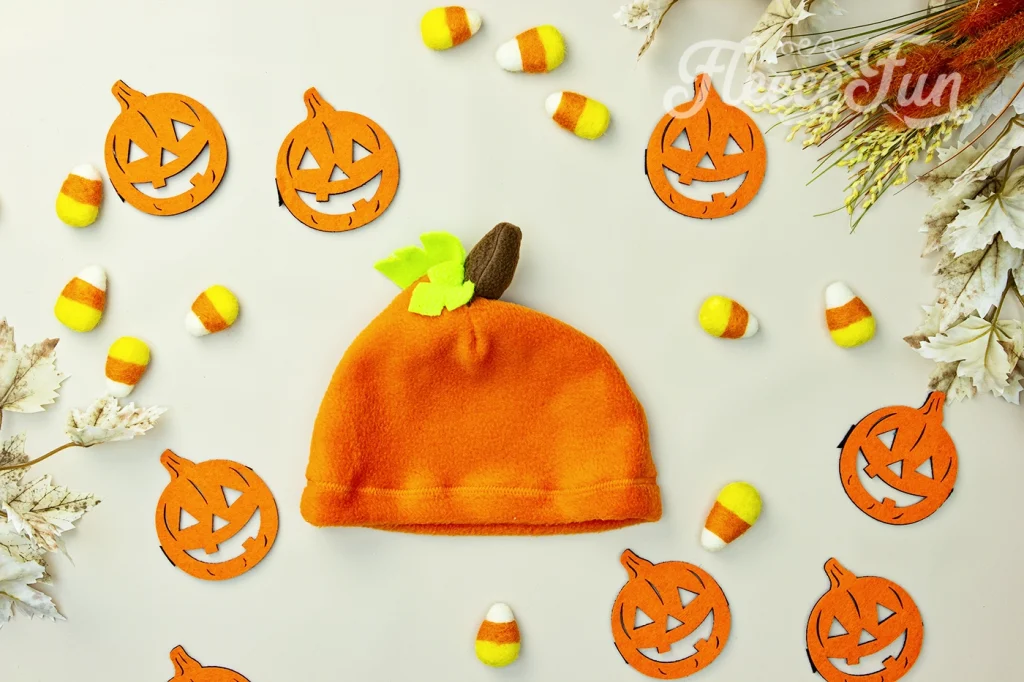
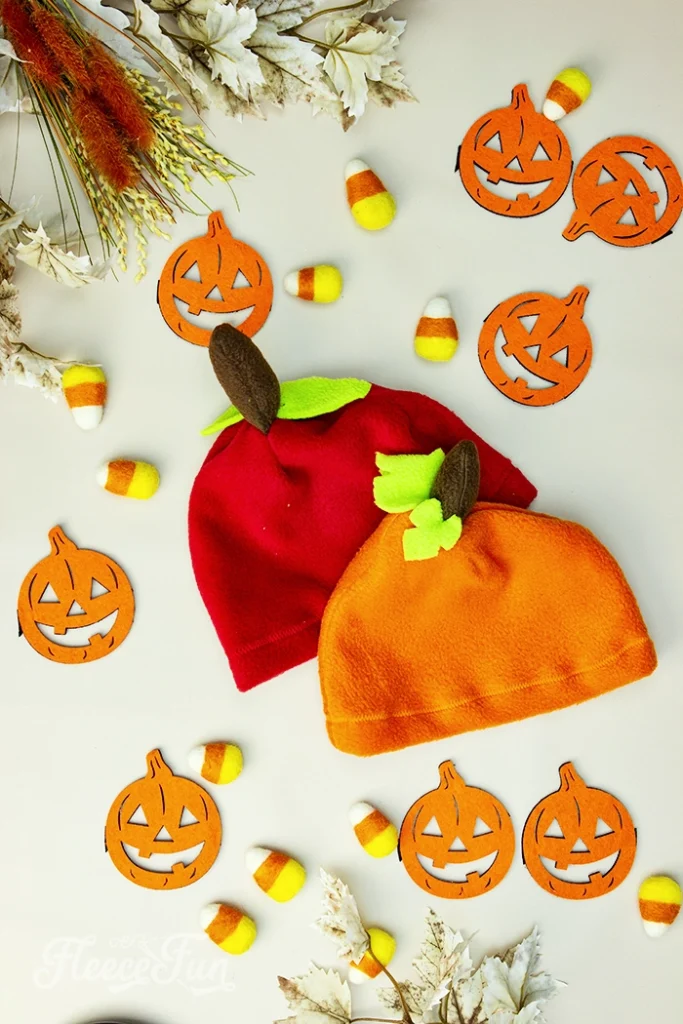
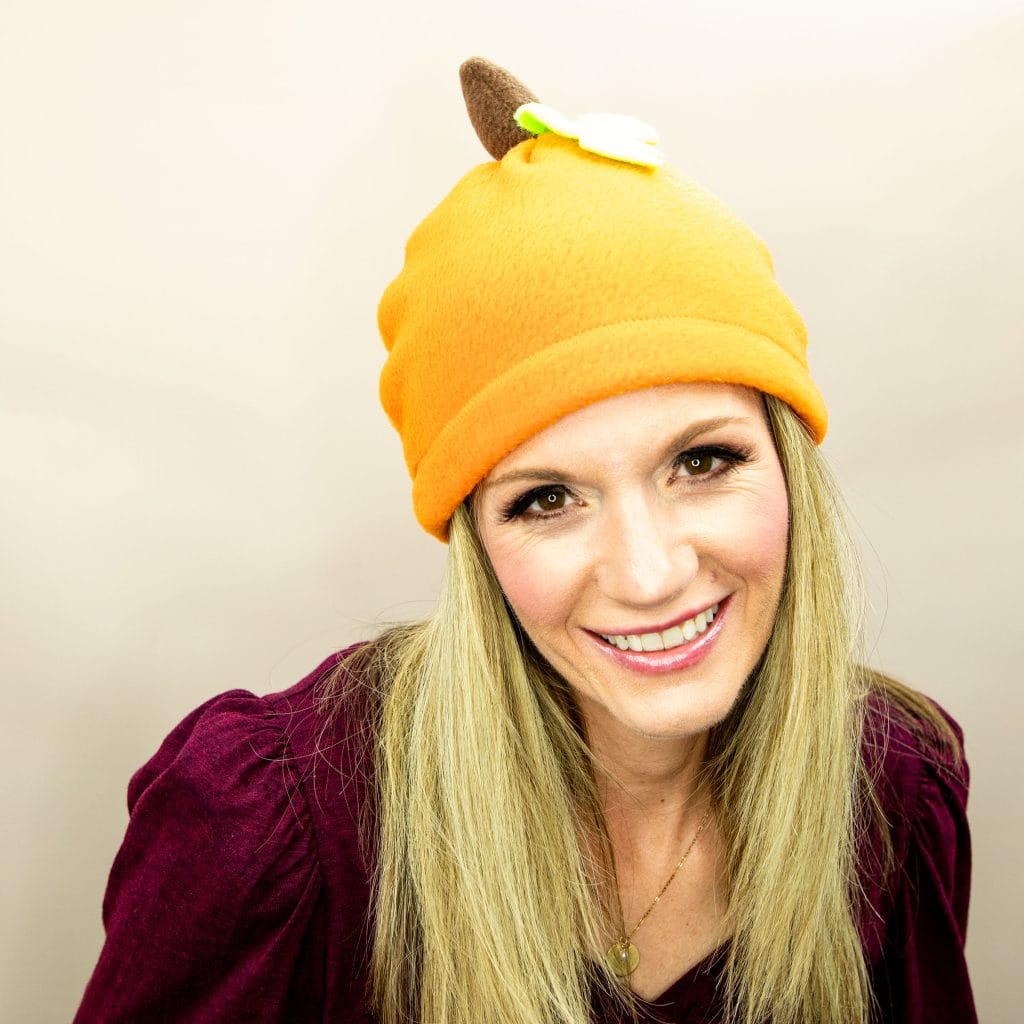
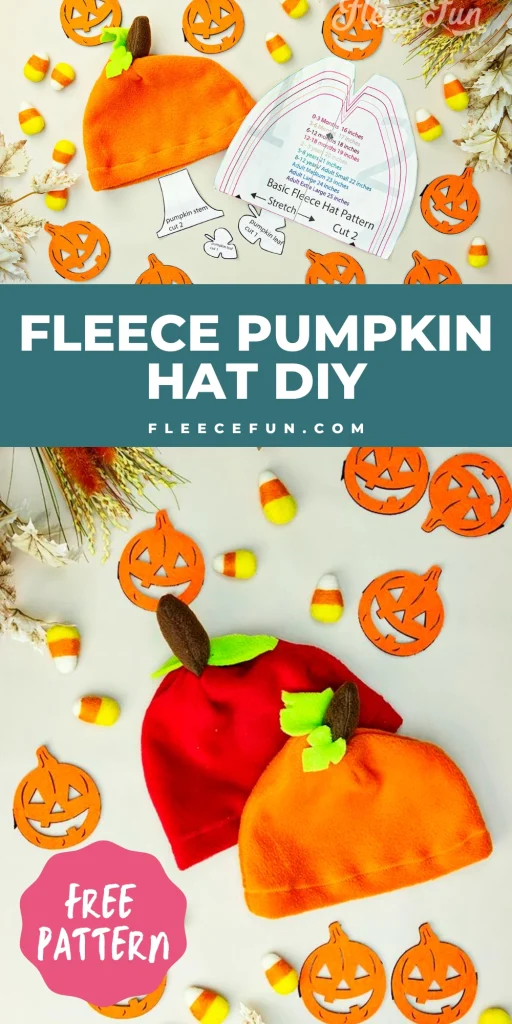
Pumpkin and Apple Fleece Hat Tutorial
So cute, you could just eat them up! These hats are very similar in their design and assembly.
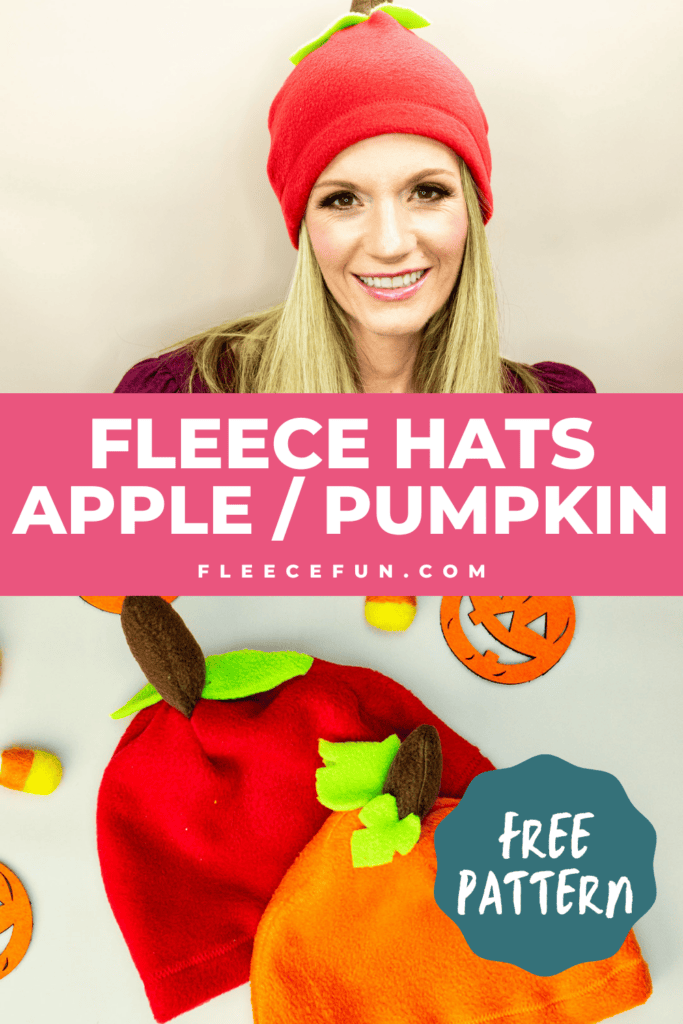
You can easily add a Jack o lantern face to the hat to give it a more Halloween look or leave it plain.
The assembly is the same on these hats the only difference is the shape of the stem and the leaves for each hat. Make sure that you have the right stem and leaf pattern for the type of hat that you’re making.
This hat also differs from the others when it comes to assembly. Instead of adding the items on the side seams they are added during the step of sewing the “v” shut.
Quick Tip
Because of the multiple layers sew slowly over the sections with the stems- it will keep the stitches more even.
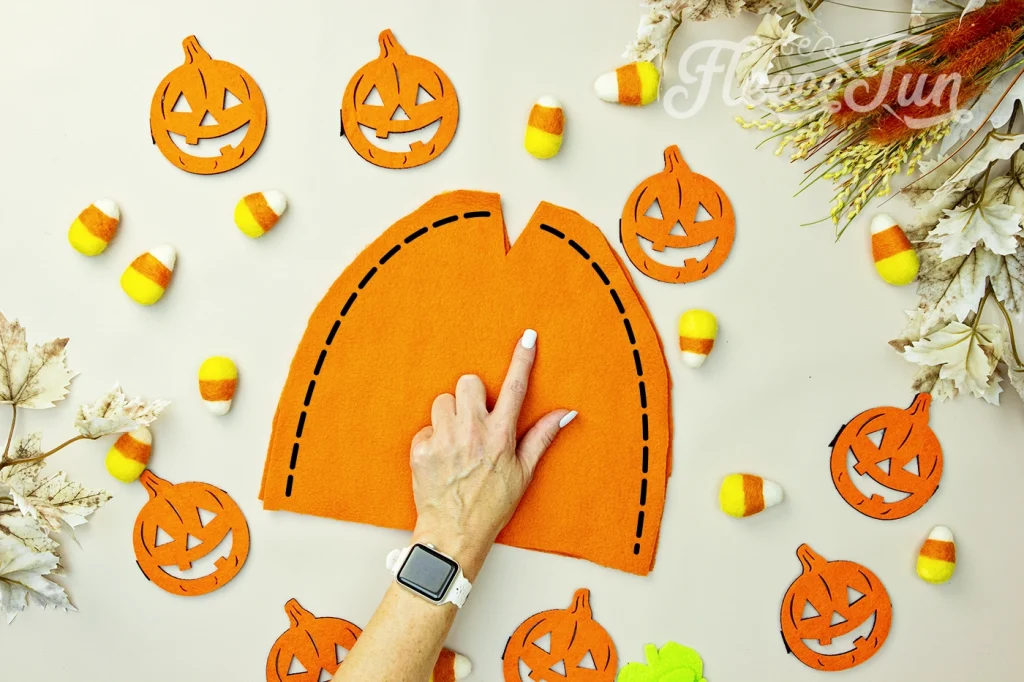
Step 1- Cut out the Free Pumpkin or Apple Fleece Hat Pattern Pieces
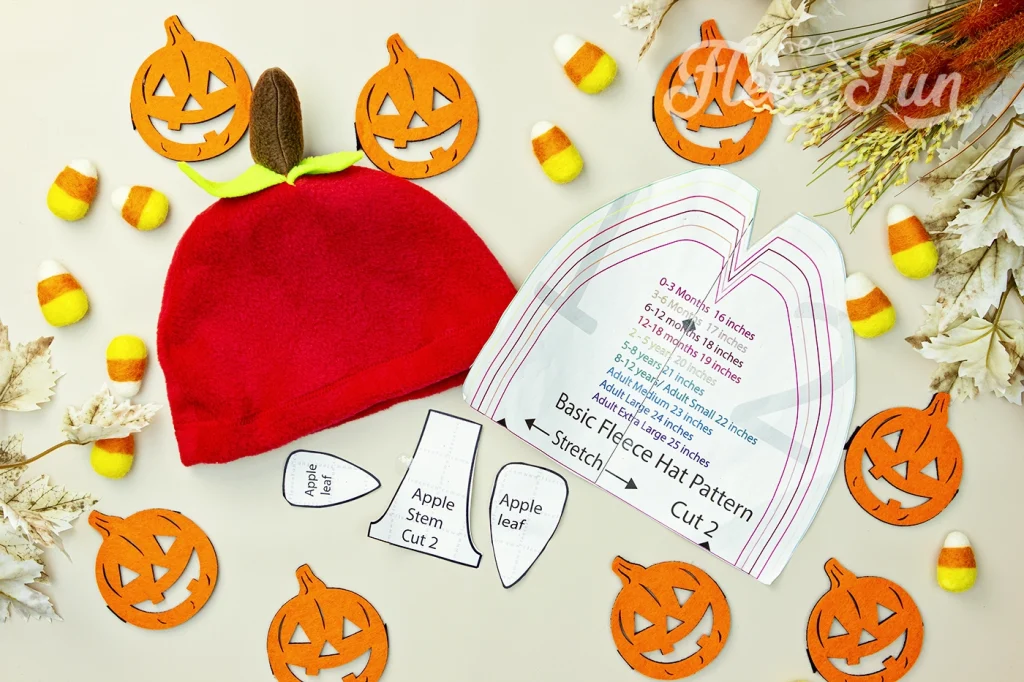
For the apple you will need 2 of the stem, and 1 of each leaf. You will also need 2 of the hat pattern in the size you desire ( the pattern comes in sizes baby to adult!).
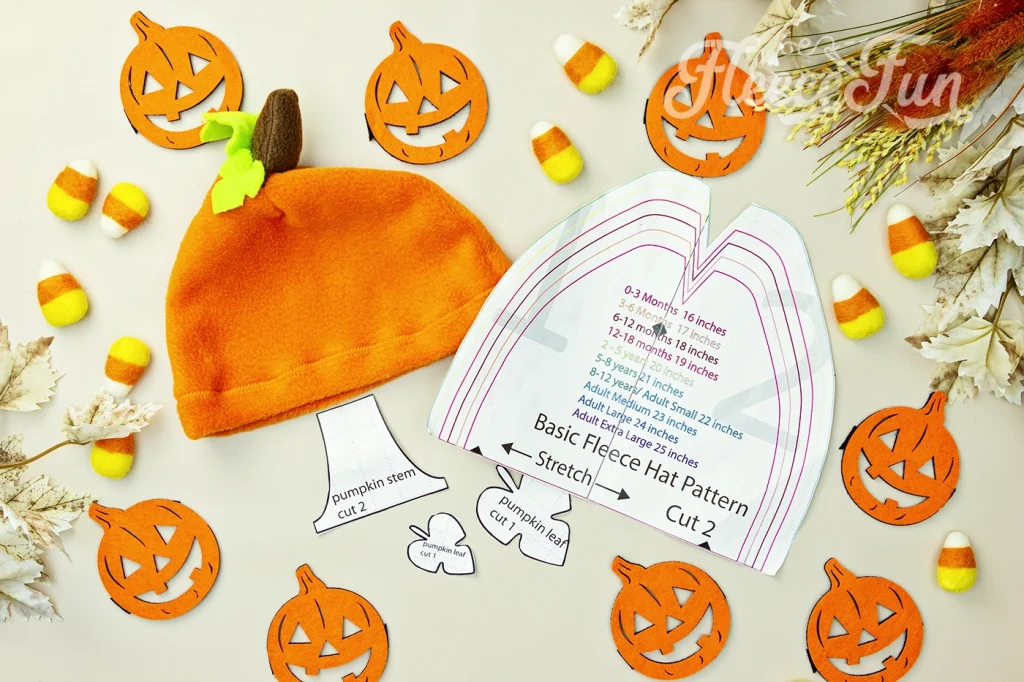
For the pumpkin hat you will need 2 of the pumpkin stem and one of each leaf. Cut out 2 of the pattern pieces for the desired size of fleece beanie hat.
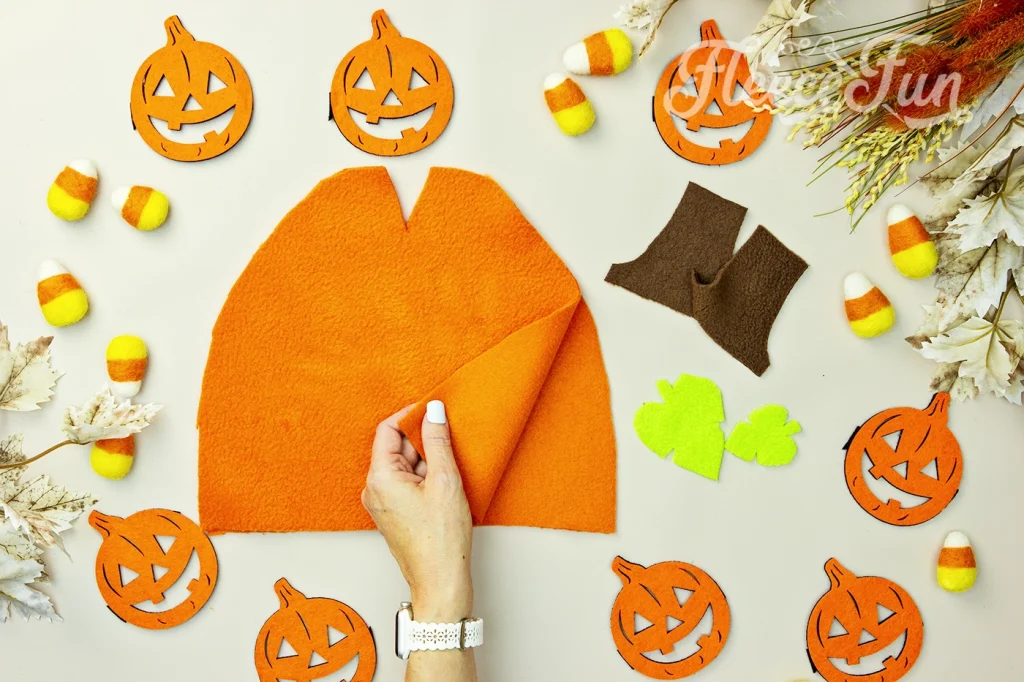
Because the patterns are so similar I’ll be demonstrating with the pumpkin hat, but the steps are the same for the apple hat.
Step 2- make the stem for the pumpkin hat Pattern.
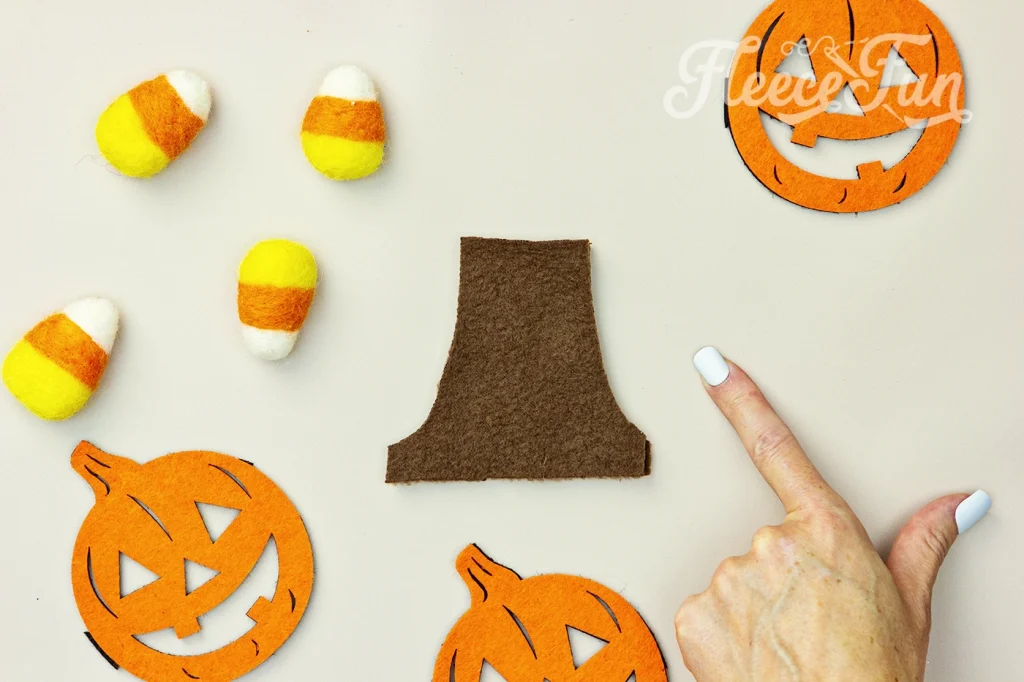
With right side together sew the stem, leaving the bottom open for turning. For baby and child use a .5 seam allowance. For adult a .25.
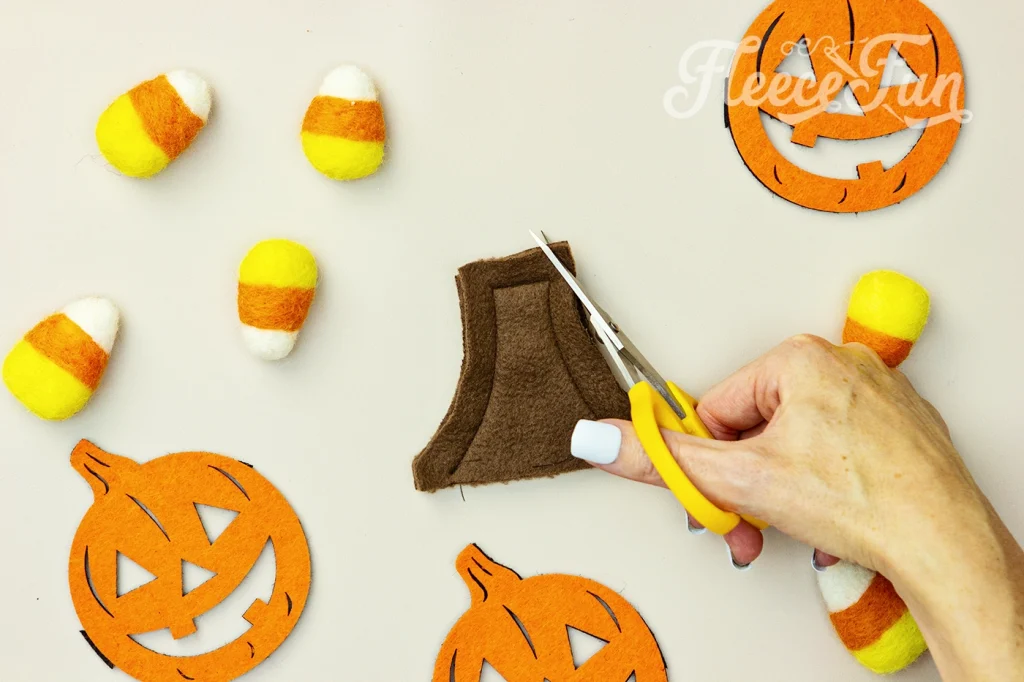
Trim the corners and snip slits in the curved sections of the seam allowance.
Turn right side out.
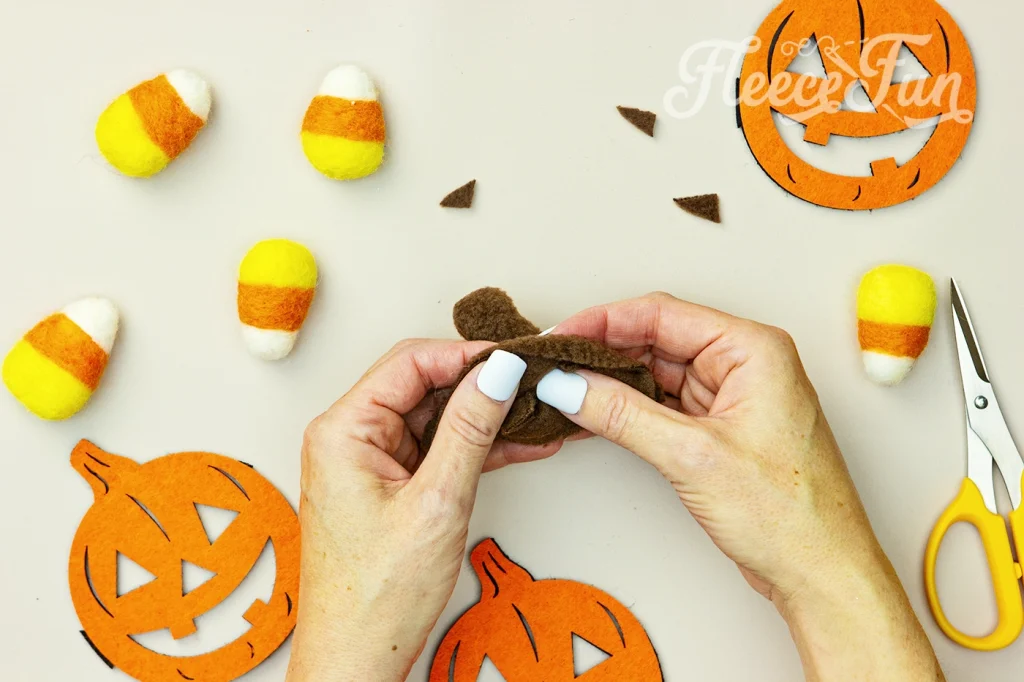
Then stuff stem using poly fill or fleece scraps leaving a finger’s width at the bottom not stuffed.
Step 3- Pin and Sew the sides of the fleece beanie hat
Using a 1/2 inch seam allowance, sew each side of the hat (the long curved side to the point before it dips into a “V”.) Be sure to leave the bottom (the brim) open.
Now that you’ve sewn the sides of the hat it’s time to close the top.
But first you are going to place the stem and the leaves (facing down into the hat – in between the right sides.). This way when you sew the “v” shut you will also sew on the stem and leaves. Place the leaves on either side of the stem.
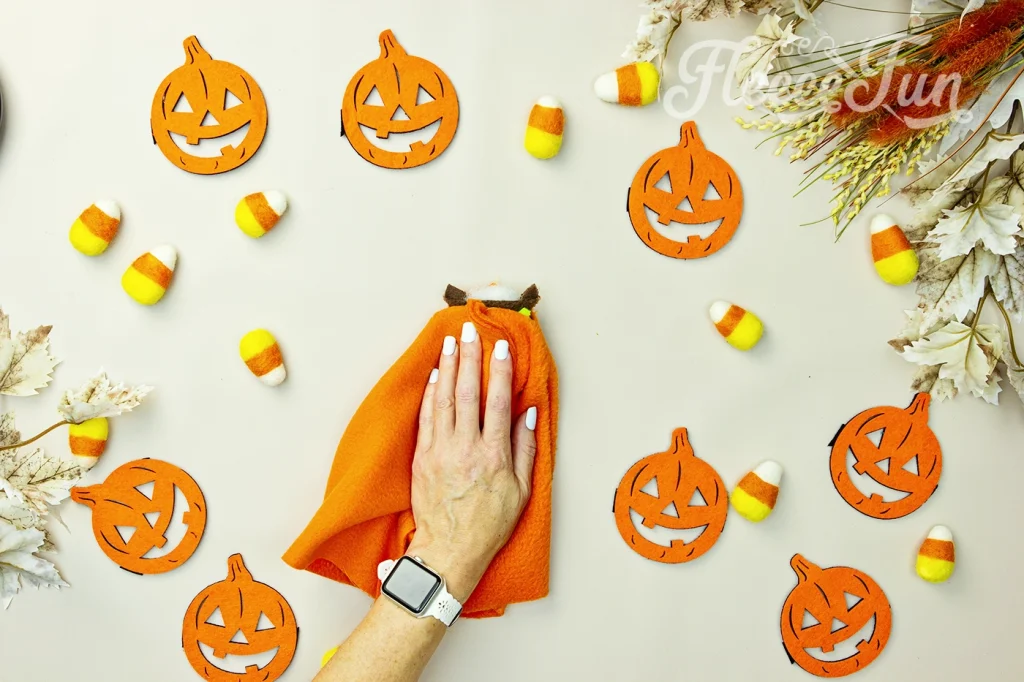
Fold the hat in half so the seams you just sewed are touching. Pin the “v” on each side closed.
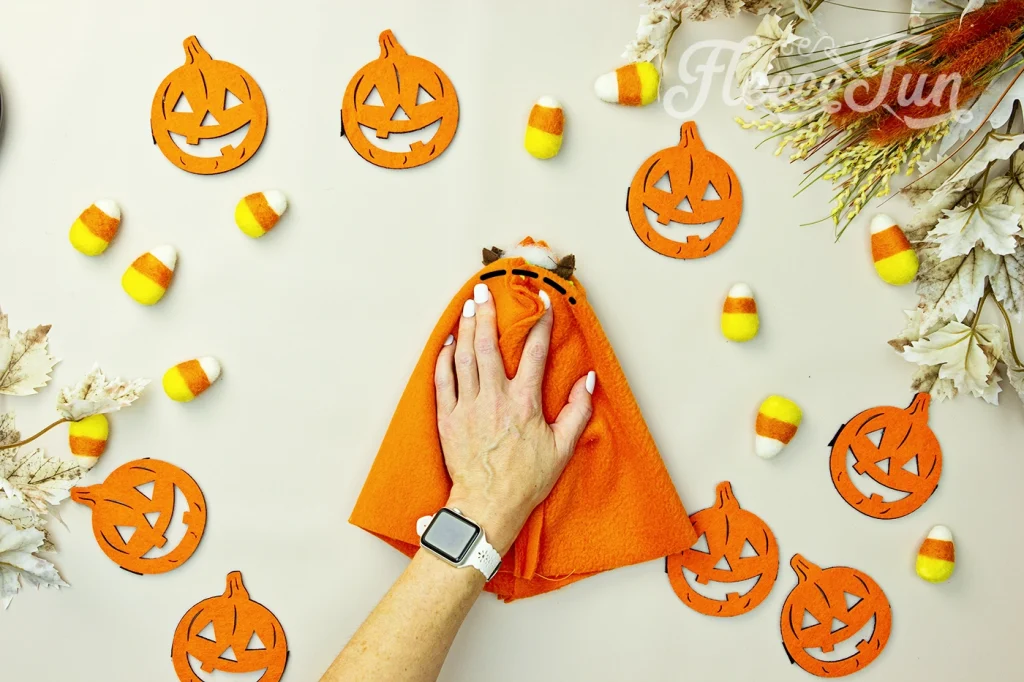
Sew one seam along the top of the hat closing the “v” on both sides. (This will make a rounded top.) This is process is very similar to a boxed corner.
Step 4 – Finish off the cute fleece hat
The hat is finished by turning the brim under 1 inch and zig zagging over the edge and then turning the hat right side out. You can see detailed instructions here.
Get the Free fleece animal hat patterns Below:
I only approve of Adobe reader. By downloading you are agreeing to pattern terms of use. Fill out this form to have it delivered to your inbox.

More Winter/Halloween Fleece Hats:
- Monster Mash Fleece Hat
- Fleece Bunny Hat
- Fleece Dog Hat
- Basic Hat with Horns
- Basic Hat with Bear Ears
- Fleece Unicorn Hat
- Fleece Frog Hat
- Ladybug Hat
- Monkey Hat
- Fleece Owl Hat
More Fleece Projects!
- Basic Hat (Adult, Child, and Baby)
- Fleece Winter Hat
- Fleece Hat with Ear Flaps
- Bow Ear Warmer Headband
- Fleece Scarf with Pockets
- Fleece Vest Tummies and Tails
- Fleece Vest Monster Legs
- How to Make a No Sew Fleece Tie Blanket
- Fun Facts about Fleece
- All Warm Fleece Hat Sewing Patterns!

Previously seen as:

Vey nice patterns, I can’t wait to try this and the patten for the cape ^_^ Great job, as expected. Thank you so much.
~Koala
I LOVE ALL of your patterns!!Thank you sooooo much for the free patterns!!I really appreciate you doing this!! My husband was just laid off and i am 9 months pregnant and i am making stuff for my baby and this helps us out sooooo much!!! THANK YOU AGAIN AND GOD BLESS YOU AND YOUR FAMILY 😀
SUZY OTT
Awesome patterns. Thank you SO much for making these available for free. I was going to purchase a car seat canopy cover/replacement car seat padding and it was going to be $30 JUST to ship it… It is supposed to be a free deal thing. We had a boy first and now we’re having a girl. I figured this would be a great way to personalize the old teeny car seat for a new arrival! P.S Would you, Could you… make a pattern for a car seat padding replacement? heh.
Hi Kristi!
Unfortunately I won’t be making a car seat padding replacement anytime soon for 2 reasons: 1 – there are so many baby car seat styles that it would be impossible to make one that would fit. 2 – Car Seat Manufacturers are against home made padding covers as they can interfere with the mechanics of a car seat and put a child at risk.
Fortunately the baby car seat canopy hides a used or well loved car seat. =)
Love love love these hats! And so do my kids… Made the Viking and dinosaur hats tonight. I had a really hard time getting my foot to go over multiple layers of fleece. Once it got started it would feed through pretty good, but at the next horn or seam and it wouldn’t move. Any suggestions?
Hi Morgan!
A couple of things you can try when sewing through lots of layers. Be sure that you have that finger width of “no batting” at the bottom of the horn so you’re not trying to sew through four layers of fleece and batting. You may want to try sewing it with a slightly larger/ sturdier needle. This can make a big difference when it comes to heavy layers.
Hope that helps!
– Angel
Any tips on how to make a horse hat? Looking for how to add a Maine to hat and ears?
Hi Kathy!
I think if you used the cat ears they might work for horse ears. Maybe try putting on the mane, like the dragon plates and then put the ears on when you sew the v shut. Good luck with your project!
– Angel
First of I LOVE everything! I was wondering if a child that was 5t would that be a size small child’s pattern?
Hi Jane – My five T fits a medium child hat – so I think that should work for you!
– Angel
Thanks so much!
Thanks so much! These were super fun to make and the grand-kids love them. Instructions were great. Going to use my scraps to make hats for our local homeless shelter. Thanks again!
Thanks for these awesome patterns and tutorial! I featured them on my blog!
Hi Julie!
Thanks so much for the mention – could you pretty please add a link? =)
Angel
I just made the dino hat and I love it! My head is warm and it looks super cute!!
Angel,
I have been recently visited your website and I am surprised. I really didn’t know how many things except of throws can be made with fleece. I have bought fleece and made pj for my kids. Now straight away for the hat pack 1 and 2.
Love your videos. Very helpful instructions. Your work is awesome.
Thanks so much.
I love these patterns, thank you so much for sharing them. A quick question I don’t quite understand these instructions for making the crease in the bear ear? “make the top and bottom of the line on the interior ear pieces on the right side of the fabric.” Am I meant to cut here or sew along the line or join the top and bottom together? I am a novice at sewing but would love to get the crease. 🙂 thanks again.
All you need to do is topstitch (stitch on the fabric – no seam involved) down the middle of the ear to make the crease. This is purely a decorative stitch – the ear will function fine whether you do this stitch or not.
– Angel
Thank you, that helps me a lot. My little girl has just asked me for a mouse hat I am looking forward to getting started now.
Terrific patterns! I’ve on my 5th hat now and LOVE them! We’re into hippos here at the present moment so I’ve been making the bear ears and sewing them down more like a hippo ear then adding eyes, nose, teeth etc to make them really look hippo – thanks for the easy to read directions!
I’ve just made one of your hats for a 10 year old boy, but I doubt it’s going to fit him… I took the teen/adult’s small size… As it’s for a gift I can’t measure the head, what do you recommend?
Anyway, I love your patterns and work instructions, they are really easy to follow.
HI Sara,
Boys heads are closer to being full grown – bet you the adult medium will fit him great. It’s hard to give “hard rules” for fitting as it can vary so much.
– Angel
Thank you for this pattern. I just made some of them to use for lamb costumes in our nativity this year. They are adorable!
When you fold the sides together, I’m confused… do you sew straight down the V or across the whole top section of the hat? Could you post a picture showing exactly where to sew?
I feel like an idiot since everyone else says how simple these are to make, and I can’t figure it out. 🙂
You sew across the top of the hat – if you check out the Halloween hat pack two video here – http://youtu.be/ydqAfqhLVEI . It shows it a little better.
– Angel
I want to print out the pattern to make a hat for my baby but all the infant patterns only have the small parts like the parts to make the eyes for the frog or the horn for the viking but not the actual hat part of the pattern…
Hi Janet,
You are welcome to store the digital file on your computer and or Flashdrive for personal use. You should be able to print the pdf file from it. As for giving you another version of the pattern – I can’t offer that, but you should be able to take your digital copy print from that. =)
Thanks,
Angel
hey , how can I make sure that my patterns that I take printout are of the right side, actually our printer has many options like, u want stretched size, or actual size, in portrait mode or landscape mode, wat shld I choose, plz help
They should print at actual size, in portrait. Basically I’ve tried to lay them out so you don’t have to make any adjustments to your printer – you just print. =)
I made a cow hat. I modified the Viking hat, adding ears below (sew together a brown Cat Outer Ear to a pink Cat Outer Ear, turn inside out, and fold 2/3 along to make a cow ear). The recipient was absolutely delighted!
Just Wondering, Im just learning to sew and I wanted to make these hat but not use fleece. Do they still hold up fairly well? 🙂 thanks so much your videos have helped me TONS 🙂
Hey Angel, Thank you so much for this tutorial, love it. I was wondering what are the vertical lines at the bottom for, if you don’t mind me asking. Thank you and keep up the good job.
It’s if you want to make the ribbon hat pattern. Just ignore them for the Halloween hat pack. =)
can I use wool fleece too?
Should work – just be sure to finish the edges so it won’t unravel on you. 😉
Angel
actually its not wool fleece its wool felt. I am still getting used to materials lol
Wool felt isn’t stretchy….so they may not fit well. :/ I’m going to make some from upcycled wool (wool sweaters from thrift store). 🙂
This is sooooo cute! I sewed the bunny hat and the bear hat and they are adorable!! Can I make a unicorn hat the same way?
Thanks a bunch,
A
I whipped up a fun dino hat tonight! 🙂 Check it out on my blog!
Thanks for the free patterns – these are fabulous! I made the Viking hat and used yarn to make braids for my daughter to go as a Viking for Halloween! Worked beautifully!
I love your patterns and can’t wait to make my baby a pumpkin hat! I read your terms of use but want to be absolutely certain that I am allowed to sell items that I personally make using your patterns, as long as I give you pattern credit. Is this accurate? Thank you so much for your wonderful patterns!
Hi Sarah!
Yes as long as you credit FleeceFun.com for the pattern you are welcome to sell completed items from the patterns!
– Angel
Thank you SO much for this pattern. I don’t really sew, but I am using a modified version of your pattern to make the head of a Hobbes costume for my son and I to be Calvin and Hobbes at Halloween. It is coming out great! The video showed me how to do the ‘V’ at the top which I wasn’t really understanding from the written instructions. You also did a great job explaining how to get so many layers through the machine. 🙂
Sew easy and SEW CUTE! I started with the cat but I have the Dino cut out too one for Grand daughter and one for Grandson and now I know what to do with all the scraps of fleece! THANK YOU SEW MUCH!
THIS IS AWESOME AND EASY! THANKS FOR THE PATTERN. i USED PUMPKIN HAT TO MAKE COSTUME HATS FOR THE CHILDREN UNDER MY CARE IN SCHOOL… I BET THEY WILL BE ALL CUTE IN THIS.
Really great hats. Can’t wait to make them for little friends. Thank you for the patterns.
So cute!
Does it make sense that my 3 year old has a 51 cm head? He’s quite a small child… Maybe I’m measuring wrong?
Drat!! Trying SO hard to open the hat pattern b/c my friend in sewing class whipped up the CUTEST purple kitty hat in about an hour the other night, but McAfee Web Gateway is denying Google Ad Services, saying it’s a conduit for malicious downloads. Any thoughts on how to open? (Note that I’ve been able to open/download your suuuuuuper cute boutique pants with no problem, but there was an envelope pic there rather than a green Download bar….)
Hi Dew, scroll down and you should see the same envelope type picture to download the hat pack. =)
– Angel
Thanks for the great pattern! I altered it a little bit to make a unicorn hat (so it has additions to the hat running in both dimensions). It worked out pretty well; my kids love it. It probably would fit a lot better if I had used fleece like your site recommends, but I used a minimally stretchy fluffy felt.
Thanks again for the fun pattern!
Thank you so much for your wonderful tutorials! I just started sewing this week and made your fleece pants and the dragon hat today for my little guy. They turned out really good which is surprising for my beginner status. Excited to go through and try more! And yes I did notice the pants run small. I made the 3-4T for my little guy who wears 2T and they were still a little snug around the thighs. I know i didn’t get as close to the edge on the seam as i should have though. Thank you so much!!
Hi, thanks so much for these patterns, I’m having loads of fun with them. I just thought I’d let you know that the small adult hat pattern came up too small for my 6yo son. This is NOT a complaint! I should have measured properly. I just thought you would like to know.
hello I’m from Brazil and I really liked your site and tips. thank you
I don’t have a machine. if I sew this with a needle w/ thread, will it work as well?
HI caedance,
You can sew this by hand and it should work fine – it just takes some patience.
Thank you for the free pattern and tutorial! I just made a monkey hat using your Halloween Pack, and it looks great (even though I am a sewing novice.) Thanks again.
Hi! I found this on pinterest. Thank you so much for the free pattern! I had a lot of fun and it was super easy! Thanks again!
Thank you soooo much Angel. I am 64 yrs young and I have just gotten back into sewing. I admit I’ve forgotten just about everything and these new machines are so incredible. I was so thrilled to see some patterns I can actually understand lol. I have a new grandson and all these patterns are going to be fun and get my confidence in sewing back.
It is very nice of you to let people have these patterns for free, your name fits you. 🙂
Grandma Jo (Joanne)
Hi Joanne! I am so happy that you’re enjoying the site! Your grandson is lucky to have such a living grandma to make him things 🙂
Awesome!! Hi, i’m from Brazil and I loved your blog, thank you for sharing your technics, you are the best =]
How do you determine what size to print the patterns out at?
THe patterns are to scale – no need to resize the print. 🙂
how do you find the link to print the pattern? I have been trying to get it for about 2 hours now.
You use the sign up form and have it delivered to your inbox.
I love these patterns, thank you so much
Hi I used the sign up form a few times but never received an email.
Please check your spam and try another browser.
Thanks,
Angel