
How to make a Mini Pirate Hat or Mini Tricorn Hat
This content contains affiliate links or sponsored elements, read our Disclosure Policy.
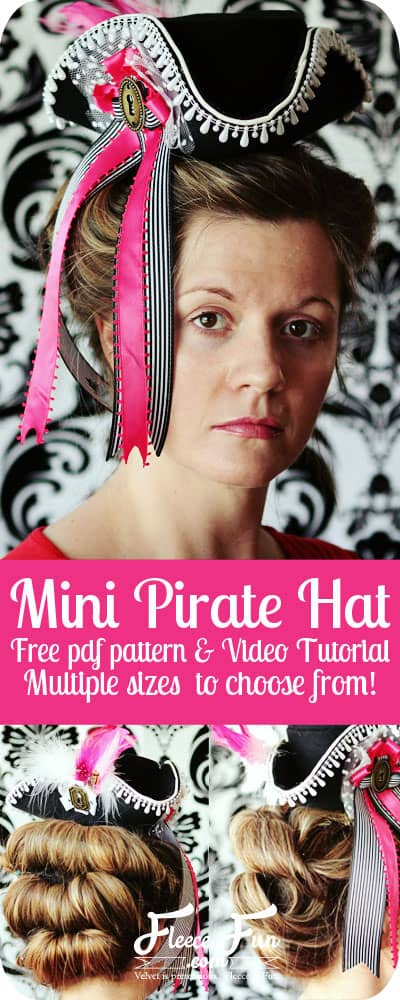
Ahoy, makers! Are you ready to add a touch of pirate chic to your Halloween costumes? Our Mini Pirate Hat or Mini Tricorn Hat tutorial is exactly the treasure you’re looking for! Using our free pattern and tutorial, you’ll create a cute and fashionable mini hat that’s perfect for any pirate costume.
These mini hats are not only fun to wear but also easy to customize to the perfect size for you- from Large to Mini sizes! Give your pirate ensemble a fun, feminine twist with a mini hat that even Elizabeth Swann would love to wear! So, grab your materials and get ready to set sail on a crafting adventure to create the perfect mini pirate hat for your next costume party or event!

The Large Hat is approx. 3.75 inches high
The Medium hat is approx. 3 inches high
The Small Hat is approx 2.25 inches high
The Mini hat is approx 1.75 inches high
YOU WILL NEED:
- 1/4 yard polar fleece or felt
- Items to decorate you hat (feathers, ribbon, tulle, brooches)
- Barrette Clips or combs
- Cording
- Hot glue gun
- spray on adhesive
- The .pdf pattern printed on card-stock.
- Sewing Essentials (pins, scissors, etc.)
- Sewing Machine
- Get the free pattern here.
You May Also Like:

Watch the Mini Pirate Hat or Tricorn Hat Video Tutorial:

Step-by-Step Guide: How to Make a Mini Pirate Hat or Mini Tricorn Hat
Step 1 – Cut Out the Mini Pirate Hat or Tricorn Hat Pattern Pieces
You can find instructions on how to assemble the pattern here.

You will need to print the pattern onto card stock as the pattern will become part of the hat.

Cut out the and assemble the pattern – be sure to tape the front and the back of the pattern seams (where the paper overlaps) .

Trace the pattern onto the cloth using a marking pen (or even a regular pen – as long as it doesn’t bleed through the fabric.

Be sure to trace the brim twice.

Once on the solid line. Then cut down to the dotted line and trace again. Be sure to also trace the hole in the center.

Then cut down all the pattern pieces (the cardstock) to the dotted line.
Step 2 – Prepare All the Pieces for the Mini Pirate Hat

You now have four pieces of fabric cut out. Set the smaller brim piece aside. Spray the back side of the card stock with glue and center on each piece (there should be about an allowance all the way around – except for the hole in the center of the brim. That should just line up with the fabric.

Using a glue gun, fold over the excess fabric and glue down along all the edges of the pieces. Leave the ends of the wall unglued. The wall seam will appear less bulky if you don’t glue the ends under.
Step 3 – Assemble the Hat Wall for Your Hat

Taking the wall piece, gently fold it around so the two ends overlap (see note). Glue ends together, be sure to hold it for a while to secure or use a clothes pin or clip to hold it in place.
NOTE
You should check to make sure that the wall and the top of the hat will fit together properly before gluing the ends of he wall together. Depending on the thickness of the fabric you are using you will need to adjust the overlap for the perfect fit.
Step 4 – Attach the Top of the Mini Pirate or Tricorn Hat

Once the wall is secure it’s time to add the top of the hat. Using your glue gun, glue around the the top part of the wall, just barley on the inside place top on glue hold in place to secure for a few seconds.
Step 5 – Build and Shape the Hat Brim

Glue cording along the edge of the brim, all the way around the hat (this will give the edge a nice finished look)

Then glue the smaller brim piece onto the cardstock, taking car the glue the edges really well.
Step 6 – Attach the Hat Wall to Your Mini Pirate Hat

Place glue on the bottom of the wall of the hat (lining up the bottom circles) and press firmly onto the brim. You may need to hold this for several seconds to ensure it is well glued. You should be gluing the wall to the smaller brim piece that you just glued down.
note
Place the seam where you will be folding up the hat. In my example I placed the seam in the back. The brim is an oval shape – the sides should be the thinnest part of the oval and the brim should be wider at the front and back of the hat.
For extra support tape a few pieces of tape between the brim and the wall of the hat.
Step 7 – Fold, Finish, and Style Your Halloween Hat

I strongly recommend that you play with the hat for a bit , before gluing the up the brim. You’ll note that the brim is an oval. The longer sides are designed to be the front and the back of the hat.

Start with the “back” side, glue the brim of the hat to the wall. Hold it for at least one minute and repeat two more times to make your hat. Add a couple of clips or a comb to make it so it can stay in place.

You can glue them directly or use a scrap of fleece to glue them on, or you could also use a length of elastic thread and make it stay on the head like a party hat. You now have a blank canvas to work with.
note
In the example, I made a large size. With all of the extras, it’s heavy – you’ll want a sturdy wig or hair in a bun to keep this on your head! The smaller sizes are lighter and easier to keep in place.
Now comes the fun part….
This for me is the best part! Add ribbon, tulle, beading, feathers, buttons, brooches, glitter, you name it and make this hat your own. I used tulle, feathers, ribbon and charms in the example. Old jewelry would work well too. Sky is the limit and your creativity reigns – what will your hat look like? Send me a picture (angel@fleecefun.com) or feel free to post it to the Fleece Fun Facebook page!
Some other ideas for this hat –
Trace the pattern onto scrapbook paper and make hats from paper for an even cheaper alternative.
Put together hat making “kits” for party guests to make their own mini top hat (great for pirate parties, birthday parties, girl’s night.)
The Mini size is so stinkin’ cute on little girls and babies – awesome for photos
Dress up a forgotten stuffed animal – and give an old toy new life.
Download the Free Mini Pirate Hat Pattern here.
You can get a free copy of Adobe reader here. By downloading you are agreeing to pattern terms of use. Click the picture of the pattern envelope to download the .pdf !

OTHER COSTUME HAT PATTERNS:
MORE HARRY POTTER CRAFTS:
- How to Make a Wand
- Hedge Witch Hat
- Free Hogwarts Robe Pattern (kid to adult sizes)
- How to Make a Spell Book
MORE HALLOWEEN TUTORIALS:
- Boo Witch Mason Jars
- Candy Corn Bowling activity/ printable
- All Hallows Eve Printable Party Pack
- Fabric Pumpkin
- Jack O’Lantern Finger Puppet
- Halloween Printable Treat Box
- Jack O’Lantern Tote
I absolutely love this! This will be perfect for halloween! (Even if it is a while off) I may even scale it down smaller and make it easy to clip in. 🙂 Thank you for sharing such a great pattern!
Thanks Maeghaen!
I’ll be adding a couple more mini sizes that are smaller in the future.
Everytime I try to print out the pattern for the Tricorn HAT, I can not get the part about folding and finishing. Why?
Hi Sharon!
I’m not sure why you’re having trouble, I just tried it in Google chrome and it worked fine… My suggestion would be try clearing your internet cache and try again. If that doesn’t work try a different browser and see if it helps.
– Angel
What size is the one the model is wearing in the photo?
That’s the large size.
If you don’t have a personal printer (like me), but have one at work, OR don’t want to buy cardstock, what I do is print out on regular paper and glue the pattern to a sheet of poster paper, then cut out the pattern. It’s very sturdy and works just as well.
Great tip Jessica!
Unfortunately you did not invent the tri-corner hat so you cannot claim it as your intellectual property. You would need to design something that doesn’t exist in order for you to claim sole right to sell these hats. Nice website though.
Hi Mary,
you are correct that I cannot call the “tricorn hat” mine. However the pattern that I personally drafted and the process and instructions I can copyright. Also I don’t sell these hats, I allow people to use my patterns for free. =) Thank you for visiting my site!
Angel
can the pattern be adjusted to an actual size tricorn hat?
Hi Sydney,
It could, but I would not recommend it. It would be extremely heavy and not very comfortable. I would recommend buying a felt one from a costume shop for comfort’s sake. 🙂
I just want to leave a little suggestion; depending on what pattern size you use take a few pipe cleaners in the brim. It makes it easier shaping and you can change hat shape.
Great idea!
What is the diameter of the hats? 12 inches?
I sent you an email asking if I could use your images for a module I am writing for an after school care program. Can I?
Hi Kenna, I do not allow my patterns to be used in for profit endeavors.