
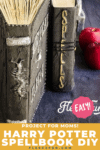
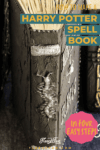
Harry Potter Spell Book DIY
This content contains affiliate links or sponsored elements, read our Disclosure Policy.
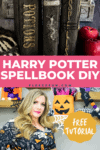

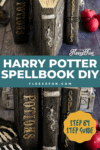
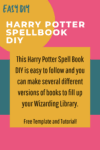
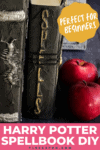
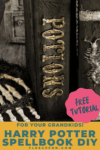
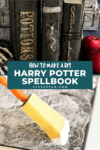
This Harry Potter Spell Book DIY is easy to follow and you can make several different versions of books to fill up your Wizarding Library. Be the envy of our Hogwarts classmates with your book collection! In the example I’ve kept the book s a little more generic, but you can easily label the books with some of Hogwart’s traditional curriculum such as: The “Standard Book of Spells, Grade 1”, “A History of Magic”, “Magical Theory”, “Magical Drafts and Potions”.

Calling all Harry Potter fans! Have you ever dreamed of attending Hogwarts School of Witchcraft and Wizardry? Well, now you can bring a piece of the magical world into your own home with this easy Harry Potter spell book DIY.
Get ready to immerse yourself in the enchanting world of spells, potions, and wizardry as we show you how to create your very own spell book straight out of the pages of J.K. Rowling’s beloved series. Grab your wand and let’s step into the magical realm together!
YOU WILL NEED:
- 3 hardcover books (I like finding them for cheap at the Dollar Store)
- Foam, puffy or 3d letter stickers
- Hot Glue Gun with extra glue sticks
- Embellishments of choice (plastic bugs, gems, stickers)
- Mod Podge
- Paper Towel – separated into 1 ply and ripped into sections
- Black Paint
- Metallic Paint
- Distressing Ink
- Ribbon or suede
- Standard Tools:
- Paint Brushes – small bristle brush and sponge brush
- Hairdryer
Harry Potter Spell Book DIY
Step into the enchanting world of Harry Potter, where magic and wonder await at every turn. Whether you’re a die-hard fan or simply intrigued by the mystical realm of Hogwarts, creating your very own DIY Harry Potter Spell Book is sure to ignite your imagination and transport you to a world filled with spells, potions, and fantastical creatures. Get ready to unleash your inner wizard as we guide you through the steps to craft your own magical tome that would make even Professor Snape proud!
Step 1 – Prep the Spell Book
Remove the dust jacket to the hardback book – discard. Make sure the book cover is free debris. Now we’re going to add embellishments to give the book some dimension.
Attach the foam stickers to make the titles on both the cover
and the spine of the book.
Use a glue gun to make studs, or patterns if desired.
Attach any embellishments that you would like to be black.
Step 2 – Add some “Magical” texture
Make sure your paper towel is separated into one ply and moisten with a couple of drops of water. Squeeze out any excess. You want it to be barely damp.
Place the book open with the hardcover sides facing up. Apply a layer of mod podge on the book.
Begin applying the paper towel in small sections to the cover of the spell book, back and spine. You want to make small wrinkles and work the pieces around any lettering.
Apply another layer of mod podge using a dabbing motion.
Use the hairdryer for about 5 minutes to dry. If you don’t use a hairdryer, you will need to let everything set overnight and it could take a few days.
To create the metallic raised bars on the side of the book, I used damp paper towel and molded it on with mod podge.
The “compass” on the front of the Mystical Places book was created by hot glue and a fake coin.
The pattern on the front of the spell book was created using 3D stickers.
Step 3 – Paint the Harry Potter Spell Book
Use a sponge paint brush to apply black paint to the entire cover, back and spine of the book. I find a “dabbing” motion to be most helpful with this craft … for all the painting steps.
Then, use the hairdryer again for about 5 minutes to dry the paint.
Use the small bristle brush to apply metallic paint to the lettering and any embellishments that were applied.
Try mixing golds and silvers for a really interesting look.
Use the hairdryer again for about 5 minutes to dry the paint.
Step 4 – Make the Pages Appear Worn and Old
Use the distressing ink to apply stain to the edges of the pages.
Crumble and bend the pages without tearing them to create a worn in look.
Finish your Harry Potter Spell Book DIY by adding gems or wrapping in ribbon/suede.
More Harry Potter Crafts:
love this harry potter Book? See More Halloween Tutorials:
- Boo Witch Mason Jars
- Trick or Treat Banner DIY
- Candy Corn Bowling activity/ printable
- All Hallows Eve Printable Party Pack
- Fabric Pumpkin
- Jack O’Lantern Finger Puppet
- Halloween Printable Treat Box
- Jack O’Lantern Tote
fun HALLOWEEN CRAFT PROJECTS:
- Fall Fairy Costume DIY
- Mini Pirate Hat or Mini Tricorn Hat
- How To Build a Pirate Ship Out Of PVC Pipe (Tutorial)
- DIY Mini Witch Hat (No Sew, Free PDF and SVG)
- DIY Halloween Garland – Cute and Funny Bats!
- Free Halloween SVG Decor – Easy And Fun To Make!
- Aladdin Magic Carpet Costume DIY (Free Pattern)
- Glowing Maleficent Staff DIY For the Mistress of All Evil
- Minnie Ears DIY Maleficent Inspired Style (Free Template)
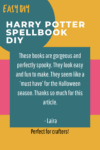
These books are gorgeous and perfectly spooky. They look easy and fun to make. They seem like a ‘must have’ for the Halloween season. Thanks so much for this article.
Amazing work. Book looks so fascinating. I love this idea a lot.
At the beginning of the tutorial it says:
“Remove the cover to the hardback book – discard.”
I know we are decorating the cover, but if we discard the innards, what do we put inside? The finished books shown have blank pages in them. Were did you get them to fit the book?
Thanks, this looks like a really cool project, but I’m confused how to do it.
sorry charlene it should say “dust jacket”