
Saturday Morning Scarf – fleece scarf tutorial
This content contains affiliate links or sponsored elements, read our Disclosure Policy.


This fleece scarf tutorial has a new twist – jersey knit ruffles! You can make a warm, comfortable scarf that is perfect for wearing on Saturday morning. The combination of the cool jersey with the warm fleece makes for a pleasing mingling of textures in this sewing tutorial.

YOU WILL NEED:
 1/3 yard fleece
- 1/2 yard jersey knit (t-shirt fabric)
- Rotary cutter, ruler and mat
- Thread
- Sewing Essentials (pins, scissors, etc.)
- Sewing Machine
There is no need to download a free pattern here, this pattern is so simple – none is needed!
Help I’m having trouble printing, downloading, understanding! Click here.
Watch the Fleece Scarf Tutorial Video or Follow the Written Steps Below

Saturday Morning Scarf – fleece scarf tutorial
step 1 – Cut out pieces
Taking your rotary cutter and mat cut the following strips :
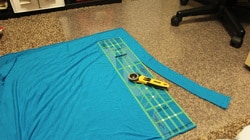
From the fleece cut 3 strips that are 3 inches wide (and 60 inches long)
From the jersey knit cut 6 strips that are 2.5 inches wide (and 60 inches long)
Quick Tip
Don’t have a large cutting mat? Just use a plastic office chair mat – it’s soft plastic so it won’t hurt your blade, and it can take abuse.
step 2 – Prep the knit pieces and lettuce edging (optional)
Sew three of the knit strips together – place wrong side to right sides (the the pieces of fabric are overlapping about .5 inches) and then sew together with a straight stitch, Repeat with the other three strips.

While this step is optional, this edging really adds to the body and “waviness” of the scarf. You can use a serger to make the edging or…..
if you are like me and don’t own a serger you can make “fake lettuce edging” for this fleece scarf tutorial.
To make fake lettuce edging, take one of your knit strips, begin to fold over edge (about and 1/8 to 1/4 of and inch) and sew along the edge using a wide zig zag stitch, that is close together (not quite a satin stitch, but tighter than the normal setting on you machine).
Sew, gently stretching the cloth before and after the sewing foot all the way down the edge.
note
Practice this technique on some scraps to get it down before you try it on your cloth. Heavier knits tend to do this better than very light knits. Also it doesn’t have to be perfectly even – it won’t be noticeable on the scarf!
step 3 – The fleece Section
Be sure to cut off the about 2 inches off the ends of the fleece strips.
Then, sew the fleece pieces end to end using the same technique we did with the knit – place wrong side to right sides (the the pieces of fabric are overlapping about .5 inches) and then sew together with a straight stitch.
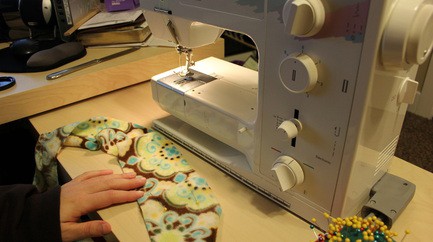
Step 4 – Assemble the Scarf and Attach the Knit and Fleece Pieces
Starting at one end of the scarf pin the knit on top of the fleece (wrong side to right side so the fabric is stacked and overlaps .5 inches. Pin all the way down and curve around the bottom (see picture).
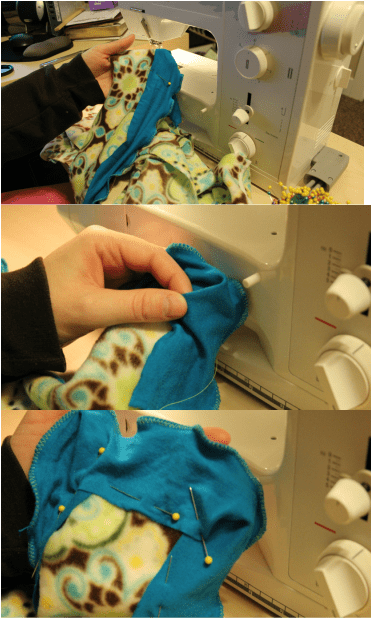
Sew on using a straight stitch. Then starting at other side, repeat, making sure you have both ends with knit.
step 5 – Add the scrunch
Almost done with this fleece scarf tutorial! Using a basting stitch, (a long stitch that isn’t finished on the ends) sew down one side the scarf to gather (do this in three sections, using the overlap seams of the fleece as a natural break, I recommend doing this in three sections as the scarf is long and there is a lot of gathering to do). Do the same on the other side.

Gather the scarf to the “scrunchiness” you want on both sides.
Quick Tip
This is a good thing to do while watching a movie. May I recommend “To Catch a Thief” with Carry Grant and Grace Kelley? =)
Step 6 – Set the Scrunch and Finish Your DIY Fleece Scarf

Now that you have your scarf gathered just the way you want it – it’s time to make sure it stays that way. Using a medium width, but slightly shorter zig sag stitch, over your basting stitch all the way down the scarf. Trim your thread and you are finished!
More Fleece Scarf Tutorials:
- The Lucet Scarf (cute braided scarf)
- The shirred scarf
- The Fast Fashion scarf (warmth meets a feminine touch)
- The Charmed to meet you Scarf (scrunched scarf)
- Fleece Scarf with Fur Pockets
- Candy stripe scrunch scarf
- Chevron Scarf
- The Bubble Scarf
- Color Block Scarf
- Bow Infinity Wrap
- Want to learn how to Hand Stamp your Scarves?
- You can see all of the Scarf Tutorials Here

Adorable Angel!! So glad your back. Do you happen to know if there are any new Hat patterns/instructions in the future??? I have the thought to pick a few days shortly before Christmas and take my (our) creations to my apartment complex and sell for last minute gifts. I have never sold any crafts and would welcome any advice you might have concerning a selling price. A close friend suggested that since the fleece is so inexpensive, I could ask the purchaser what THEY believe is a fair price??
Thanks again. You ROCK!!
Is there a print option to print just the steps without the pictures?
Hi Katie,
I recommend just copying and pasting the text in to a word document for your personal reference
If my machine doesn’t have a basting stitch setting, should I do a running stitch by hand for the scrunch part? I don’t really get what you’re saying in that step. Can you clarify a little for me?
Hi Christi,
a basting stitch is just a really long running stitch – so your machine can do it. Just set your stitch to it’s longest length and loosen the tension a little and Tada – basting stitch. 🙂