
Fast hooded cape free pattern and tutorial
This content contains affiliate links or sponsored elements, read our Disclosure Policy.


This hooded long cape can be made in under an hour. It’s simple, but elegant design makes it a versatile costume piece.

YOU WILL NEED:
- An 8 by 8 frame

- A printed out version of this pattern.
- 5/8 yard fleece for hood – plus what you want the length to be ( based on fabric that is 58- 60 inches wide)
- Thread
- Rotary cutter, ruler and mat (available here)
- Ribbon or leather cording (for the ties)
- Sewing Essentials (scissors, pins, etc.)
More FREE patterns you may also like:
The Red Riding Hood cape (with video)
The Snow Princess Cape (with video)
Designer’s Secret:
The hoods from the Red Riding Hood Cape, the Fast Long Cape, the Easy long cape and the Long Cloak are all different and interchangeable. So if you like the body of this cape but want a hood with a point on the end – you can use the hood from the fast long cape with the body of the long Cloak.
Fast hooded cape free pattern and tutorial video

Fast hooded cape free pattern and tutorial written
1- Assemble and cut out the Pattern
You will need to assemble the pattern. For instructions on how to assemble the sewing pattern, click here.
Cut out two pieces of the hood.
Set aside.
Make sure the remaining cloth has straight ends on each side.
The length of the cape is up to you. In the pattern example, I used 50 inches of fleece.
To determine the length of your cape, measure from your collarbone to where you want the hooded cape to fall.
note
This cape is designed to have a little rise in the front (this is to help prevent tripping on it), so the length you measure will be at the longest point of the cape in the back.
If you desire, cut off the selvage from the cloth.
(I confess, in the pattern example I didn’t) Take the negative cut-out and place it on the edge of folded fabric (make sure the part that is supposed to be on the fold is aligned correctly) and cut the bottom of the cape.
If you leave the selvage on like I did, the pattern will be a little short, just continue the curve and cut to the edge of the fabric.
Measure the length you desire from the bottom of the cape, then cut off the top using a straight line.
Step 2 – Make the Hood for your fast hooded cape
Take the two hood pieces and using a .5 inch seam allowance sew them together (1).
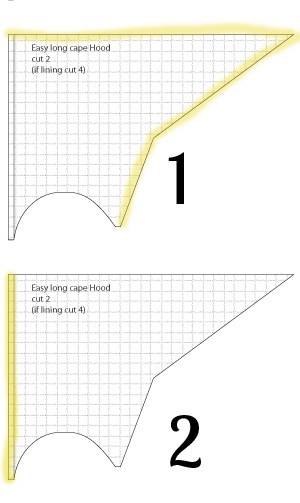
Then turn under rim of hood .5 and using a zig Zag stitch along the edge sew down (2).
Step 3 – Attach the hood to cape
Take the cape and sew a basting stitch along the top (the straight edge).
Gather the cape to the length of the bottom of the hood.
Pin right side together.
Sew the hood onto the cape using a .5 inch seam allowance. You may need to go slow as you are sewing through thick layers.
Step 4 – Add the Ties to finish your long hooded cape
Taking ribbon or leather ties, make them the length you want, and sew them onto the top edges of where the hood meets the cape. Trim your threads, put on your long hooded cape and chase your kids (or roommate) around the house—the kids will think it’s hilarious, the roommate will just think you’re weird.
Get the Free Sewing Pattern Below:

I only approve of Adobe reader. By downloading you are agreeing to pattern terms of use. Fill out the form to have it delivered to your inbox.
love this fast hooded cape? see more CAPES/CLOAKS TUTORIALS
- Long Hooded Cloak Pattern (Free)
- Easy Long Cape (Sew or No Sew)
- How to Make a Cloak in 20 Minutes
- The High Low Cape with Pixie Hood
- How to Make a Child Cape or Car Seat Poncho
- Cowl Capelet Free Pattern
- The Amazing Cape Secret on Fleece Fun
- See more of our Cape Patterns here
MORE CAPES FOR YOUR HALLOWEEN COSTUMES:
- Harry Potter Inspired Wizard Cloak
- The Red Riding Hood Cape (with video)
- Batman Cape Costume Tutorial
- Queen Elsa Cape Tutorial (Includes Jacket Warmth)
- The Snow Princess Cape (with video)
- Easy Superhero Cape Tutorial
Be sure to check out all of my costume tutorials here.

More Costumes You Might Like:
- The Lord of the Rings DIY Costumes
- Flapper Costumes
- Green M and M costume
- Pinata Costume
- Willy Wonka Bar Costume

I made this cape for my 8 yr olds Halloween costume (Merida from Brave). I took some liberties for size and shape but it turned out great! Thank you so much for the idea and pattern!
Can i ask? how can i get the size of the hood to make it exactly right to my head? and where can i get the patterns for this? please need help ! i cant figure out how to do this 😀 Thanks
Hi Alrish,
I’m not sure what you mean by “exact right size”. Mid-evil capes are not tailored – they were typically a “sort of fit” which is what this cape is modeled after. It’s sized for an adult. So if you an adult it’s your size.
im 13 yrs old maam 😀 so im actually an adolecent 😀 or maybe a teenager 😀 haha
oh sorry im 13 yrs old 😀
Fun! I’m going to make it in white blizard fleece and sew white fluffy ribbin around the edges for a Snow Queen Christmas costume! Thank you so much for the pattern, it would have taking me 3 times longer to figure it out 🙂 Nice work!
This looks like an awesome pattern – I especially like the hood, but can’t connect to the pattern I think the link has a problem. Please could you email me a copy if it’s not too much hassle.
done!
Love it! Once I had the pattern assembled I made it in 20 mins! I actually cut the fabric out of a old sheet and didn’t have to finish off all of the edges.
Awesome – great idea with the sheet!
I dont understand the shape of the hood pattern or where to sew what. Please add some more details into the patterns picture. (What goes where, whats the face of the hood, what gets sewn to the cape, whats the back of the hood?
Hi Guppy.
Please watch the video for a better explanation. =) The yellow highlighted lines on the pattern pictures show what seams to sew.
– Angel
Hi! I love your pattern for the fast hooded cape! Is there a way to slightly modify the hood pattern so that the hood is rounded instead of pointed? Thanks!
Hi Angela,
You can swap this hood for the hood on the red riding hood cape – they are interchangeable!
I made two of these capes for my granddaughters yesterday. What a FABULOUS pattern! It was quick and easy and I was able to modify it for the kids. The first was made out of a soft, light plush fabric and I put a braided trim around the hood and part way down the front, then added a metal clasp – adorable! The second was made out of a twin-size sheet. Can I tell you? Super easy! Zero hemming!!! The sheet had a pretty hem with some satin at the top and this is what I used for the hood, that tiny bit of satin trim made it pop. Also, I used the bias edge for the bottom hem and the front was already turned and sewn. Easy-peasy! I didn’t end up using the curved front end, as the girls wanted it long all around. Thank you so much. This was a great project for all of us. And we even have enough fabric to make mini capes for their AG dolls. 🙂 <3
Have just made this and found it so simple! ( and I’m no master sewer)
I have made it to wear to a wedding (to keep me warm in an old church in January!!) and have used some pretty ribbon for the tie.
My only question is, is it normal to still get ‘movement’ along the basting line once complete? I’ve stitched the ends over so it can’t come undone, but I can hear it move a long the basting thread when I put it on (hope that makes sense?)
Thanks for this great pattern
It sounds like that in some section the final seam – where the hood and cape join is above the basting stitch so your getting that movement sensation. If the hood is well sewn onto the cape you should be ok. 🙂
hi how are you my question is. what are the measurements to make this pattern so for someone who can’t print it can make it themselves
Hi Ashley. This tutorial is based in the pattern. If you are looking for a tutorial that doesn’t require a patter check out allfreesewing.com
It was fine and looked great. Had some nice comments from other wedding guests too (and felt rather smug when I told them I had made it! !)
Lol!
My teenage daughter needed to be Little Red Riding Hood for a play at school, and this was perfect. Took me more than an hour, more like 4, but I had to get all my sewing stuff out first. I was also a little slow figuring out that I needed to print all the pieces of the pattern and then tape them together. Once the lights when on, it was a sinch. Thanks, and she loves the cape.
Hello, What am I doing wrong please? I’ve subscribed twice already but as soon as I try to download the pattern the box comes down over it again asking me to subscribe yet again!?
Many thanks
Shirley
Hi Shirley! You need to confirm your email (check your spam folder). Make sure that you’re allowing cookies because that’s the site knows you’ve subscribed. 🙂
Am I correct in figuring that I have to actually make the pattern pieces from the pattern pieces I printed out by using 1″ scale paper to blow them up? Both pieces of the pattern together that printed out are smaller than one piece of computer paper. I can’t find a place to download larger pieces that I can tape together. Thanks.
It sounds like you’re only seeing part of the download. I just checked it’s there. It’s 13 pages long. Be patient and let it all load to print. 🙂
Hi, I love the pattern but was wondering if the hood from the red riding hood half cape would fit the pattern of this cape. I want to make a long cape but prefer the other hood. Would that work? Please and thank you.
Yes it’s designed so you can swap them out.
Used this pattern to make myself a cape for World Book Day – I dressed up as Frodo Baggins, it made a perfect Hobbit clock.
Just a little feedback on the video tutorial:
The making of the cape went by a little too fast. Can’t really see what you were doing.
It actually took several hours to figure out what was meant with the “negative patern” and all, esspecially as a beginner. And that that was actually the piece that wasn’t meant to be there as part of the cape. It was bit confusing at first.
Lucky it worked out in the end.
I am sorry that you found that confusing – I figured a negative cut out is a lot easier than assembling sheets upon sheets of pattern for what is a simple shape.
When I click the link the page it takes me to is blank, would it be possible to email the pattern? Thanks!
Paula you already have the pattern you just downloaded a zip file. Check your Downloads folder and unzip the file.
I love the cloak and it is my very first sewing project…ever. I am almost 52! The directions were easy to follow and the video tutorial was awesome. I probably watched it 20x to make sure I didn’t make a mistake. The most difficult part was the basting stitch and pulling in the gathers. I broke a lot of thread, but I searched around for other video guidance on how to do it without breaking the thread. So, I let up the tension and that made all the difference in the world. Thank you so much! I can’t wait to wear my cloak.
Hi Carol!
That’s wonderful! I am happy your had a successful project!
I am trying to download the pattern but every time I enter my first name and email address the response Recaptcha not valid (0.3) comes up. Please help.
Sent Check you email.
Thanks for the pattern . The cape turned out great. Made it for a “Cindy Lou Who” costume for a Christmas Party. Much appreciated
I have tried downloading the free cape pattern but have had no success. At first I used my auto complete to do it but then saw the notice that it doesn’t work so entered my name and email address manually but still no luck. Please help! I want to make a hooded cape for my grandaughter for Halloween.
According to my records you’ve been sent an email. Please make sure to check your spam folder and whitelist hello@fleecefun.com