
Princess Anna Cape Tutorial (free pdf pattern)
This content contains affiliate links or sponsored elements, read our Disclosure Policy.
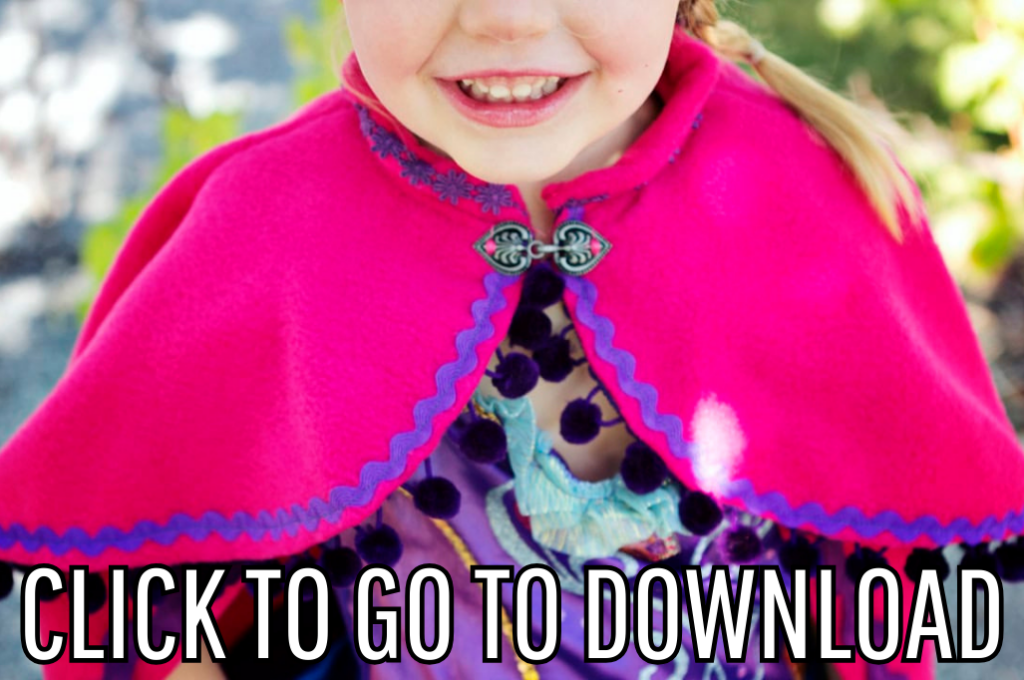
This snow princess cape is inspired by Princess Anna’s cape in Disney’s Frozen. I have two little girls and guess what they’ve been telling me they want to be for Halloween for the past 10 months? This Princess Anna cape tutorial is cute and functional and a pretty decent homage, if I do say so myself. It’s also great for trick or treating on a cold night.
You can find more pictures of the completed project here. You can find the free pattern and tutorial for a matching Snow princess hat here.
Hate The Ads?
This pattern with video and printable instructions is available to members of the Maker’s Studio. The Maker’s Studio is an ad free experience, no video ads, no forms, no zip files, just creating.

YOU WILL NEED:
Planning a Disney Vacation? Use the code “FLEECEFUN” to get get an extra $10 off any 2-night or longer Southern California package (hotel and 2 ticket minimum) when you book here.
- 1 1/2 ( 1 and 3/4 for size 7 – 9) yards of fleece
- 1 7/8 yards of purple pom poms ( 2 yards for 7-9)
- 1 7/8 yards of small purple ric rac (2 yards 7 to 9)
- 15 inches of purple decorative trim for collar ( I used a flower chain trim)
- 3 yards of large purple ric rac
- One silver heart clasp
- Thread
- fusbile interfacing
- Sewing Essentials (pins, scissors, etc.)
- Get the free pattern here.
princess anna cape Video tutorial

The Princess Anna Cape Tutorial
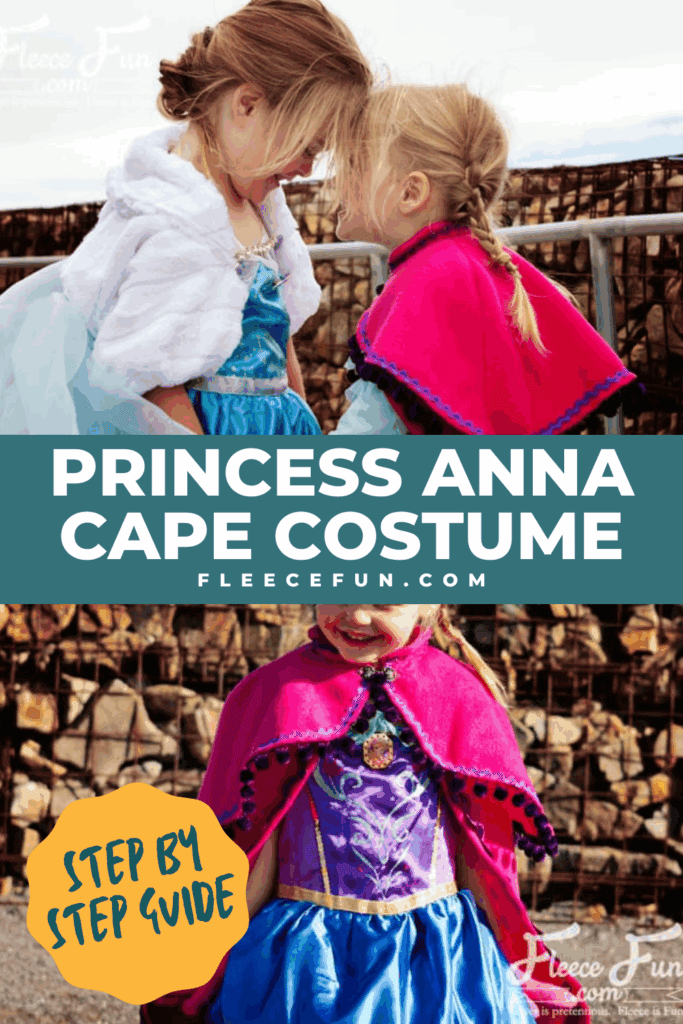
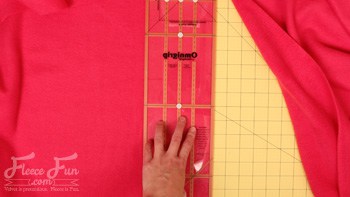
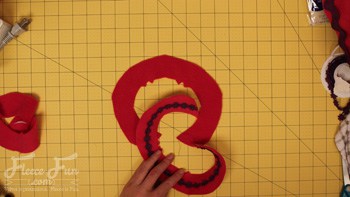
step 1- Assemble and cut out the Pattern

You can find instructions on how to assemble the princess Anna cape tutorial pattern here.
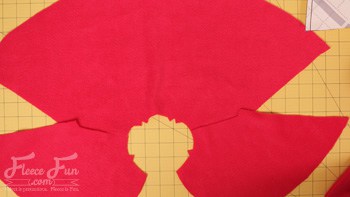
Take the following measurement: Measure from your child’s base of neck to their ankle or wherever you want the cape to fall.
Cut a length of fleece the length you measured.

You will need to cut down the width of the fleece as well to match the width of the cape bottom, doubled.
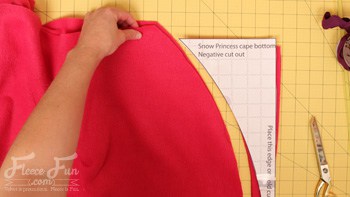
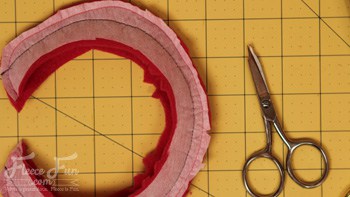
On folded fabric place the cape bottom and cut off the bottom to make a curve along the bottom.
Place back of cape on the fold and cut 1.
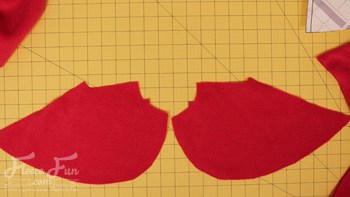
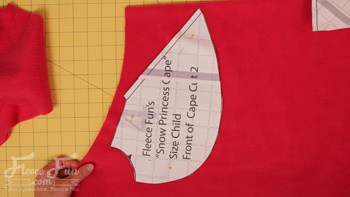
Cut two of the front of the cape.
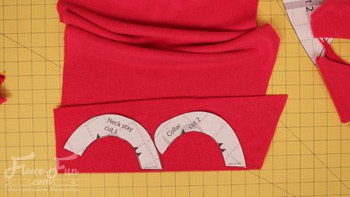
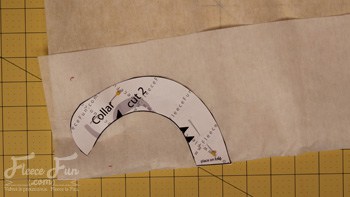
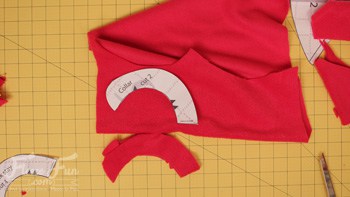
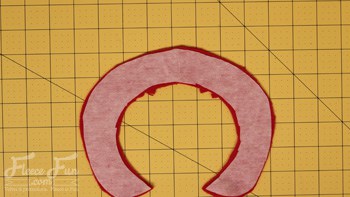
For the collar, cut two pieces and place them on the fold.
Cut out one of the collar piece from interfacing
Cut out one of the neck stay (be sure to place on the fold).
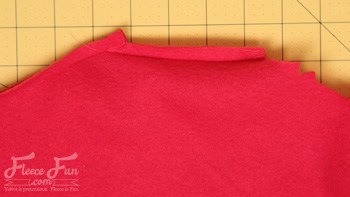
step 2 – Assemble the top cape piece.
Take the back and two front pieces.
Using a .5 inch seam allowance seam allowance, sew each of the front pieces to either side of the back piece to begin assembling your Princess Anna-inspired cape. First sew the side seams and then sew the shoulders.
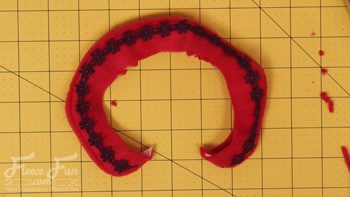
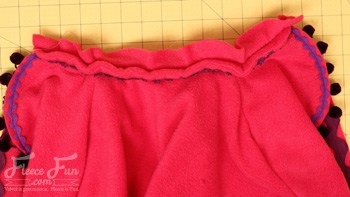
step 3- Add decorative trim to top cape and bottom cape pieces.
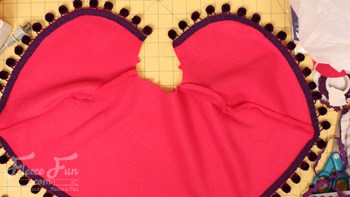
Sew on decorative pompoms on to the top cape piece.
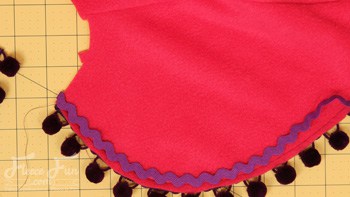
Then sew small ric rac onto the top cape piece.

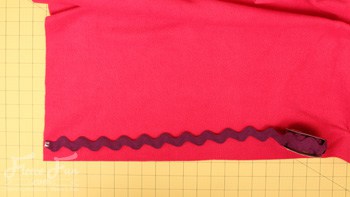
Sew jumbo ric rac onto bottom cape piece.
Take one of the collar cut outs and sew decorative ribbon or elements to the center if you like.
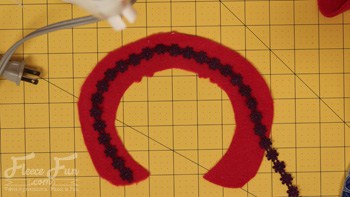
step 4 – Assemble the collar
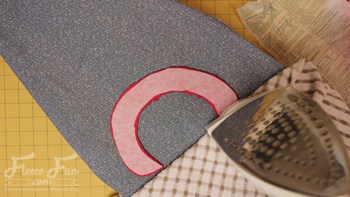
Take the collar pieces.
Take the cut out of the interfacing and cut it down so it’s about a quarter inch inside the fleece collar.
Iron on.
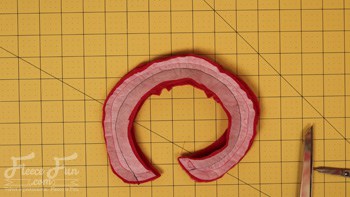
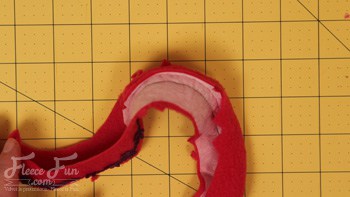
With right sides together, using a .5 inch seam allowance, sew the two collar pieces together, leaving the inner curve open for turning.
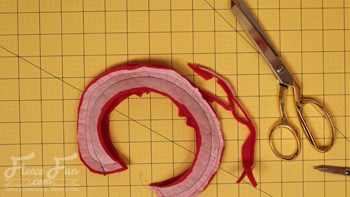
Trim down the seam allowance and snip notches into the outer curve.
Turn right side out.
step 5 – Prep the back of the cape to line up
Sew a basting stitch along the top of the cape bottom (long) piece.
Gather to the neck line to the top cape.
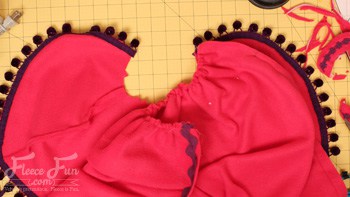
Place the right side of the cape to the wrong (under) side of the top cape. Tack or baste down.
step 6 – Bring it all together to finish princess anna cape
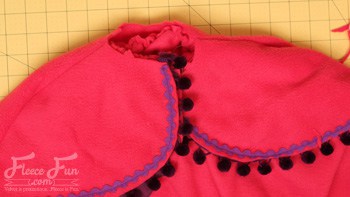
Flip cape over add the collar to the top right sides together.
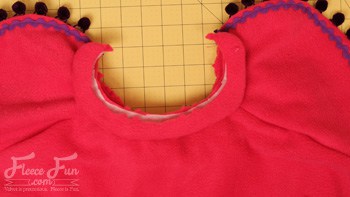
Then place neck stay on top of collar sandwiching the collar between the cape the and collar stay.
Sew on using a .5 inc h seam allowance.
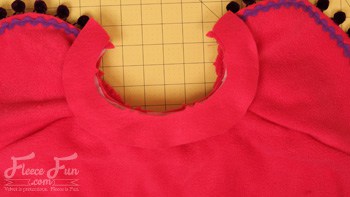
Flip collar up and fold collar stay around the seam created so it is now touching the long part of the cape.
Then top stitch around the collar – .25 inches from the seam around the outside to help it stand up, and have the collar stay cover the bulky seam.

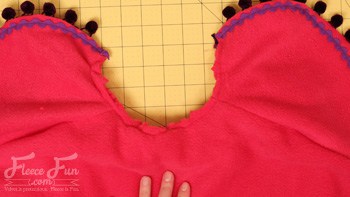
Sew on the clasp and you’re finished with the princess Anna cape tutorial!

Download the princess anna cape Pattern here:
You can get a free copy of Adobe reader here. By downloading you are agreeing to pattern terms of use. Click the picture below and fill out the form to download the free pattern .pdf !
love this princess anna cape? see More Frozen Costumes!
- Princess Anna Hat Tutorial Free PDF Pattern
- Queen Elsa Cape Tutorial Includes Jacket Warmth Free PDF Pattern
YOU MIGHT LIKE THESE CAPES/CLOAKS TUTORIALS:
- Long Hooded Cloak Pattern (Free)
- Fast Hooded Cape (with video)
- Easy Long Cape (Sew or No Sew)
- How to Make a Cloak in 20 Minutes
- The High Low Cape with Pixie Hood
- How to Make a Child Cape or Car Seat Poncho
- Cowl Capelet Free Pattern
- The Amazing Cape Secret on Fleece Fun
- See more of our Cape Patterns here
MORE CAPES FOR YOUR HALLOWEEN COSTUMES:
- Harry Potter Inspired Wizard Cloak
- The Red Riding Hood Cape (with video)
- Batman Cape Costume Tutorial
- Queen Elsa Cape Tutorial (Includes Jacket Warmth)
- Easy Superhero Cape Tutorial
- The Best Free Cape Tutorials for Halloween

THANK YOU !!!! Thank you !! My 7 yr old granddaughter will thank you as well !!! Again, thank you …
Hello, great pattern! Did you ever come up with a pattern for the snow princess hat??? I would love to see that one on here! Thank you!!!
Hi Olive,
I’m going to be honest with you – that pattern is kicking my but. I’m working on it, but sadly can’t promise it in time for Halloween. =( The grading on it is driving me crazy and I don’t know if I can offer multiple sizes for it.
– Angel
wondering when the 3 to 5 pattern will become available?
Hi Jennifer,
All the patterns are up! Enjoy!
Help! I tried to print the size 7-9 pdf, but when I was piecing it together I noticed it was the 4-6 size. I tried again, thinking I clicked the wrong one, but all 3 sizes pull up the size 4-6 pdf. I can use the 4-6 since my daughter is 6, but I want to make it something she can use for several years as dress-up clothes, not just Halloween.
This is super cute and I can’t wait to make it! I already bought berry colored fleece and was going to wing the pattern, but I found yours instead!
So sorry – the issue has been fixed. =)
Thanks! (and so fast!)
I plan on making the size 7-9 Snow Princess Cape. In the materials listed it says 1-1/2 yards of fleece. In the instructions is says to measure your child’s base of neck to their ankle (or whereever you want the cape to fall) and cut the length of fleece the length you measured.
My question is, is this cut of fabric separate from the 1-1/2 yeards of fleece listed in the materials?
Thank you,
Darla
That’s the total abount you’ll need – unless your child is unusually tall – then I would add 1/3 of a yard.
My daughter is a 12-14. Any chance you will be publishing that size?
Hi Stacey,
I’m sorry but I don’t have plans to add that size at this time.
– Angel
Hi, I am in the process of making this darling cape. Thank you for the pattern!! I am a little confused on the neck stay. Does it go under everything – under the bottom (longer) part of the cape? You said “Place neck stay over the basted under cape”. Sorry if I’m being dense and thanks for any help.
Hi Natalie,
So sorry i can see why you’re confused. I’ve fixed the instructions – it was my bad directions! I hope it’s clearer now. If not please feel free to email me and we’ll get it figured out.
– Angel
Thank you so much!! I think it makes sense now! If I have problems I’ll email, but I think I got it. Thanks again!
Great Tutorial! Just a quick question…Where did you get the clasp for this cape?
Thanks
Jeni
Hi Jeni,
I got it at Joann’s in the sewing notions section.
Well this is embarrassing, I am making 2 of the Anna capes. I got the pattern cut out, no problem. Then the time came to put it together and I got stumped on the very first part.
“Cut a length of fleece the length you measured.” Once I get my length, how wide should this be? I either get a cape that could wrap around a 4 year old several times or they gave me too much fabric.
” You will need to cut down the width of the fleece as well to match the width of the cape bottom, doubled.” What exactly does this mean?
“On folded fabric place the cape bottom and cut off the bottom to make a curve along the bottom. ” I do not understand how this is placed on the fold (here you are talking about the pattern piece labeled “negative cut out” correct?) to make the edges come out curved. It seems like if it were on the fold it would cut out right in the middle of the fabric. And the piece says “cut 1”.
Everything else is clear as can be. I don’t see that anyone else has asked this so I know It is just me, missing something somewhere. Thank you for the pattern by the way. If grandma can figure this part out, they are going to love it. Thank you also for your help and patience.
The Negative cut out is the width of the lower cape halved (since you place it on the fold). So basically fold the lower cape fabric you have in half. Place the negative cute out on the fold (where it says place on the fold) any excess fabric you have at the end of the negative cut out needs to be cut off. Try looking at the video and see if it helps ( I’m a visual learner – which is why I do videos).
I was stumped here too. For me, it clicked when I realized that the tiny edge is what goes on the fold — the side the arrow is pointing to, not the length the words are written down. Just use the width of the fleece as your cape width, cut the length you want. Then follow it “hamburger” style and place the pattern on your fabric so that only that tiny edge is on the fold. Hope that helps!! I was embarrassed to be stuck on cutting that piece!
Thanks Jessica – sometimes it takes just stating it a different way for it to click. Thanks for your input! 🙂
I figured it out. Guess it just took writing it down-should have sent myself an email! Thanks again.
Lol – glad you go it all figured out. Just posted a video tutorial to make it easier also.
Hi! Thank you for the pattern. I am currently trying to make the cape and have done the smaller top cape piece without any problem but I am really having trouble figuring out how to do the bottom longer cape piece. Could you please provide some further clarification with that section? I just don’t understand what part of the material attaches to the collar and why you are making the first cut on a fold. There is a lot of material and I am unsure of how to cut it down. Can you help please? Thanks!
Specifically you say “You will need to cut down the width of the fleece as well to match the width of the cape bottom, doubled.
On folded fabric place the cape bottom and cut off the bottom to make a curve along the bottom.
Place back of cape on the fold and cut 1.”
Is it possible to get another picture of just the bottom cape alone so that I have a better understanding. I don’t know why I am having such a rough time with it- but I just can’t picture it. Sorry! Thanks in advance!
“
Thanks so much for this pattern! My littlest is going to be Anna and I’m excited to add a cape to her dress. One question: what was the width of your felt? The felt I bought is 72 inches, and I’m sure that’s too much.
Hi Amy,
I used fleece and it ‘s usually around 58 to 60 inches wide. Don’t worry the pattern should work with the 72 inch – you’ll just have some fabric left over.
Where did you find the heart clasp? I’ve been searching for one!
Hi Kami
I found it in the JoAnn’s sewing notions section.
My Joann’s didn’t have these, but I did find some on ebay. I think I searched heart clasp, sew – or something like that. 🙂
ebay .com/sch/i.html?_odkw=heart+clasp&_from=R40&_osacat=0&_from=R40&_trksid=p2045573.m570.l1313.TR0.TRC0.H0.Xheart+clasp+sew&_nkw=heart+clasp+sew&_sacat=0
Thank you for this! I made the Anna cape for my daughter for Halloween. I couldn’t find pink fleece at my local store and ended up with a citrus greenish color and used pink and purple ricrac. This was my first sewing effort in many years and your instructions and pattern were easy to follow. thank you!
Thank you for the pattern and the video. I had to break to watch the video because I was not comprehending the collar and collar stay. What is the benefit of the collar stay? Why did yiu not just sandwich the collar between the layers before you flipped them? Seeking to understand…I don’t usually sew apparel. thanks in advance.
Hi Lil,
My logic was to help the collar stand up correctly and keep it comfortable by hiding the seam. While the method you propose could work the collar seam could be a little awkward with the gathering and not stand up as nicely. The collar stay method that I am using is pretty standard practice in clothing patterns. But to be perfectly honest there isn’t a right or wrong way with this – if you like your method more – then go for it! I won’t be offended that you didn’t follow my directions exactly. 🙂
Thank you. I finished this afternoon. I didn’t time myself, but I would say it didn’t take more than a couple of hours. The cape is so cute. My daughter loves it.
Thank you so much for posting the pattern and instructions! I was able to make two capes, one for my daughter and one for my niece. They adore them and couldn’t be more pleased! I even managed to freehand a matching hat for my daughter and added yarn for braids. Needless to say, my daughter’s Anna Halloween costume is complete thanks to you! Thanks again!
This my first attempt at a sewing project ever. But I have definitely dabbled in projects that require similar skills. Is it me or are the 4 – 6 pattern and 7 – 9 pattern identical. I printed them bought out and their the same. I need the 7 – 9 but the patterns don’t see big enough. I could be completely wrong but just wanted to check before I got to cutting this beautiful fabric.
Thanks!!
Hi Cynthia!
The patterns are not identical they are different sizes. I haven’t heard any complaints on the sizing for the 7 -9 and being that it’s a cape there’s a lot of wiggle room. Good luck with your project!
thanks,
Angel
Nevermind … I got it! Your instructions were perfect I however did not read them in their entirety. First project complete. THANKS!
Thank you for all the help my little sister is going to love her new cape
I love the pattern but i would love to make in a adult size can you send me one thanks
Sorry Donna my patterns are offered “as is”. 🙁
Thank you so much for this pattern – you are very generous to share it for free. I’ve just finished making it and it has worked beautifully. Perfect for my daughter to wear with her Anna dress to a Frozen-themed party.
I have watched the video and read the instructions several times. I understand (I think) about the length and width of the lower cape part. But I’m unsure about the neck part of that lower cape. Do I cut out a rectangular piece and than taper the bottom with that negative piece? What I mean to ask is: Is the neck a straight piece, not rounded to fit the short cape? Somehow I imagine it would have to have the shape of the collar, but I may think all wrong. Hope you understand my question.
Hi Renate – the top is just a rectangle that you gather to the collar. So you only cut a curve on the bottom and top is straight across.