
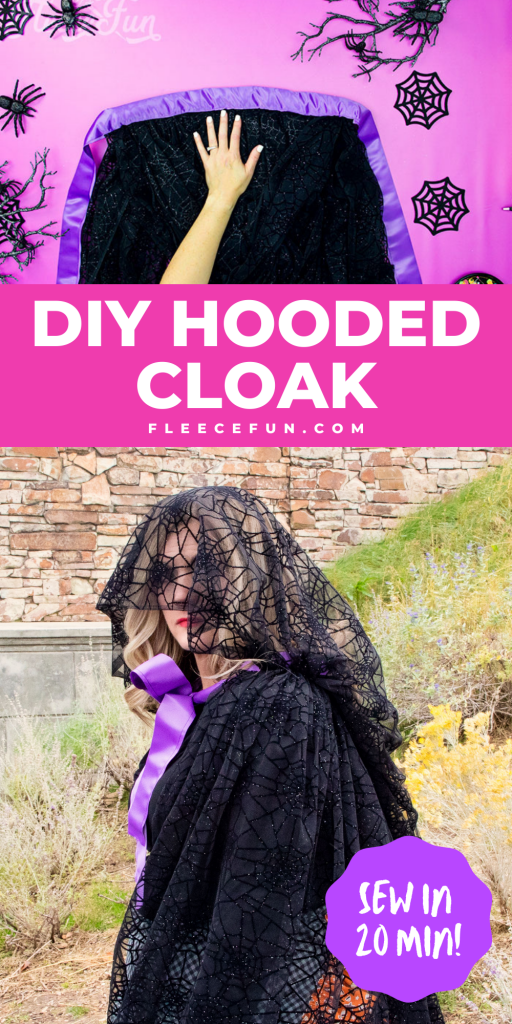
How to Make a Cloak in 20 Minutes (Easy)
This content contains affiliate links or sponsored elements, read our Disclosure Policy.


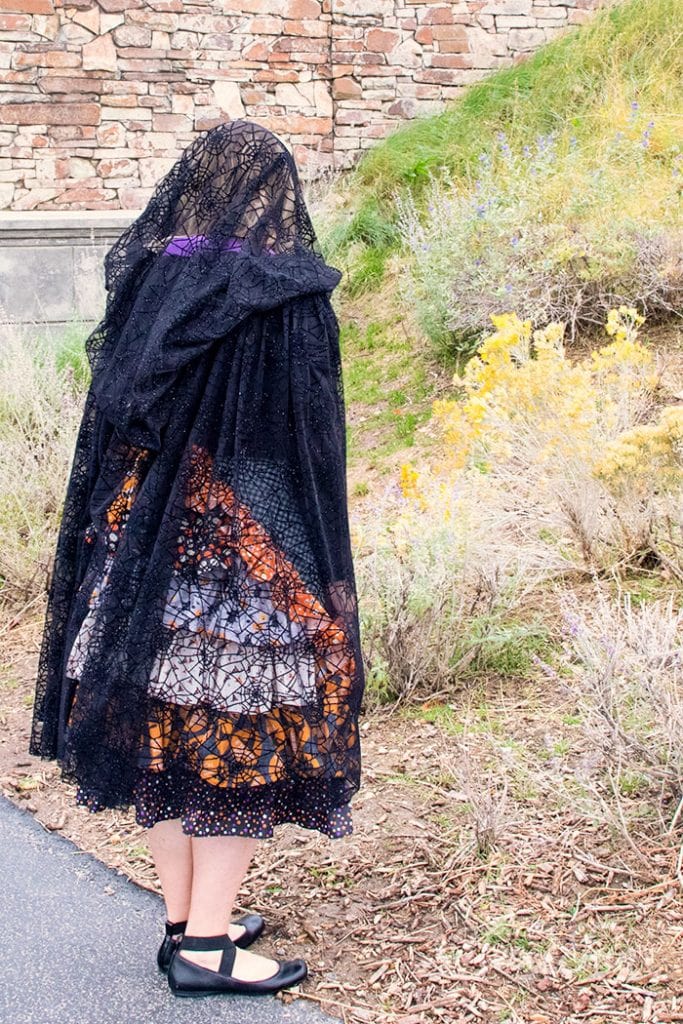
Learn How to Make a Cloak in 20 Minutes (Easy)! This Halloween cape DIY is easy to sew and is a great compliment to costumes. Made from lighter material this easy DIY cloak is made to compliment costumes, without covering them up completely.

Because this Halloween Cloak DIY tutorial requires no pattern – you can easily adjust it for the length and look you want. It can be a long cloak or a short capelet – you decide! If you use the recommended fabric this cape sews up quickly. If you choose to use a woven fabric – that will add time due to the fact that the edges will need to be finished to prevent fraying.
YOU WILL NEED:
Since I know people will ask, I got the fabric I use in the example (which is a tulle with a flocked spiderweb pattern on it) in the costume section at my local JoAnn’s.
- 4 1/8 yards of (at least 55″ wide) tulle (apparel grade), fine netting, or mesh
- 2 Yards Satin Blanket Binding (Like This)
- Rotary Blade, Ruler and Mat
- Sewing Essentials (Sewing machine, pins, thread, etc.)
This cloak is basically made up of two long rectangles – so no pattern is needed. I apologize for the ugly graphics, but they serve their purpose. Trying to show these shapes with pictures clearly wasn’t working and I want you to be successful with your costume sewing project!
While the easiest way to figure out the length you want for the cape body is to measure from the person’s collar bone to the length desired, I understand that sometimes you aren’t near the person you’re making for.
So here are some length suggestions for the cape body:
LENGTH SUGGESTIONS:
Keep in mind you’ll need to double this amount and add the 2 hood pieces to calculate the yardage needed.
- Women: 54″ (1.5 yards) for a full length cape
- Children 3 – 5: 27″ (.75 of a yard) for a full length cape
- Children 6-8: 36″ (1 yard) full length cape
- Children 9 -12: 45″ (1.25 yards) full length cape
So for example: to make a woman’s cape I would need 1.5 yards x2 for the cape body and 20 inches x2 for the hood. So the total yardage needed would be 4 1/8 yards.
The example cape is a little shorter more of a tea length – you can adjust the length to suit your costume/ style.
How to Make a Cloak in 20 Minutes (Easy) VIDEO TUTORIAL:


HOW TO MAKE A CLOAK EASY STEP-BY-STEP TUTORIAL:
Step 1 – Cut Out Your Cloak Pieces
We’re going to make this is 20 minutes so let’s get going.

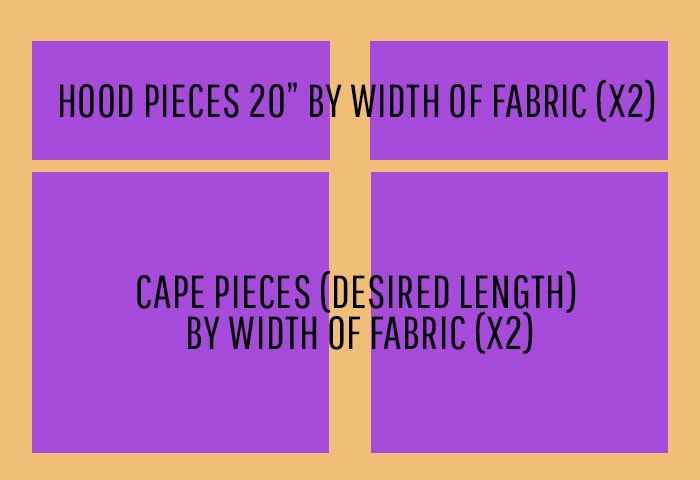
This cloak is made up of 4 pieces. 2 hood pieces and 2 cape pieces.
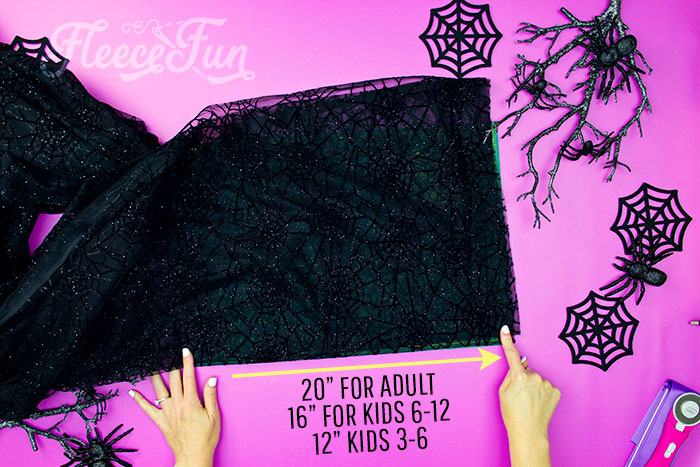
You will need to cut the 2 hood pieces, for adult is will be 20 inches long and the width of the fabric (55 – 104 in) for kids ages 6 to 12, simply cut 1 hood piece that is 16 inches long and width of the fabric for kids ages 3 to 6, simply cut 1 hood piece that is 12″ inches long and width of the fabric. For the cape body for children cut 1 cape piece that is the length you desire by the width of the fabric.
NOTE
To save time I’m leaving the selvedges on, with the gathering of the hood and cape they really don’t show. If you want to take the time to cut them off it’s up to you, but I’m leaving them on.
For the main body of the cape you will need to cut 2 rectangles the length that you want the cape by the width of the fabric.

For an adult cape you should have 2 hood rectangles (20 In by WOF) and 2 cape rectangles that are you desired height by WOF inches.
NOTE
This cape width is very generous, but you can add a section to the cape body if you want more cape.
Step 2 – Preparing the Hood
If you are making a child size cape you can skip down to the basting stitch.

With right sides together, pin the hood pieces together along the short side, making the two rectangles one long strip. Sew together using a .5 inch seam allowance.
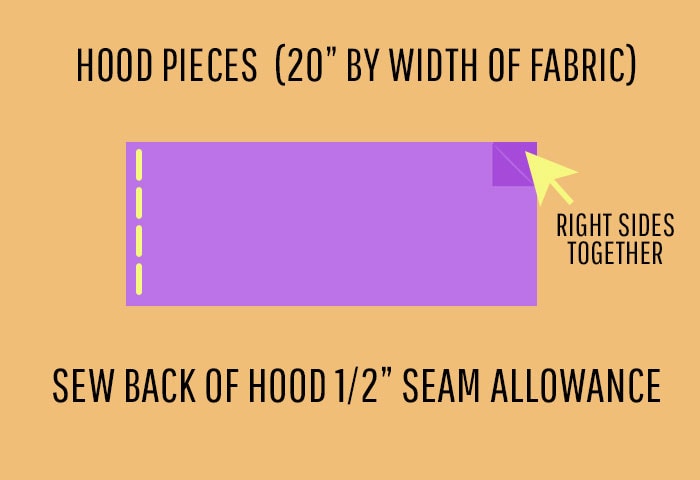
Here’s graphic to show another way to look at it.
The Hood is now one long strip- it’s time to make the top and bottom to it.
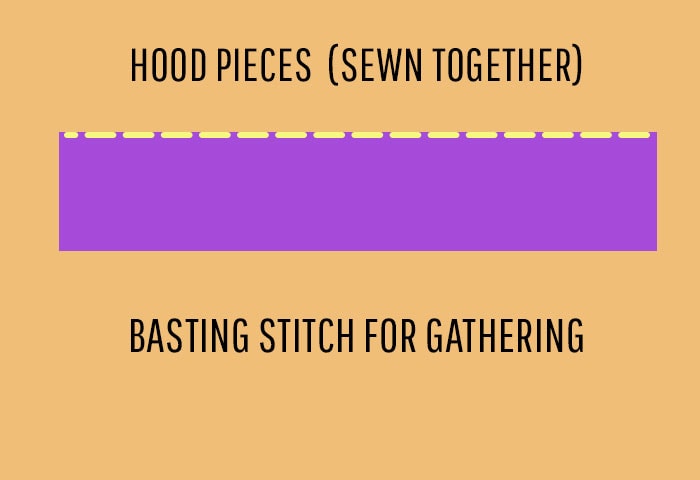
On the side that you want to be the bottom run a basting stitch for gathering at the neck.
This will be the bottom of the hood.

Fold the hood in half, so right sides are touching and the ends meet. Sew the top of the hood together using a .5 inch seam allowance.
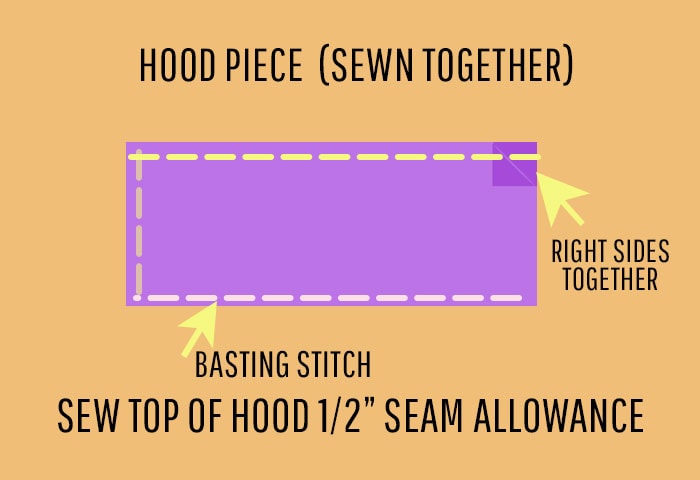
Here’s a graphic to clarify.
Step 3 – Assembling the Cloak
Finally, it’s time to sew the cape pieces together. Like with the hood, the two cape pieces need to be sewn together to make one long rectangle.

With right sides together pin along the short side of the cape (the selvedge edges).
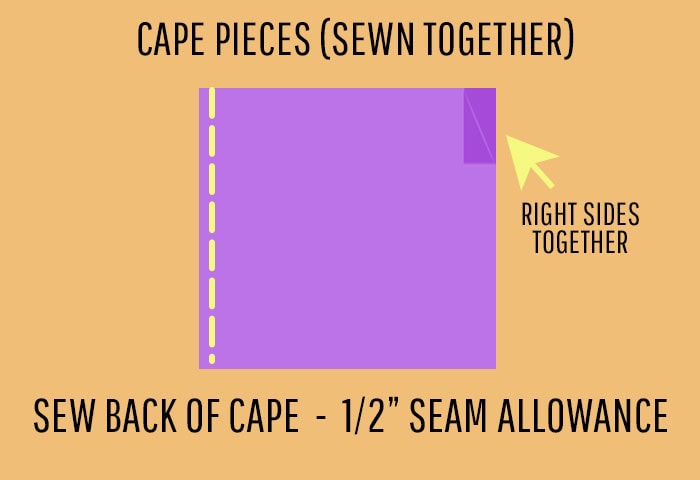
Sew together using a .5 inch seam allowance. ( If you’re making a kids cape with 1 panel you’ll skip this).
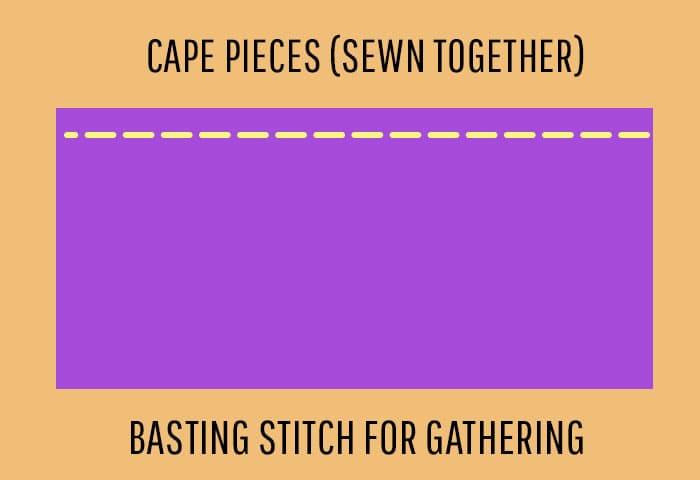
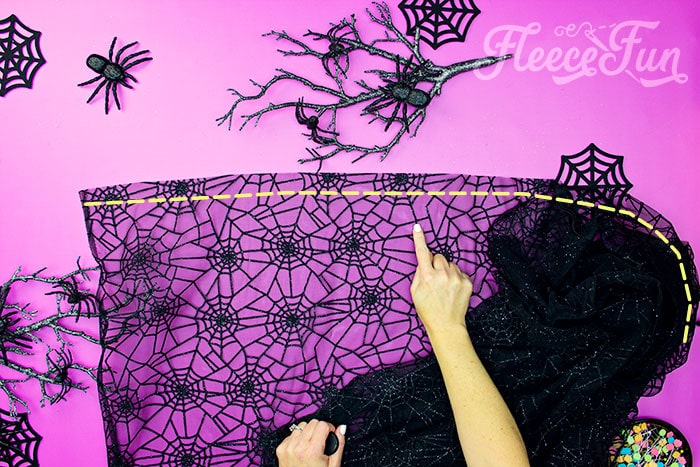
Now that it’s one long rectangle, run a basting stitch along the top of the cape for gathering.

It’s time to gather them a little. Since the lengths are so long, take a little time to gather the top of the cape and bottom of the hood in preparation for the next step.
Step 4 – How to Make a Cloak
Let’s bring this fabulous cloak together! Measure out the satin binding. for adults I recommend 2 yards. For kids 6 – 12, 1.5 yards and for 3- 5 1.25 yards.
NOTE
This makes a bow with some longer tails, you are welcome to shorten it to suit your style – just make sure that there is enough to tie! Also be sure to finish off the ends of the binding with a match or lighter (BE CAREFUL) so it doesn’t fray.
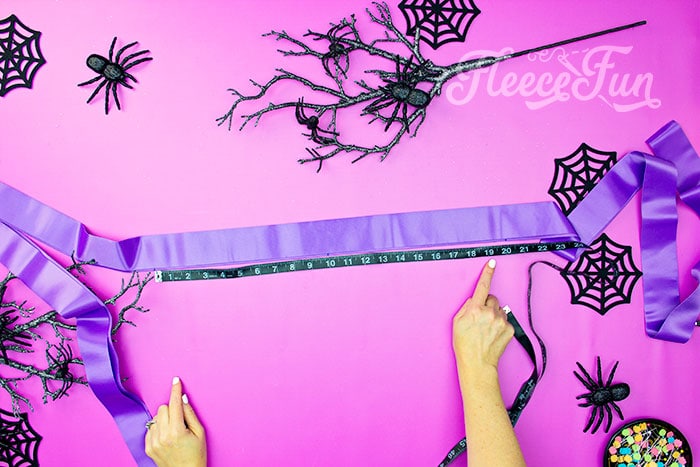
Grab the satin blanket binding. Find the center and mark it on the inside. For adults measure 10 inches from either side of the center mark it (so the neckline is 20 inches total). For kids 6- 12 the neck should be 16″ (so 8 inches from either side of the center mark), and kids 3 – 5 is should be 14″ (7 inches from either side of the center mark). You should have 3 marks on the binding the center, the beginning of the neckline and the end of the neckline.

Open up the binding. Gather the cape body so the right side is facing up. Now pull the basting stich so the gathers are evenly distributed and the gathered fabric is the length of the neckline (the markings we just made).
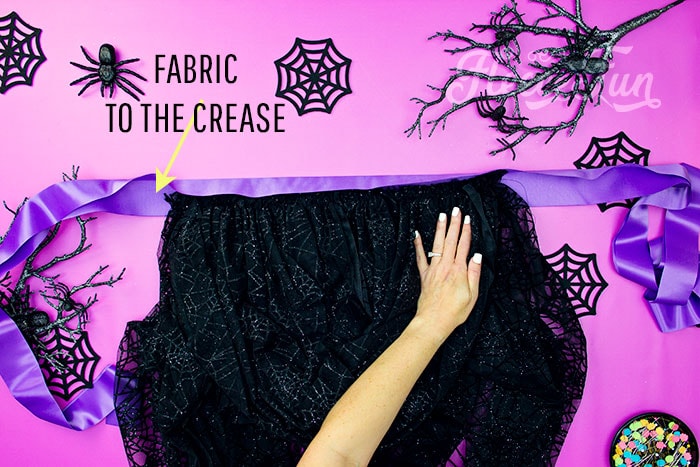
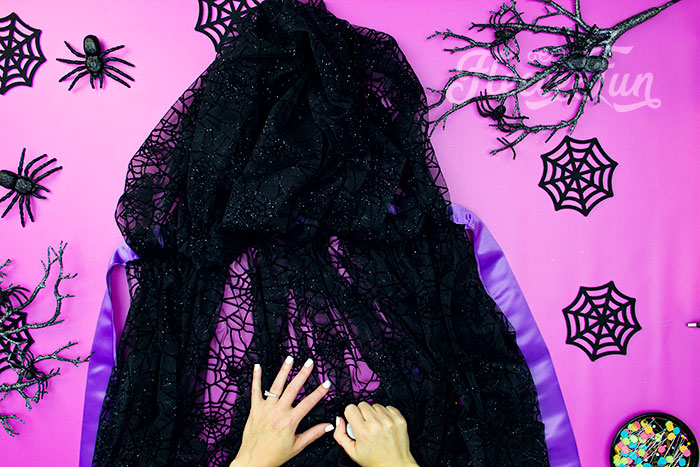
Now get the hood piece – right side of the hood fabric should be touching the right side of the cloak body we just gathered. The wrong side should be facing up at you. Gather the basting stitch to the neckline, like we just did for the cape. Line up the gathered edges of the hood and the cape body, and place in the binding right up to the crease.

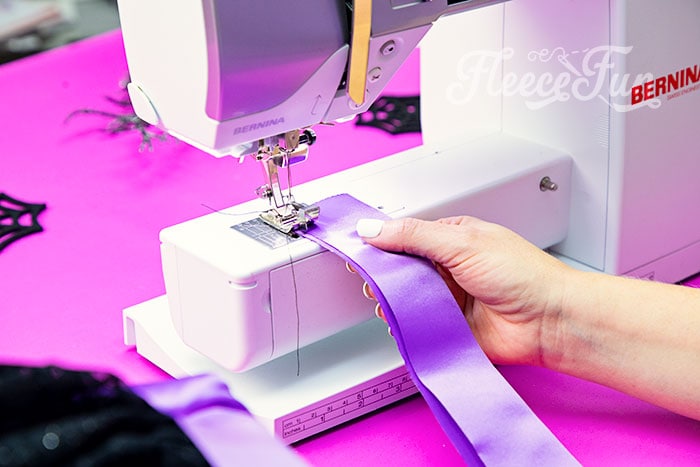
To finish up the DIY cloak, we’re going to sew the binding shut by topstitching along the edge of the binding – for the entire length, sewing the hood and cape to it in the process.

QUICK TIP
Pin the section with the hood and cape well.
Start at on end of the binding and sew to the other end. It’s a lot of layers to sew through when you get to the cape and hood – so take your time and go slow. Be mindful that the fabric doesn’t bunch up under the needle.

Trim your threads and that’s it!
You have a cute cape with a dramatic hood that can work for different costumes!
QUICK TIP
While I love the dramatic length of this hood – you can make it shorter by shortening the length of the hood pieces.
I love that this adds to the costume – but you can still see what is being worn beneath it!
YOU MIGHT LIKE THESE CAPES/CLOAKS TUTORIALS:
- Long Hooded Cloak Pattern (Free)
- Fast Hooded Cape (with video)
- Easy Long Cape (Sew or No Sew)
- The High Low Cape with Pixie Hood
- How to Make a Child Cape or Car Seat Poncho
- Cowl Capelet Free Pattern
- The Amazing Cape Secret on Fleece Fun
- See more of our Cape Patterns here