
How to make giant love letters tutorial
This content contains affiliate links or sponsored elements, read our Disclosure Policy.
Learn how to make giant love letters with this easy to follow tutorial with template. Perfect for weddings and Valentines day this large love sign makes a statement! You can see more pictures of the finished project here.

YOU WILL NEED:
- 3 Sheets of 12 x 36 x 1 of Styrofoam
- 4 containers (8 oz) of “Smooth Finish” by FloraCraft
- 1 Styro Cutter Plus by FloraCraft
- 2 cans of spray paint (one color for the letter and one for the heart)
- Tape, regular and masking
- Spatula
- Toothpicks
- Glue
- Scissors
- Pins
- Get the free template here.
giant love letters step-by-step tutorial:
STEP 1 – Assemble the Giant Love Letter Pattern
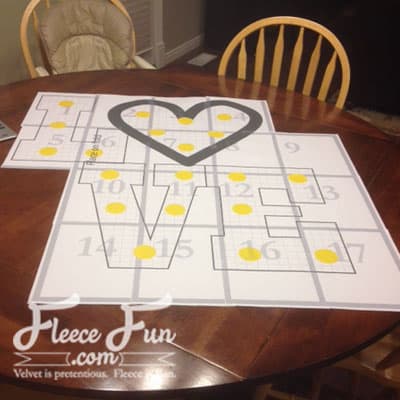
Print up and assemble the free template provided. You will want a large space to work with this piece it’s nearly 36 by 36 inches in size.
Once the pattern is assembled, use the scissors to cut out all the white space (including the space between the letters).
STEP 2 – Assemble the Styrofoam Boards
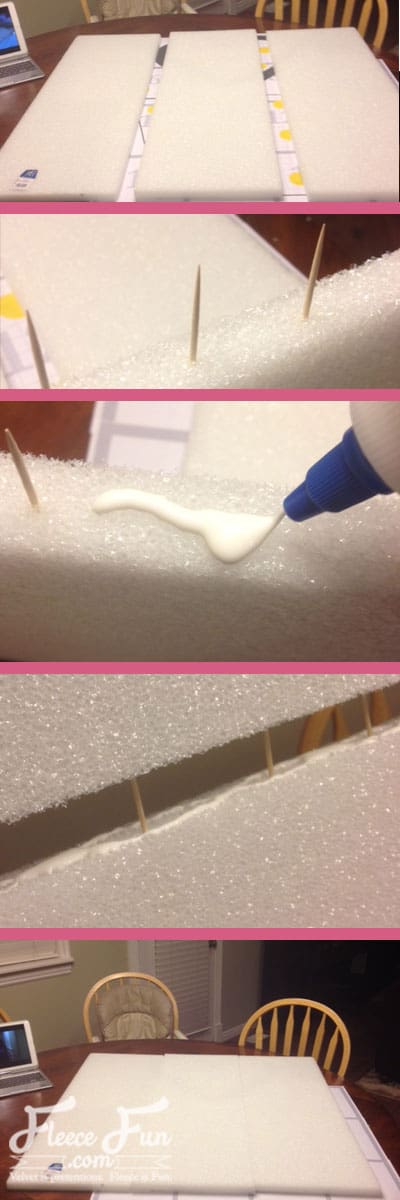
This is one solid pace. We will need to join the boards together to cut it out properly. Place toothpicks along the seams (about every 3 to 5 inches) then place glue on the edge and slide the boards together to join them.
Repeat again so all three boards are joined, making a square that is 36 by 36 inches. Allow glue to dry.
STEP 3 – Cut the Love Letter Shapes
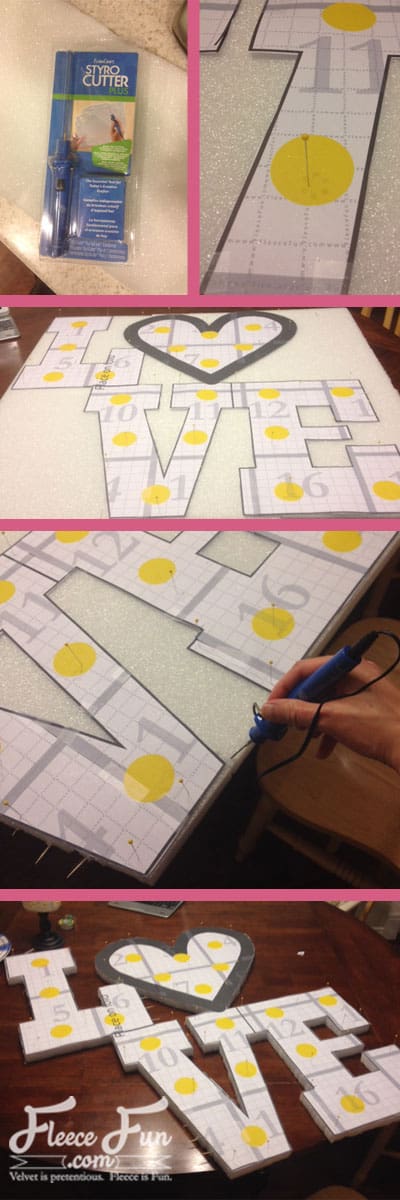
Warm up the Styrocutter (allow to warm for a few minutes). Pin the giant love letters template to the large Styrofoam board. Then using the Styrocutter cut out the sign.
A few tips when working with the Styrocutter:
Go slow. Basically you’re melting the foam away, but you need to let it do it’s job and not force the tool.
Watch for toothpicks. If you can’t get the cutter to move – odds are it’s either not plugged in or you’re hit a toothpick. Simply skip over the toothpick and continue to cut. The Styrofoam will fall away and after you’re finished simply snap off the exposed toothpick.
Work off an edge. Like the edge of a table or counter for easy cut out.
I have to say I really liked using this tool – so much better (and neater) than sawing the Styrofoam to cut it out!
Remove the template (but don’t discard)
STEP 4 – Add Texture

I didn’t want a “Styrofoam” texture so I added this cool stuff called “Smooth finish”. I lathered it on using a spatula to give it a more plaster look and not just a flat styro look. It’s also great for hiding the seams between the Styrofoam sheets. Let that dry over night.
STEP 5 – Add Color
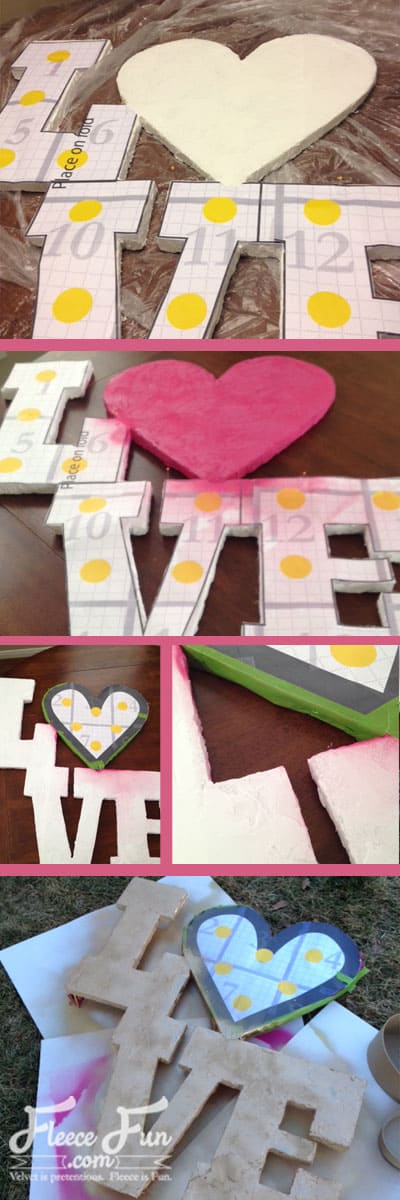
Cut the heart shape away from the giant love letters template. Using pins, template and tape mask off the “LVE” section and spray the heart the desired color. Allow to dry. Then mask off the heart using pins, template and tape. Spray the “LVE” section the desired color.
NOTE
I used spray paint, but you can use almost any type of paint on Smooth Finish.
Take it farther
You may have notices the yellow dots on the template. These are for if you wanted to add patio lights to the sign. It’s designed to work with a 25 string of lights.
Download the free giant love letters printable here:
You can get a free copy of Adobe reader here. For personal use only, not for sale or mass distribution. Click the picture below and fill up the form to download the .pdf !

See more DIY Valentine’s Day Crafts and Decorations
- DIY Valentine Craft Cozy Home Sign
- Valentine Decoration Ideas Rustic Heart Branch DIY
- Valentine’s Day Table Decorations Heart Tree DIY
- How to Make a Chenille Heart Pillow Tutorial
- Easy Valentine’s Day Fleece Pillow Slipcover Tutorial
More Free Valentine’s Day Tutorials!
- Valentine Candy Wraps Free Printable
- Free Valentine’s Day Printable Coloring Pad Kit
- Make Heart Hand Warmers Handmade Gift Idea
- Heart Pillow
- See all of Fleece Fun’s Valentine’s Day Tutorials here!
