
Vintage Apron Pattern Free and tutorial
This content contains affiliate links or sponsored elements, read our Disclosure Policy.

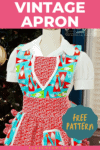


This Vintage Apron Pattern Free and tutorial is a festive way to ring in the holidays. I confess I have a weakness for frilly throwback aprons. The Vintage style that has fun details, curves and ruffles that transform a plain apron into a addition to your outfit. While most of my tutorials are beginner friendly this tutorial is geared toward an intermediate sewist.

Don’t you just love those Vintage Style aprons that your grandmother used to wear? I confess I got this inspiration for this Vintage Apron Pattern while watching an old Christmas movie – “Christmas in Connecticut” .
I imagine this is an apron Barbara Stanwyck would wear while faking her culinary skills.
Also, I love the large ties and the button back at the collar.
I also love the V detail with the mini pom poms on the bodice and apron.
Don’t you just love all the fun details.
YOU WILL NEED:
- 3 yards of fabric “A” for this fabric I used Michael Miller’s Holiday Row Oh Ho No Aqua
- 1.5 Yards of Fabric “B” for this fabric I used Michael Miller Holiday Row Holiday Ho Red
- 1 package of extra wide double fold bias tape (4 yards)
- A package of single fold bias tape
- 1 large button 1 to 2 inches
- 3 yards Baby pom trim (optional)
- Sewing Essentials (Thread, Scissors, Pins, etc)
- Rotary Cutter, Ruler and Mat
- Fleece Fun’s free pattern, get it here!
Vintage Apron Pattern Free and tutorial:
Step 1 – Cut out the free pattern
Print up the free pattern (you can get assembly instructions here).
Gather your materials. Get the pattern set up.
Place the bodice top of the fold and cut out.
Cut two of the bodice top from fabric A.
Cut out one of two pockets. For my apron I cut out 1.
Cut one of the apron bottom skirt from fabric A.
Cut along the pink line to make the Apron top skirt pattern.
Then, cut one of the Vintage Apron Pattern skirt top from fabric B.
Cut one of the Vintage Apron bodice décor.
Using your Rotary Cutter, Ruler and Mat cut out the following:
From Fabric A cut 2 strips that are 6″ by 40″ for the ties
Then, from Fabric B cut 2 strips that are 5″ by 24″
From Fabric B cut 6 strips that are 4″ by 40″ (for the ruffle – which is optional, but I confess I like it)
Once you have those cut out it’s time to sew.
Step 2 – Make the Vintage Apron Top Skirt
Finish the sides and bottom of the skirt with the bias tape.
Finish all the edges of the Vintage Apron Pattern pockets with bias tape.
Place the pocket and topstitch into place.
Step 3 – Make the bottom skirt to the apron.
Sew the strips of the strips together, end to end to make on really long strip.
Finish the bottom edge of the long strip with a rolled or baby hem. Then gather the strip into a full ruffle with a basting stitch or a ruffler foot.
With right sides together, pin the ruffle to the sides and bottom of the skirt of the Vintage Apron Pattern. Place the single fold bias tape with the right side facing down and unfold the tape and line up the edge of the ruffle, tape and skirt. Sew through all the layers using the crease of the bias tape closest to the edge as the seam guide.
Once sewn, flip the ruffle down and have the single dole tape cover the seam and raw edges. Top stitch the single fold tape into place.
If desired add the baby pom pom trim and top stitch into place.
Step 4 – Assemble the Vintage Apron Bodice
Outline the sides of the bodice décor with double sided bias tape.
Take one of the bodice pieces.
Line up the top of the bodice décor with the neckline of the bodice. Pin down. Top stitch down along the inside edge of the bias tape ( this will give it a more three dimensional look).Top stitch the baby pom pom trim in place.
Place the other bodice piece on top (right sides together). Pin, sew together using a .5 inch seam allowance (this can be modified to a .25 inch seam allowance if you want to make the bodice bigger (for a size 14 up).Trim the seam allowance and notch the curves. Turn right side out and press. Top stitch around the outside.
Step 5 – Make the Waist and Ties
Fold down the top of the waist pieces 1/2 inch and press (the strips from fabric b that are 5″ by 24″). To give a crease to follow.
Finish the edges to the ties with a baby hem and cut to a point if desired.
Place the two ties right sides together then place the ties on either side. Gather the ends of the ties so they come in 1/2 inch from the top and bottom.
Sew either side with a .5 inch seam allowance, catching the ends of the ties in the seam, stopping .5 from the top of the waist on each seam.
Step 6 – Complete and Sew the Vintage Apron pattern Together
Gather the vintage apron skirt top and bottom. Gather the bottom so is it the same length as the waist (fabric B) and gather the top so it’s the same width as the bodice. Center the top skirt on the bottom skirt.
Take the waist loop that you mad and place the gathered apron skirts in between the loop, ( making a sort of sandwich) with the ties on either side. Pin the layer together and sew down using a .5 inch seam allowance.
NOTE
Make sure that if the fabric is directional it is going the right way
NOTE
Make sure that if the fabric is directional it is going the right way when you flip it up
Now it’s time to add the bodice. Flip the waistband up turning it right side out. Centering the bodice on the waistband, place the front side facing down and pin it in place and sew on, sew ONLY through the top side of the loop ( NOT the back of the loop)
Flip the bodice up. Use the pre ironed crease as a guide and have the bodice and the fabric flip down. Use the pre ironed crease on the back side of the fabric also flip down to make a nice finished edge. Top stitch along the edge of the fabric through all the layers bringing the front and the back of the waist and bodice together, and finishing off the apron.
Mark on one side of the back of the vintage apron where you would like button to go on the collar.
Mark the button hole on the opposite side and sew on button hole and button on opposite sides of the collar. To make the collar more adjustable you can but in a second button hole or a button.
You’ve just completed the Vintage Apron Pattern Free Tutorial.
Download the Free Vintage Apron Sewing Pattern
You can get a free copy of Adobe reader here. By downloading you are agreeing to pattern terms of use. Click the picture below and fill up the form to download the .pdf !

Other Free Apron Patterns to Enjoy:
More Christmas Crafts and Recipes!
- Deer Head Pillow
- Advent Calendar Wreath
- Let Us Sew SVG Christmas Décor
- Holiday Spa Set Tutorial
- Christmas Stocking How-To
- No-Sew Christmas Stocking Patterns
- Holiday Bath Bombs DIY
- Christmas Tree Pillow
- Christmas Terrarium DIY with Cricut Maker
- Christmas Ideas
Printables and Cut Crafts this Season!
- Free Christmas Printables
- Free Christmas Picture Printables
- Personalized Christmas Pajamas
- Free Christmas Printable Joy World
- Free Christmas Printable for Hot Chocolate
- Free Christmas Printable for Apron
- Perfect Stocking Stuffers for Sewing Lovers
- Mad Hatter Tea Party Paper Chandelier
- Printable Handmade Gift Planner