
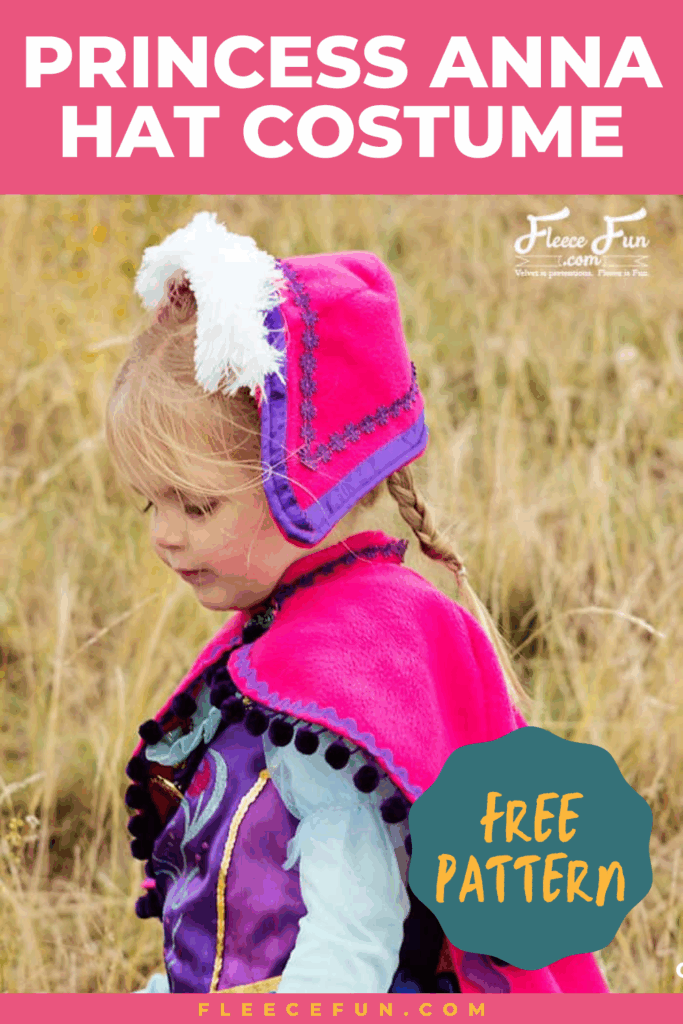
Princess Anna Hat tutorial with free pdf pattern
This content contains affiliate links or sponsored elements, read our Disclosure Policy.
This cute little hat brings your little snow princess’s outfit together. This Princess Anna hat tutorial is inspired by Disney’s Frozen. This hat sits toward the back of the head, and covers the ears similar to the one in the film.
For more pictures of the final hat you can look here. For the cape pattern and tutorial just click here. I also have an “Snow Queen (Elsa inspired) jacket cape that you can find here.
YOU WILL NEED:
Planning a Disney Vacation? Use the code “FLEECEFUN” to get get an extra $10 off any 2-night or longer Southern California package (hotel and 2 ticket minimum) when you book here.
- Fleece Fun’s Free pdf pattern
- 1/4 yard fleece in magenta
- 1 yard 1 1/2 inch purple ribbon
- 1 yard decorative purple trim
- Scrap of white fur ( less than a quarter yard – in the example I used eyelash fleece.)
- Sewing Essentials (pins, scissors, etc.)
- Bobby pins, comb or elastic to keep it on the head.
- Get the free sewing pattern here.
The Princess Anna hat Tutorial
step 1 – Assemble and cut out the Pattern
You can find instructions on how to assemble the pattern here.
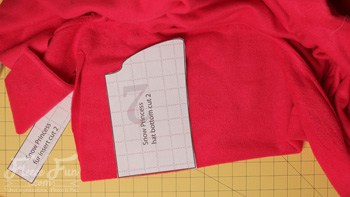
You will need to cut out the following from the magenta fleece:
2 of the hat top

2 of the hat bottom
1 of the fur trim insert
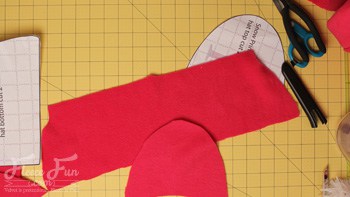
step 2 – Begin to sew the princess anna hat
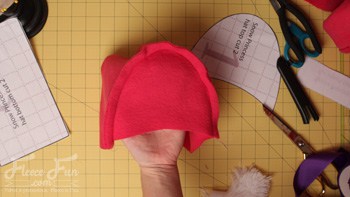
With right sides together, pin the round section of the hat to the top. Sew together using a .5 inch seam allowance. Snip slits along curve to help hat lay properly. Repeat with the other pieces.
step 3 – Add decorative detailing
This step is completely optional and not necessary for the hat to be completed – but it does look nice.
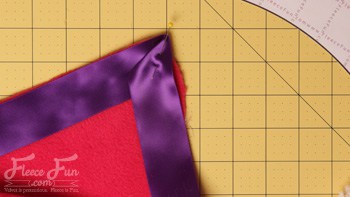
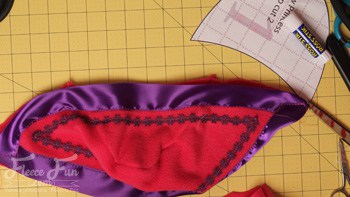
Take one of the sewn hat pieces and flip right side out. Taking you purple ribbon, turn under the edge a half inch and starting at the back of the hat pin ( or you can use a glue stick to tack down ribbon) all the way around the edge of the right side of the hat, mitering the corners to make the turn at the ear covering section.

Continue to pin all the way around until you meet up with where you started, tuck end of ribbon under the folded end. Sew down along inner edge of ribbon using a medium zig zag stitch along the edge.
For the second layer of decor, pin about a half inch away from the ribbon and sew down.
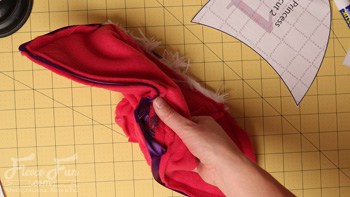
step 4 – Prep the fur piece
Fold the fur trim piece in on itself lengthwise (so it’s a long rectangle). Sew each side using a .25 inch seam allowance, leaving the bottom open. Turn right side out. Next is the last step of this Princess Anna Hat Tutorial.
step 5 – Bring the hat together
Take the exterior the hat piece that has decor on it and place it right side up.
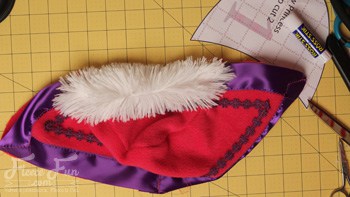
Then place fur at the front of the hat – unfinished ends (the gap that you flipped the fur right side out with) should line up with the edge of the front of hat.
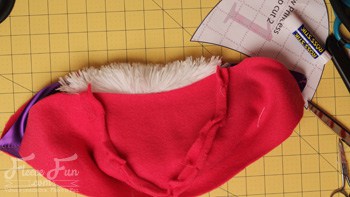
Then place lining right side down onto the fur and hat exterior.
Pin.
Quick Tip
With really long fur try your best to make sure that it’s in between the two hat pieces and not sticking of the seam as this will be stuck inside the hat once we turn it.
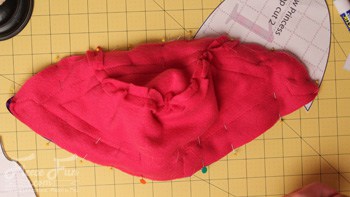
Sew all the way around using a half inch seam allowance, leaving a 3.5 to 4 inch gap in the back for turning.
Trim sections of hat that might be bulky and flip right side out.
Topstitch .25 inch from the edge all the way around the main part of the hat ( not on the fur – just the fleece part). to give hat shape and sew the gap shut.
This hat has no way to stay on the head without a little help – you will either need to sew an elastic for each point at the ear flaps to go under the chin, or sew (or glue) combs into the inside of the hat to help it stay in place.
You’ve now finished the Princess Anna Hat Tutorial!
Download the free princess anna hat pattern below:
You can get a free copy of Adobe reader here– it is the ONLY reader I recommend. By downloading you are agreeing to pattern terms of use. Click the picture below and fill out the form to download the free pattern .pdf! Fleece Fun’s patterns are free and this site will never ask for your credit card information for the patterns.

More Frozen Costumes!:
- Queen Elsa Cape Tutorial Includes Jacket Warmth Free PDF Pattern
- Princess Anna Cape Tutorial Free PDF Pattern
love this princess anna hat? see More Girl Costumes!
- Moana Costume Tutorial
- Butterfly Wings Costume
- Belle Costume Tutorial Beauty and the Beast
- Aladdin Magic Carpet Costume DIY Free Pattern
- Bonus Craft Tutorial Fall Fairy Costume
- DIY Tiara Free Pattern and SVG File
- Costume Patterns
More Costume Tutorials you might like!
- Yoda Costume Tutorial DIY
- Hedge Witch Hat
- Cute Baby Yoda Hat
- Best Aladdin Costume DIY Free Vest Pattern
- Princess Poppy Costume DIY Free Pattern
- Make Supergirl Costume Tutorial

I love the patterns for the cape and the hat! I made a small cape for my great niece, and just finished a larger size 7-9 for my granddaughter. Whew! I am just a beginner sewer, but I did have a slight problem. I cut out the hat two times before I finally figured out my problem. The bottom part of the pattern for the hat does not say “place on fold”, so I didn’t. 🙂 I finally figured out by looking at the pictures over and over that I needed it on the fold. Also, the collar piece for the 7-9 cape pattern does not say on it “place on fold.” I remembered from the smaller cape that I needed to place it on the fold. I am not complaining! I’m just such a visual, literal learner.
Ooops – I’ll add that to my list of stuff to fix – thank you for letting me know. So happy to hear that you’re sewing for your family!
– Angel
I absolutely love this Princess Anna hat tutorial! The step-by-step instructions and the free PDF pattern make it so accessible. I can’t wait to make one for my daughter, she’s going to be thrilled! Thank you for sharing such a cute project! ♥
I absolutely love this Princess Anna hat tutorial! The free PDF pattern is such a thoughtful addition, and I can’t wait to try making it for my daughter. Thank you for sharing such a fun and creative project! ❤️
Absolutely love this tutorial! The princess Anna hat is adorable, and the PDF pattern is such a great bonus. Can’t wait to try making one for my little girl. Thank you for sharing!
I absolutely love this Princess Anna hat tutorial! The free PDF pattern is such a great bonus. I can’t wait to make one for my daughter – she’s going to be thrilled! Thank you for sharing such a fun project! ♥
I absolutely love this Princess Anna hat tutorial! The free PDF pattern is such a fantastic bonus. I can’t wait to try making one for my daughter – she’s going to be thrilled! Thank you for sharing this adorable project!
I absolutely loved this Princess Anna hat tutorial! The free PDF pattern is such a generous addition, and the step-by-step instructions made it easy to follow. My daughters are going to adore these hats for dress-up! Thank you for sharing such a fun project! 🌟
I absolutely love this Princess Anna hat tutorial! The free PDF pattern is such a great addition. I can’t wait to make one for my little girl—she’s going to be so excited to wear it! Thank you for sharing this adorable project!