
Red Riding Hood Cape Pattern (Free) Child and Adult Cape
This content contains affiliate links or sponsored elements, read our Disclosure Policy.


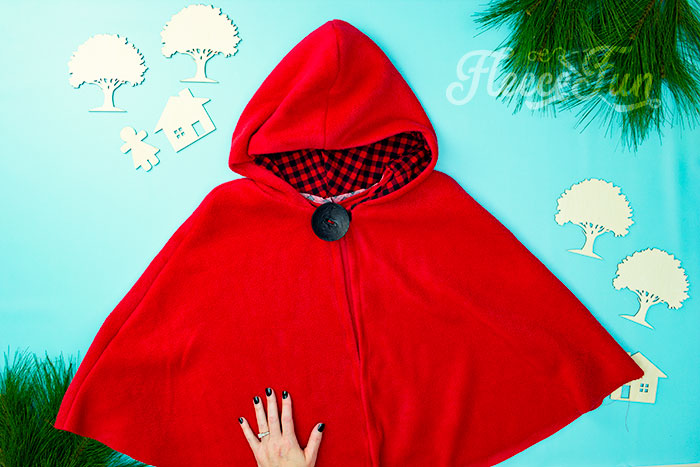
Free Costume Pattern: This red riding hood cape pattern comes together quickly and comes in child and adult sizes. An easy sew, this free sewing pattern is perfect for grandmother’s house.
This Red Riding Hood cape pattern is one of Fleece Fun’s most popular. The circular half cape tutorial is perfect for going to grandmother’s house in – it’s warmth will keep the chill from nipping, but not necessarily wolves. This half cape can be made at different lengths (and materials) to get the look you want. Perfect for Halloween or a Little Red Riding Hood costume.
The capes comes in 4 sizes: child small (12 months -2 years), child medium (3-6 years), Child Large (6 – 10 years) and adult (fits most).
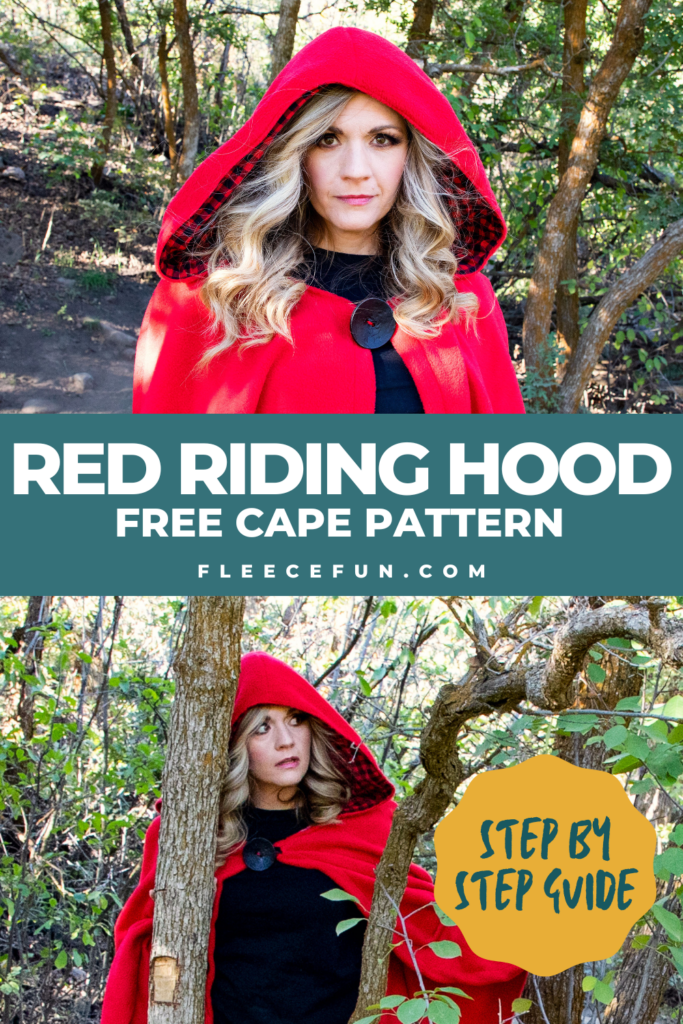
The adult cape is 28 inches long – with the option to make it shorter (into a capelet). The hood is 19 inches tall. For reference the model in the picture is 5’4″ and a size 10. If you’re looking for a longer cape – I have one right here!
Hate The Ads?
This pattern with video and printable instructions is available to members of the Maker’s Studio. The Maker’s Studio is an ad free experience, no video ads, no forms, no zip files, just creating.


The great part about this cape is that it’s a great generic costume pieces. I’ve had makers send me pictures of how they’ve used this cape for Hobbit costumes, a Handmaid’s Tale, and elves! All it takes is a change of color to the fabric and different fasteners to change the look.
YOU WILL NEED:
Please note that the fabric for this cape (particularly the adult cape) needs to be 60” wide.
- 2 and 1/4 yards fleece for adult – 1.5 yards for children sizes, felt or jersey knit (depending on size of pattern and if you line the hood or not)
- 3/4 yard Jersey knit or 5/8 yard for a child size (or two large t-shirts, optional)
- Yard of Ribbon or elastic and a button
- Thread
 Sewing Essentials (scissors, pins, etc.)
- Get the free pattern here.
More FREE patterns you may also like:
- The Fast Hooded cape (with video)
- The Snow Princess Cape (with video)
- Harry Potter Inspired Wizard Robe (with video)

Red Riding Hood Cape Pattern Video Tutorial:

Red Riding Hood Cape Pattern (Free) Child and Adult Cape Tutorial:
Step 1- Assemble and cut out the FREE Red Riding Hood Cape Pattern
You can find instructions on how to assemble the pattern here.
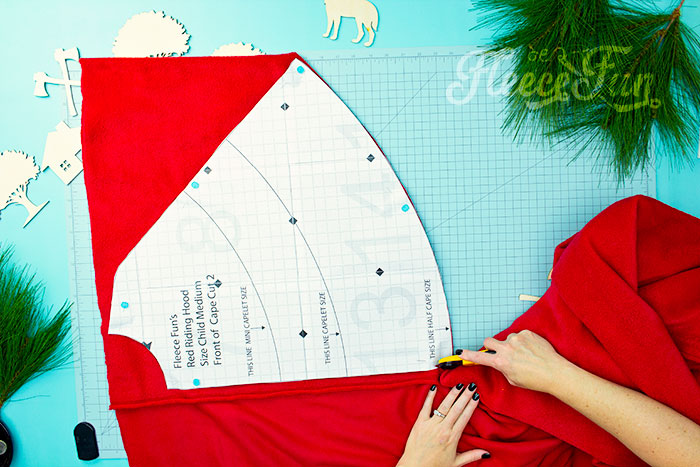
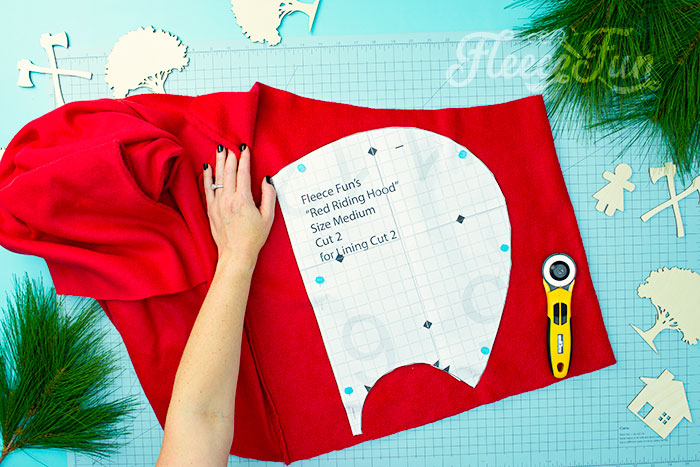
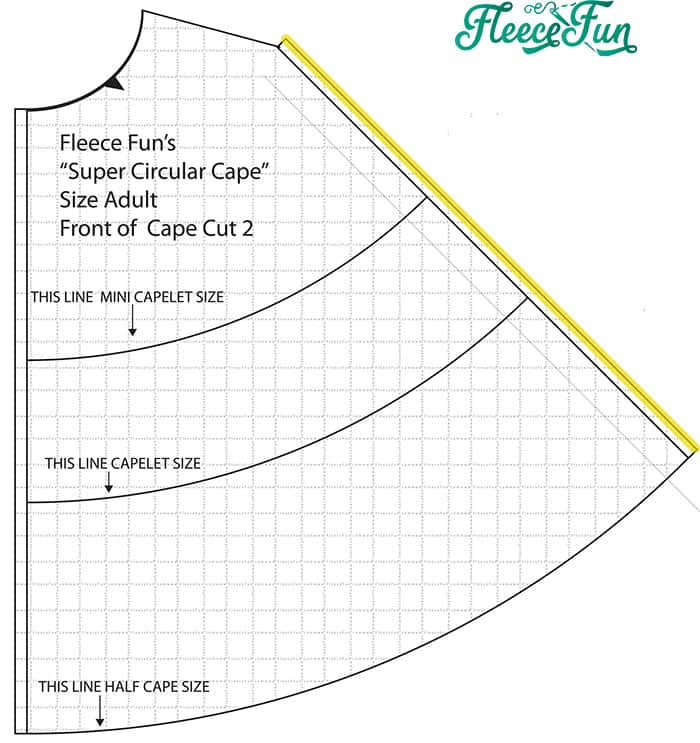
You will need to decide what length of cape you want to make. Cut the pattern to the same length you want on both cape pieces. One of the reasons I love fleece is you don’t have to finish the edge. I don’t plan on finishing the bottom of the cape – so by using a rotary blade to cut out the pattern, I get a nice crisp line.
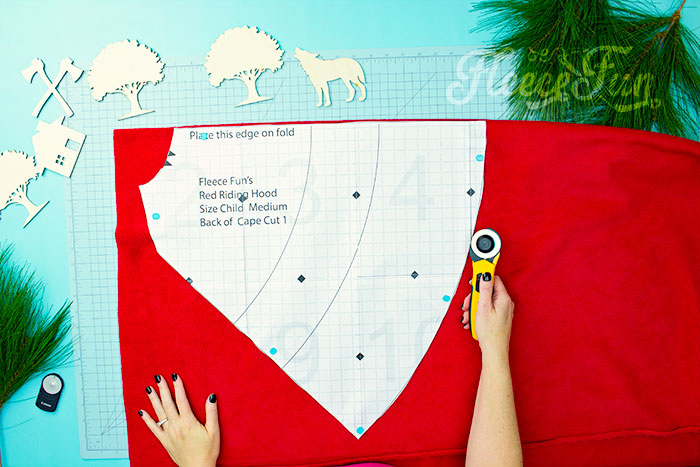
Cut out 1 of the back of the cape by placing it on doubled fabric on the fold so it will be one large piece.
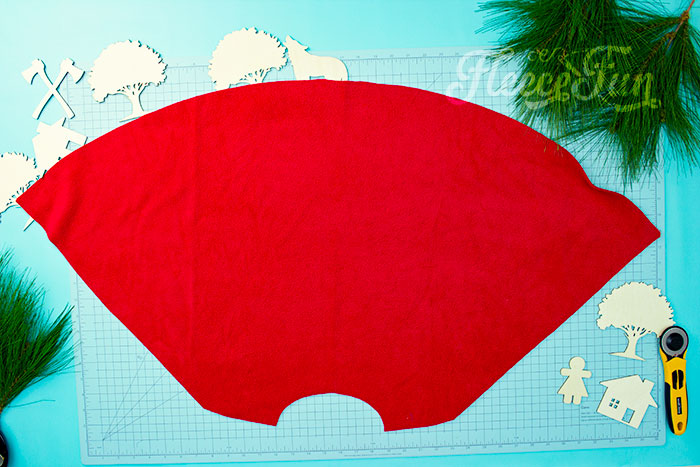
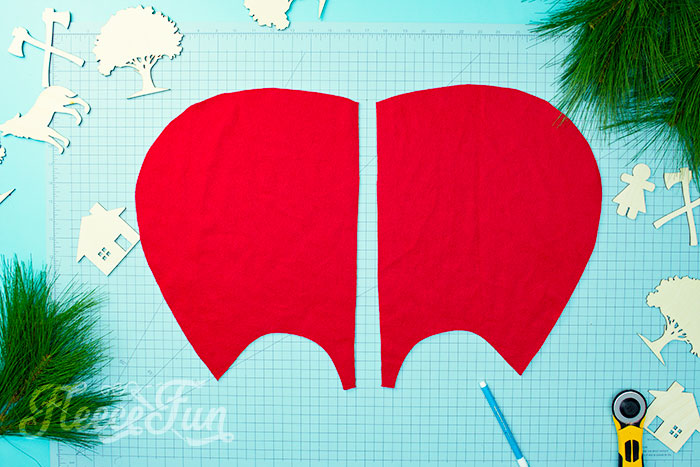
This is how it should look when the back piece is unfolded. Mark the arrows.
On folded cloth, cut out 2 of the front cape piece.
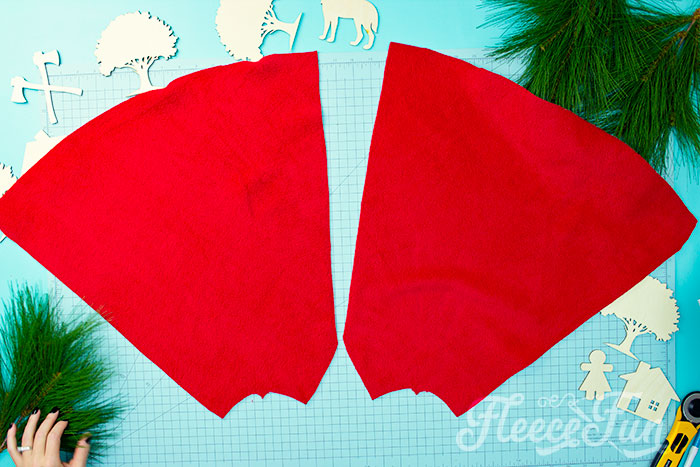
This will make front pieces of the cape, mirror images of each other.
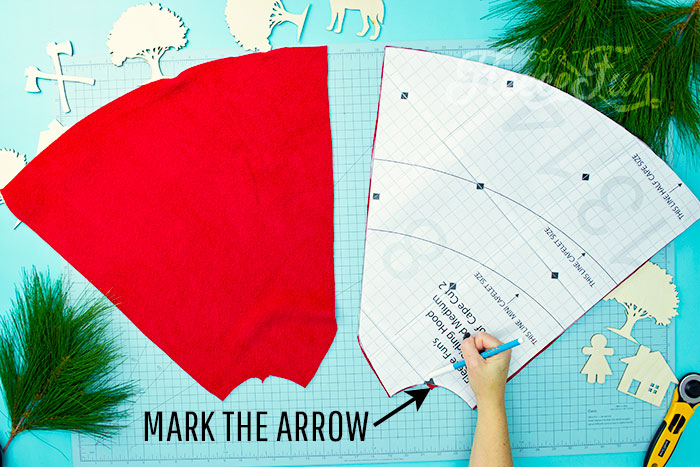
Again mark the arrows from the sewing pattern – either with a marking pen or a notch in the fabric.
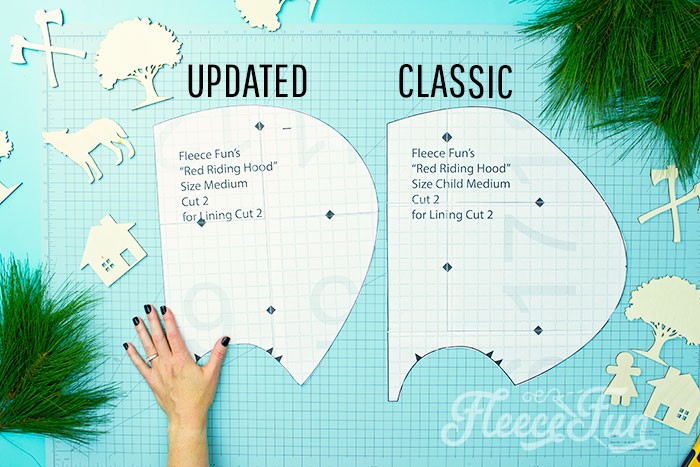
I’ve updated the hood to this free cape pattern, so there are 2 versions. The newer one or the classic. Pick one for your hood.
On folded fabric, cut out 2 red riding hood pieces or exterior.
This is how the pieces should look cut out, be sure to mark the arrows that are on the free costume pattern on the fabric.
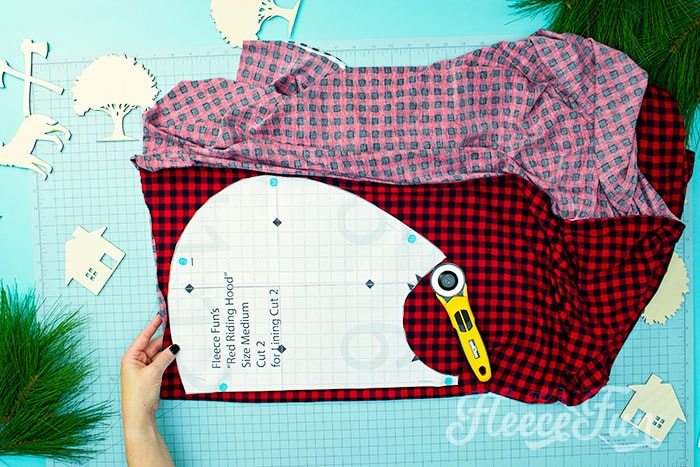
On folded fabric cut two of the lining (if you do not wish to have a lining just cut out 2 pieces for exterior.)
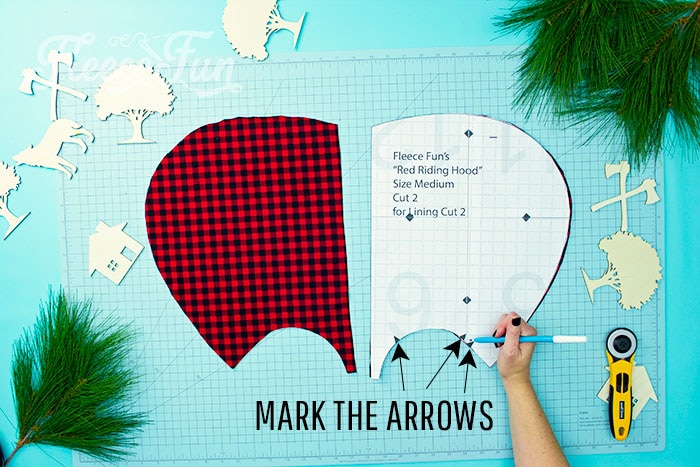
Be sure to mark the arrows on the cape hood lining. The purpose of the triangles is to help line up the hood to the cape.
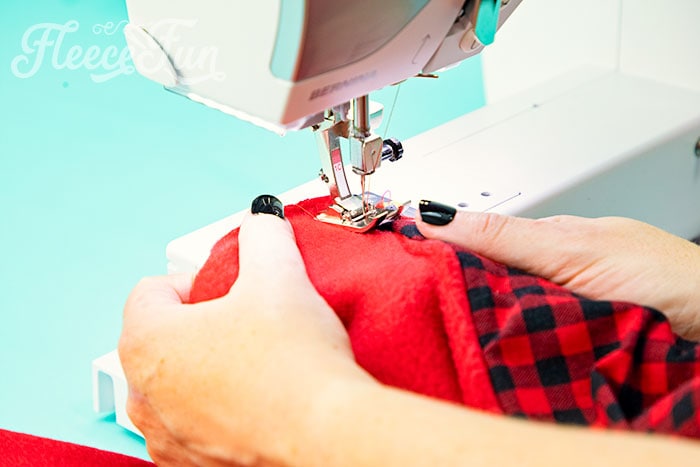
Step 2 – Sew the Hood to the Cape
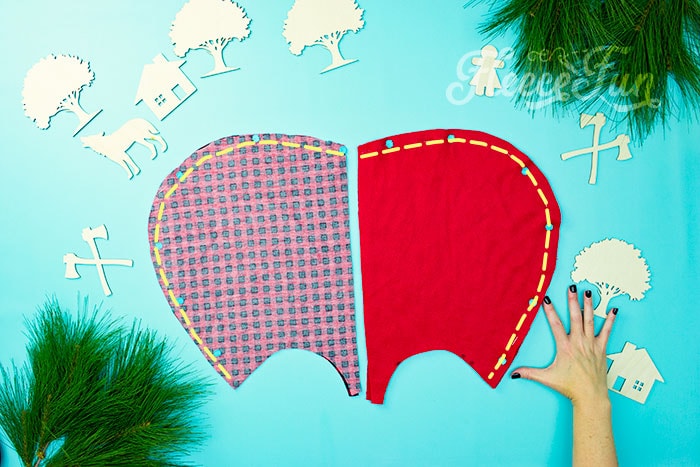
With right sides together pin the hood exterior pieces together. Next, with right sides together pin the lining pieces together. Using a .5 inch seam allowance sew along the path shown in the picture (the back of the hood).
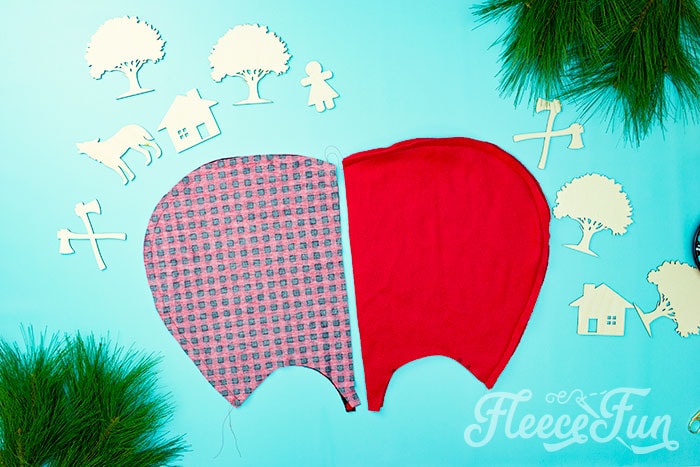
Now that the back of the cape hood exterior and the lining are sewn, it’s time to bring them together.
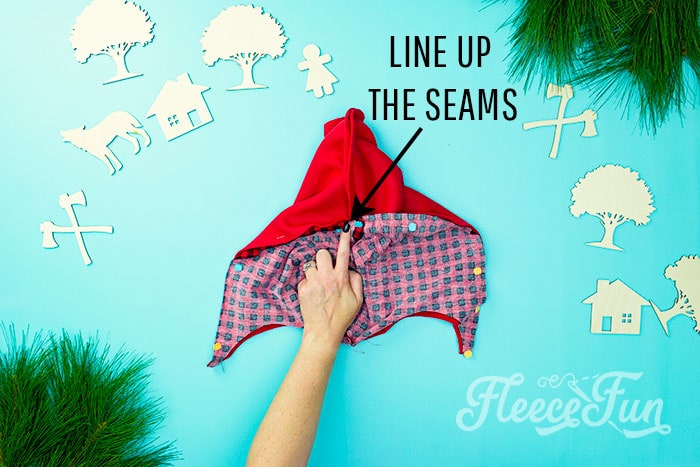
Again, with right sides together, pin the front of the hood exterior and the hood lining together. Line up the center seams.
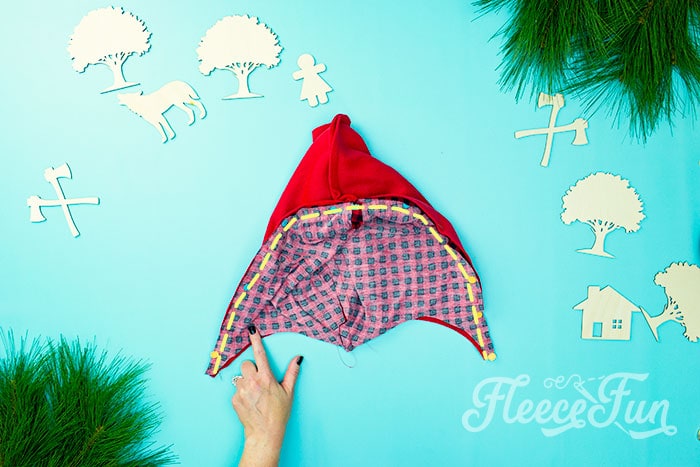
Sew the hood pieces together using a .5 inch seam allowance. Be sure to leave the bottom (where the triangle marks are) open.

Turn right side out, stuffing the lining into the hood. Set the Hood aside. If no lining: Turn front of hood exterior under .5 inches and sew, using a zig zag stitch along the edge of the fabric. Set aside.
Step 3 – Make the Cloak
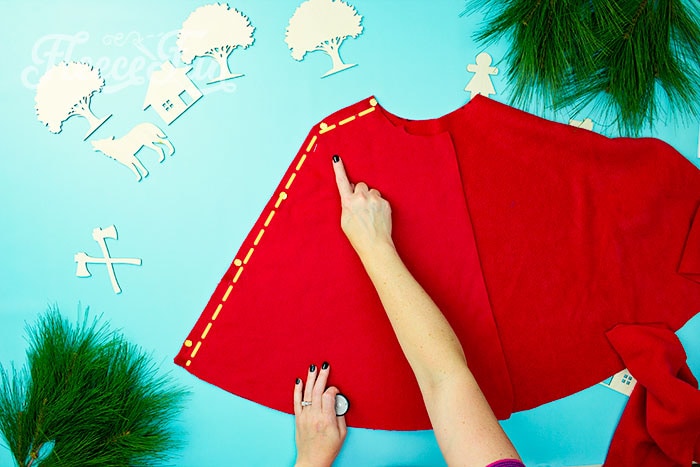
Lay the Back piece out flat, with the right side facing up toward you. Place one of the cape front pieces on it- so right sides are touching. Sew the side of the cape together using a .5 inch seam allowance.
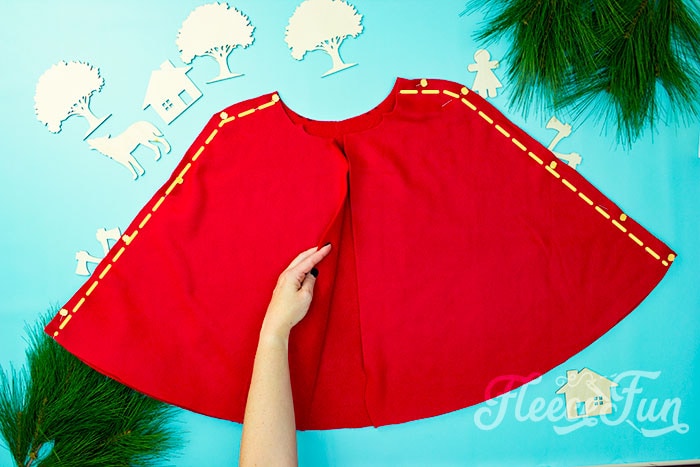
Also, repeat with the other front piece.
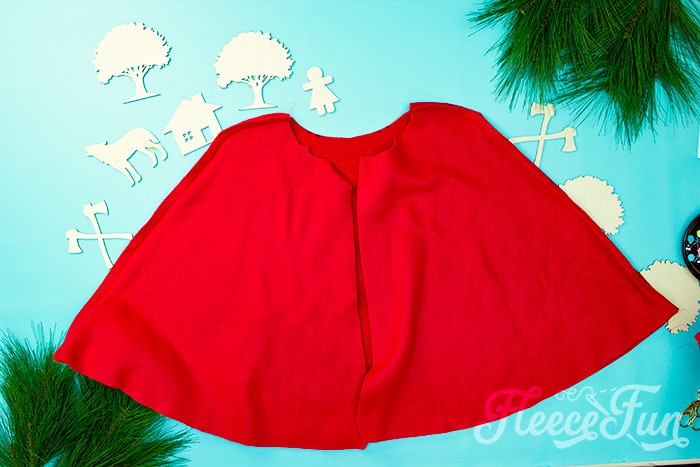
Now the cloak is ready for the hood.
Step 4 – Attach red riding hood to the cape
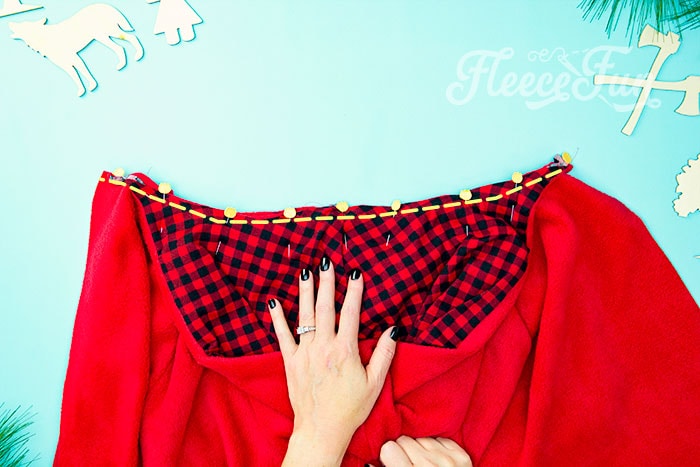
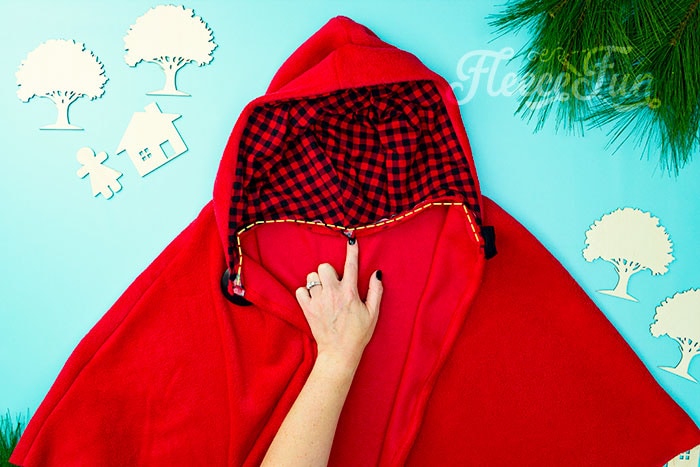
Next it’s time to bring the red riding hood cape together. Using all those arrows we marked, line up the hood to the neck of the cape. Right side of the cape should be touching the right side of the hood exterior, the lining facing up.
Quick Tip
The hood does NOT go all the way to the front ends of the cape – so be sure to use those arrows.
Sew the hood to the cape using a .5 inch seam allowance. Take your time and go slow, you’re dealing with a lot of layers and might need to lengthen your stitch. Be mindful that fabric doesn’t bunch up under a needle.
Step 5 – Finish The Front of the Cape
If you’re pressed for time you can skip this step. But the cape will look nicer if you do this.
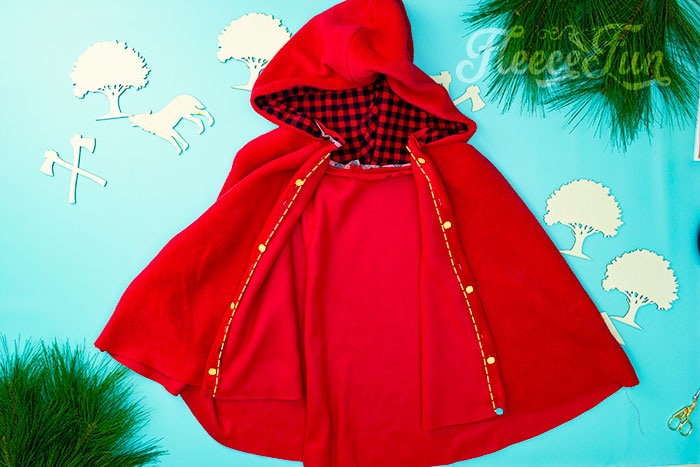
On the front edges of the cape, turn under 1 inch and sew into place. ( A Zig zag stitch along the edge works great or a straight stitch). At the top (neckline) you will notice that fabric from where the hood ends to the edge of the cape needs to be turned under .5 inch and sewn into place.
Step 6 – Finishing up the Red Riding Hood Cape Pattern
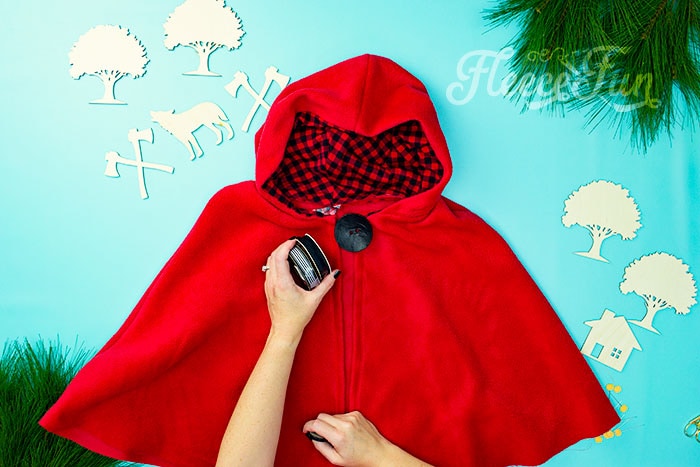
You can use several different things as the closure for the capelet. Ribbon on either side, or you can use elastic and a button. For really little kids I recommend Velcro for safety.
Sew the button on one side and the elastic loop on the other. Or cut the ribbon in half and sew each piece to the sides of the cape where the hood meets the cape.
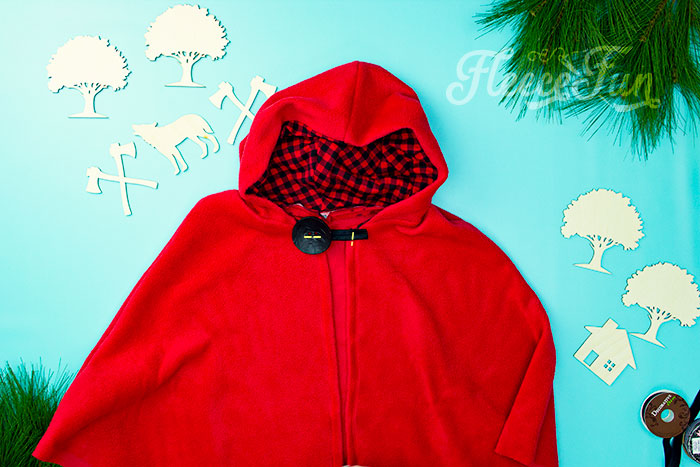
That’s the free red Riding Hood cape finished!
A few extras you can do (but are optional).
If the unfinished neckline is bothering you, you can stitch it down.

To do this, use an edge foot, use the current seam as a guide and offset your stitch to the right as far as your machine can to sew down more of the fabric at the neck.

Another extra is you can top stitch along the rim of the hood. This gives the hood a little more structure and keep the lining in place. Again optional, but nice if you have the time and skill.
I have a different attitude when it comes to finishing costume pieces – they don’t have to be perfect because they are rarely worn or they are on stage. So if you choose you can turn under the bottom cape edge .5 inch and sew a zig zag stitch to finish the edges. Or you can just leave them raw – that is the beauty of fleece/felt/ jersey after all!
Download the free pattern!
Adobe reader is the ONLY reader I recommend. By downloading you are agreeing to pattern terms of use. Fill out the form to have it sent directly to your inbox! Can’t see the form? Try here.

YOU MIGHT LIKE THESE CAPES/CLOAKS TUTORIALS:
- Long Hooded Cloak Pattern (Free)
- Fast Hooded Cape (with video)
- Easy Long Cape (Sew or No Sew)
- How to Make a Cloak in 20 Minutes
- The High Low Cape with Pixie Hood
- How to Make a Child Cape or Car Seat Poncho
- Cowl Capelet Free Pattern
- The Amazing Cape Secret on Fleece Fun
- See more of our Cape Patterns here
MORE CAPES FOR YOUR HALLOWEEN COSTUMES:
- Harry Potter Inspired Wizard Cloak
- Batman Cape Costume Tutorial
- Queen Elsa Cape Tutorial (Includes Jacket Warmth)
- The Snow Princess Cape (with video)
- Easy Superhero Cape Tutorial
- The Best Free Cape Tutorials for Halloween
Additional Fleece Sewing Projects:
- Bow Ear Warmer Headband
- Fleece Ribbon Throw
- Women’s Fleece Vest
- Headband with Ear Flaps
- Hooded Fleece Blanket
- Fleece Scarf with Pockets
- Washable Duster
- Warm Mittens
- Easy Fleece Blanket
- Quick Sew Hobo
- Child’s Fleece Robe
- Child’s Fleece Pants
You Might Also Like:
The master index of Fleece Fun’s Free Costume Patterns
Do I have to make the cape from fleece?
While fleece is a fast, affordable option for a cape there are alternative fabrics. Jersey knit is a lighter alternative and the ends don’t need to be finished. Felt is a good alternative, but can be a little more stiff and warm. More pricey options like wool, satin and other woven cloth will work but be sure to properly finish the seams.
How to make a capelet?
A capelet is an extremely short cape. Modifying the pattern to make a capelet is easy. Simply select one of the shorter lines to cut on the free pattern to make the half cape a capelet.
Does it have to be a red cape?
No! This free cape tutorial works well for many different costumes and can be made in any color you wish.
What sizes does the free cape pattern come in?
The sizes come in adult (one size fits most), Child large (children 6-10), Child Medium (3-5 years) and child small (12 months – 2 years). Perfect cape for kid, adult or toddler.
Classic Version of the Red Riding Hood Cape:
This Red Riding Hood cape pattern is one of Fleece Fun’s most popular. The circular half cape tutorial is perfect for going to grandmother’s house in – it’s warmth will keep the chill from nipping, but not necessarily wolves. This half cape can be made at different lengths (and materials) to get the look you want. Perfect for Halloween or a Little Red Riding Hood costume.

Materials you will need:
2 and 1/4 yards fleece for adult – 1.5 yards for children sizes, felt or jersey knit (depending on size of pattern and if you line the hood or not)
3/4 yard Jersey knit or 5/8 yard for a child size (or two large t-shirts, optional)
Yard of Ribbon
Thread
Assembled printed pattern
Sewing Essentials (scissors, pins, etc.)
Classic version of the Red Riding Hood Cape Pattern (Free) Child and Adult Cape Tutorial:
1- Assemble and cut out the FREE Classic Red Riding Hood Cape Pattern
You can find instructions on how to assemble the pattern here.
You will need to decide what length of cape you want to make. Cut the pattern to the same length you want on both cape pieces.

Cut out 1 of the back (place on doubled fabric on the fold so it will be one large piece ).
Then, cut out 2 of the front cape piece (place on folded cloth so you have a mirror image of the piece).
Cut out 2 red riding hood pieces or exterior, and two of the lining (place on folded cloth so you have a mirror image of each one). (if you do not wish to have a lining just cut out 2 pieces for exterior.)
So you should have 3 cape pieces – 1 back and 2 front)
Special note: You will need to cut a triangle where there is triangle on the pattern – this will help you match up the hood to the cape pieces. So cut a triangle (cut up above the pattern – not into it) to mark it. Se the picture to understand.
2 – Begin to pin and sew hood section
With right sides together pin the front and back sections of the exterior red riding hood. Using a .5 inch seam allowance sew along the path shown in the picture (the back of the hood)

If making a lining for the hood sew the same for a lining.
For Lining: Taking the assembled hood of the exterior pin along the front to lining with right sides together.

Sew along the front using a .5 seam allowance (be sure the bottom section with the triangles remains open). Turn right side out. Sew a basting stitch along the bottom (the place where the triangle marks are) to make it easier to attach to the cape, set aside.
No Lining: Turn front under .5 inches and sew, using a zig zag stitch along the edge of the fabric. Set aside.
3 – Begin to make the cape

With right side together pin the back of the little red riding hood cape to the each of the front pieces along the side seam (see pictures to the left).
Then sew together using a .5 seam allowance.
4 – Make the shoulder seam for the cloak

Now that the front and back are together it’s time to make the should seams. Pin together and then using a .5 seam allowance sew each shoulder seam.
5 – Attach red riding hood to the cape

Now it’s time to attach the hood to the capelet.
With right side together (exterior of the hood to the right side of the cape).
Pin the Hood to the cape, lining up the triangle marks.

Then using a .5 seam allowance sew the hood onto the cape (taking care that the fabric doesn’t get bunched up under the needle – if you have a lining you are dealing with a lot of fabric go slow.) You may want to sew this twice if a lot of strain is going to be made on this cape (i.e. tumbling on stage – little boy with a lot of energy…etc.)
6 – Finishing up the Red Riding Hood Cape Pattern
Cut the ribbon in half and sew each piece to the sides of the cape where the hood meets the cape.
For a more masculine look you can sew a button on one side and use a loop of elastic on the other.
I have a different attitude when it comes to finishing costume pieces – they don’t have to be perfect because they are rarely worn or they are on stage. So if you choose you can turn under the cape edged .5 inch and sew a zig zag stitch to finish the edges. Or you can just leave them raw – that is the beauty of fleece/felt/ jersey after all!
Download the free pattern!
Adobe reader is the ONLY reader I recommend. By downloading you are agreeing to pattern terms of use. Fill out the form to have it sent directly to your inbox!


Hello!
I love the cape, I’m currently working on it but what I really don’t get is the second front piece and where I have to attach it to the back piece, in the video and in the instructions you only show the back and one of the front pieces so I’m really confused
I would appreciate your help as I’m currently stuck and not sure how to continue
Kind regards,
Sam
Sam,
There are two front pieces, one attaches to the cape back on the left and the other on the right. You can match up the tabs on each piece. I only show on side in the video – you just repeat the same steps on the other side of the cape. I hope that clarifies, if you are still confused let me know and I’ll try to think of a better way to explain it.
Angel
I am lost on the cap part so you cut both out on the fold and sew them togther am I understanding that right I dont want to cut amy thing yet and waste fabric please let me know if I a reading it right
Hi Megan,
You only cut out the back section on the fold ( ie lay it on the fold and don’t cut the fold part so it is one piece). The front pieces you cut (not on the fold) so it is two separate pieces.
Does that help?
– Angel
Yes after I wrote you I started things and looking for at the pattern and figured it out thanks for the pattern cant wait to see my little girl dressed up for Halloween this year
I think you are running into the same issue that I did. The tutorial and instructions are not very clear on the fact that the middle section of the cape goes along the folded part of your material (you double the fabric and then cut out the middle section of the pattern). I also got very frustrated that nowhere in the instruction s did it state to turn the pattern over for one cut, so waste of material and waste of time there for me there too. I loved the way it turned out in the end, but wish instructions would have been better so I had less hardships. Glad I am not alone in this though! Thanks for the pattern though =) Not trying trying to seem ungrateful.
Serina,
Sorry am assuming in the tutorial that you are cutting on doubled fabric – as that is how it is done in most sewing patterns unless other wise stated I will try to clarify it. There is no need to “flip” any of the pattern pieces if you cut out the entire thing on doubled fabric.
– Angel
Thank you really much for that beautiful work. I followed you advices and made a cape for my kids. Thanks a lot from France!
Hi Anfel Thanks for this fantastic pattern, it has worked a treat and got us out of a tricky situation. Very much appreciated. It looks brilliant.
Jacky, glad to hear it worked for you! Feel free to post pictures on the Fleece Fun facebook page if you like!
This was soooo easy to do! And I liked the fact that it was so quick too! I made 2 of them for children.
I also couldn’t resist I made myself one and adapted the length to my ankles.I put in a zipper pocket for debt card and money on the inside. I also added slits for my arms.Added a pocket for my cell as well . I also used a batting inbetween both pieces of fleece. I did finish all the edges off with my rolled hemmer on my serger. I used my serger to make the whole cape! Everyone loves it and asks where I bought it!
Next now that I have the pattern still I am going to make a wool ankle length out of winter weight and line it with satin !!! And I have enough prequilted thin batting to add as well. This one will be for cold weather obviously!
Thank-you for such a great pattern!!!
If only you had a pattern for : it looks like a cape hood with a scraf attached that crosses in the front of your neck. It’s wide not thin and it’s winter wear. i don’t know what they are called. Women in Ireland and Scottland wear them. I have tried to make the pattern myself but am missing something it doesn’t come out right! probably something so obvious and simple I can’t see it!
Thanks again!!! Keep on sewing!
Hi, I’m still confused by the second front piece after reading the other comments. if the second front piece goes on the right side of the back piece, then where does the second shoulder seam go if there isn’t a second should seam piece cut out on the right side of the back piece ?
If you could help that would be great!
Thanks
Thankyou for this fantastic pattern. I made this for my almost 6 year old who is playing red riding hood in a school production. Was really easy to put together. I lined the cape as well as the hood and made the shoulders slightly smaller for her. It looks fantastic and her teacher was very impressed.
Hi Cindy!
So happy you had success with your project!
Hello !
This is what I needed ! Before trying, i’d like to know what is the size of “Adult size” and “Child size” (because I’m small… and quite young :’D).
Is that the child size may be suitable for someone measuring 1 meter 50 ?
Thank you in advance.
Echo.
PS : Sorry if my english is bad, I’m not english or american.
Hi Echo!
The child size would work well for someone short with a small frame (body). I would recommend assembling the child cape pattern and holding it against you to make sure that it’s what you want before sewing.
Good Luck!
Angel
Hi guys!
This tutorial is awesome, I’m actually plucking up the courage to try sewing something thanks to your video tutorial. I’d love to make a hooded cape for my niece, who’s just turned one. What age child does it fit, and what should I resize the pattern to, to suit?
Thanks!
Ele
My little girl wore it last year (she was 15 months at the time) for Halloween, and it was fine (just a long cape). You might want to try printing it at 75% – 85% to make the hood smaller, but I made the cape purposefully big for my little girl so she could use it for a few years.
You do have the option of making a shorter length of the cape in the pattern so it won’t drag on the ground.
Good Luck Eleora!
– Angel
I’m 14 and I’ve looking for something like for ages and I would like to know can u alter the height of it? You know to dragging on the floor to just above your feet?
Hi Ash!
Unfortunately because the cape has a circular bottom it’s really not possible just to make it longer without completely redesigning the pattern.
– Angel
Hi Ash
If you buy extra fabric and reposition the hood to a separate piece, you can extend the side edges of the cape another 15-ish inches. It likely won’t trail on the ground (depending on how tall you are), but it will be longer.
OK, so when I looked at what I actually did with the pattern, it is a bit more complicated than that…. I also adjusted the angle of the side seam so the cape wouldn’t widen out as much.
I love the tutorial! I am actually trying to get a head start on my husband’s Halloween costume for this year… he is 6ft 6in… can I add length to the end of the pattern so it will be a floor length cape for him? The fabric I have is only so wide, so I was worried about the ends not being able to fan out, but have to eventually go straight down. Any ideas?
Hi Carla!
Because I kept the pattern simple and it’s a circular bottom it’s more complicated than just extending it. If you do what your suggesting I don’t know if the cape will fall correctly in the front. It looks like I need to design a longer cape pattern! But I won’t be getting to that for a while. =(
– Angel
Hi, I love this tutorial, I just watched the movie (with Amanda Seyfield) yesterday and your design comes really close. The only thing I will be adding are the gaps to put my arms through like in the movie 🙂 I have one question though: how long is the longest option on the adult pattern? I didn’t get a good view of the total length on the girl in the video and I would like to have it almost dragging on the floor. Thank you so much!
P.S. I’m going to check out your other designs and ideas 😉
Hi Angel,
I downloaded this cape and assembled the pattern last night, but it’s shorter than what I expected.
I am confused though as there is a comment on the front pattern’s hem that says “This line half cape size”
Does this mean this cape is a shortish one (half a cape) as I see the other markers says “capelet size” and “mini capelet size”
Regards,
Susie
Hi Susie!
Yes it’s a half cape – not a full cape. The other lines are to make an even shorter version of the cape.
Angel
It is freezing were I work so I was going to make a couple of these as gifts for the girls at the office. Of course we have to type for 8 hours a day. Where would you put slits for your arms to come out?
Thanks for the help KL!
Hi KerryLynn!
The best place to put a slit is at the natural waist (right around where the belly button is ) and about eight to ten inches from the center.
Good Luck!
Angel
Thanks thanks thanks for sharing your patterns! I’m using this one for my Lux Spellthief cosplay and I’m sure that it will turn out really well!
Thanks again for your work =)
Hi June!
How fun, You’re welcome!
Angel
Hello Thank you for the wonderful pattern. I needed a pattern for book week, my daughter will be little red riding hood. I had problems with the pattern, I had trouble locating red fleece, so settled for a 1 flat double bed sheet, and 1 pillow case (from the cheapo shop). I also doubled the length and fully lined it.
Looks fantastic. Thanks again. Now will have to explore your site further….
Mel
sorry I meant to say I had NO problems with the pattern
Hi Mel,
Oh good! I was wondering if you needed help with something. So happy the pattern worked!
Angel
Hey! Thanks for the pattern. I’m going to attempt to make this pattern a lolita-style capelet with tons of lace as soon as i get the money to do so. (teenager living off allowance). Is this pattern suitable to cottons or broadcloth because that’s what I plan to make a matching skirt out of. I know it will ravel in the sewing process, but I am very experienced. So, will this work with cotton?
Hi Robin!
As long as you finish all the edges – it will work with cotton. So either turn it under a .25 inch twice and sew down the edges – or if it’s just for a costume piece fray check (fabric glue to keep it from fraying) along the edges can be a quick fix too with less sewing. Good luck with your costume!
Angel
Thank you! I actually plan to line everything and the hem will be trimmed with lace.
Very nice! Send a pic or feel free to post it on the Fleece Fun Facebook page when you’re finished!
Angel
Hi Robin-
I’m working on two little hoods (kids mini caplets) and I’m using cotton with full lining myself. Two things: First stay stitch the neck on all of your pieces, the circle puts almost everything on a bias and this will help loads when your matching up your hood and cape notches. Second, a ham will help with pressing out the hood. The design lines that make this pattern so great won’t fall so beautifully in cotton without the pressing. Good Luck!
Hi! How long is the finished product? And is there anyway to make it longer or shorter?
Hi Jennifer,
The finished product comes to the tops of the legs on a female and just below the waist on a male ( it’s a half cape). There are guides built into the pattern to make it a shorter cape or capelet. I know there are people who have extended the pattern on there own to get the length they want. I have a new full length cape pattern that’s coming out in a few weeks.
– Angel
Looks awesome, only I was wondering if it would be a problem to put a collar on it instead of a hood. I’m planning a swordswoman costume and this looks like it’d be great for a swordswoman cape.
Hi Stephanie!
yes a collar is possible – you could even skip the collar and just turn the neckline under to finish it.
Thank you, I’ll be sure to let you know how it turns out. 🙂
Hi Angel, thank you for the wonderful pattern. My daughter needed a Red Riding Hood costume too and this was just perfect. You can see pictures here on my blog.
Hi Vicky!
So happy that it worked so well for you – your little girl is adorable! Thanks for the post and the mention!
– Angel
Thankyou for sharing this free pattern and tutorial!!!!
My sister and I made the child size out of red poly-cotton for her daughter to be “little red riding hood”. We over-locked (sergered) the seams and did rolled hems on the (unlined) hood and bottom of the cape. My sister cut the front edges on the selvage and as it is just for dress-ups we just left those. So I can say it definitely can be made in cotton or like fabrics.
This was super quick and easy. Thanks again for sharing the pattern.
Hi Angel! I’m French so maybe my English would be sometimes “catastrophic” for you but I think you won’t have problems to understand me…
Thank you for sharing your pattern! You have the only free pattern I could find and also one of the best! Your help with videos, your comments..the whole it’s quite easy to understand (even for a “no English speaker”)and you seem nice! It was the first time I try to make a “costume”myself. I’ve always wished it ! With patience and with no professional furniture I finished with a surprinzing result… it was a very good pattren, for exactly what I wanted! I’ll wear this Red Riding Hood , thanks to you, this week-end for a party and I think it will be a “sucess”!
Thank you again, Continue to make a so beautiful work!
Bye 🙂
Melody,
Merci! I am happy the pattern worked for you. I think your English is excellent – especially compared to my French (c’est horrible). =)
Thank you for your kind words,
Angel
Especially for you… a photo of me wearing the Red Riding Hood’s costume… a real pleasure for a successful effect and a great party! A simple means to be in the skin of our childhood’s character 🙂
Thank you for your reply on September 13th… you said my English is excellent and it made me so happy! I love the idea I can communicate with someone who speaks an other language … And just a thing… your two words in French, it was absolutly cute! 🙂
Have a good “continuation”.
Bye.
Mélody.
mooooh … I’m disappointed ’cause I don’t manage to send you the photo… Maybe you can have a look on my facebook, but it’s only if you’re interrested in it of course!
My facebook: Mélody Nargeot (i’m French and, a curly -blond -haired and blue-eyed girl XD )
Bye.
Mélody.
I can’t sew. So how can I buy the red riding hood cape?
Hi Amy,
Thanks for your interest. I’m sorry but I don’t sew for hire. Maybe ask a friend who sews to make it for you?
– Angel
Hi, I love this pattern – I’m making the cape for my daughter for halloween. But she wants the cape to go to the ground. I saw from other questions that you were thinking about adjusting the pattern for this. Did you by chance get that done?? If not I’m going to try it myself.
Thanks for your help either way!
Joe’l
Hi!
I’m making this for my younger sister and her red riding costume.
I was curious about the length. How long will the cape be? She wants it fairly long so would it be appropriate for her height of 5′ 4″?
Hi Alexia!
On your sister the adult size would fall a little below mid thigh.
Good Luck!
– Angel
Hello Angel!
I am so excited to try out this pattern for Halloween, but I was wondering if you have tried any other materials? I’d like to try making the adult cape out of velvet but I still want the hood to have some body to it. Do you have any suggestions? Thanks so much for the pattern!
Cat D
Hi Cat!
If you are using velvet be sure to finish all your edges – but I am sure it would be beautiful. To make the hood have some body to it you may consider lining it felt to hold up against the heavy velvet ( you may want to line it twice – and sandwich the felt between the velvet and satin for a nicer look.)
Good luck!
Angel
Hi, did you really fit the longest option on 2 and 1/8 yards of fabric?! I am really having trouble getting it all to fit 🙁 How did you do it?
Hi Kayla
The fabric has to be at least 60 inches wide (typical for fleece) – if it’s not it won’t work. I’m guessing that’s where the issue is. But I have made this pattern multiple times with that amount of fabric.
– Angel
Hi! Im in love with your website! I want to start making the cape for my halloween costume, but I do not own a sewing machine 🙁 Do you think that using a glue-gun will work?
Would you believe I made two capes for my boys this afternoon. It only took me one and three quarters of an hour. Two Jedis were born.
Thank you very much .
Christel
Chistel,
That’s awesome! So happy the pattern worked for you!
– Angel
I am unabke to get the large child pattern to open up 🙁 any idea i keep getting a message saying the website is having trouble.????
hello I would like to achieve this cape but I have a problem with this translation i’m french. you would it be possible to send me a diagram with the final patern mounted to please so that I can understand can be a little better.
including how room should be cut by patern.
excuse me for my english.
thank you
Sebura, I’m not sure what more I can give you to make it easier. Perhaps you can tell me which step you are have trouble understanding?
– Angel
please disreguard previous post it opened fine on my desk top, I must have a glitch in my laptop. I cant wait to get this made, will post pics when costume is completely done. thanks very much for the pattern!
Thank you so much for the tutorial. I have searched for weeks to find an easy cape pattern, I don’t know how to read those ones from the store (I am just learning to sew) but yours makes it super easy. I am so glad I found this on Pinterest. I am looking forward to checking out your website to make the kids hats for my little ones. Thanks again.
Melissa
hello i was woundering if ou did have a small child pattern i want to make it for 2year old?
The child size will work for your two year old – It’s on the longer side and it looks great.
Hi, The link to the “Red Riding Hood Half Cape Size: Child” actually connects to the “Red Riding Hood Half Cape Size: Child LARGE” Is it possible to get the pdf for the Child size (not Child Large)? I’d love to make a cape for my baby daughter (5 months) and I’m hoping I can alter/shrink the pattern to make it for her (she has a rather large head, so I think it should work…) Thanks for your help!
Sorry fixed the issue – try it again
Thanks for fixing the link! I went out and got fabric this weekend figuring I’d try to alter the child “large” version and see what I could do… but now I don’t have to! I’m very excited to try to make this. Thanks so much for sharing your patterns – you’re the best!
Super excited to try this! I’m wanting to do the child size, but when I click on it, it brings up the child size large pattern (both the child size and child large appear to be exactly the same). Do you have an actual child size pattern, or just the Large? My baby is 7 months old, so it needs to be pretty small. If there is no child size, I’m thinking about printing out the pattern at 50-60%–do you think that would work?
Thanks so much!
I am a first time sewer, and I love the pattern, but the explanation on the hood assembly with liner is very unclear and the video does not ever actually show clearly how to pin it together. The typed out instructions are very unclear as well, please help!!!!!
Hi Lila,
For the hood exterior you are going to sew the two pieces of the hood together as shown on step two ( The first pattern piece shown) with right sides together. You are going to do the same thing with the two pieces of the lining hood. You should now have two hoods. Next take the hood exterior, and the lining, place them right sides together, pin together along the yellow line shown on the 2nd pattern piece in step two. Sew the two hoods together (they should be inside out seams facing you) along the yellow line from one end to the other of the hood front. Then turn the hood right side out.
It this is still unclear – I recommend calling or asking a friend with more sewing experience who can physically show you what I am talking about. =)
– Angel
Scratch that–after I submitted my comment, it magically started working. Thanks 🙂
I am confused with the amount of fabric. Is the 2 1/8 yds for the adult pattern? (i.e. how much fabric is needed for the child version?). Also, does this cover both the cape and lining? So, if I wanted to line it with a contrasting fabric, would I split this amount in half?
If you are trying to fully line the cape you will need to double the fabric – only the hood is lined. For a child version you will need 1.5 yards of fleece. for an unlined cape.
Hi! I need the child large size but when I click on it to print the pattern, only the child size shows up. Also I was wondering why you would need the same amount of fabric for every size and style cape?
Hi Brianna,
that’s been fixed. For the child sizes you’ll need 1.5 yards of fabric.
I was wondering how wide the fabric has to be? I believe most fleece is at least 54″, but I want to make this out of faux fur and it may not come as wide. It if for my 7 year old, so I will be making a child size. Any advice? thanks
Hi Joanne,
The pattern is based on wide fabric (58 inches) – the child pattern is smaller and will work with a smaller width – but not much smaller. The fabric needs to be at least 49 inches wide for a child large and 41 for a child. So it depends on the width of fabric you can find the faux fur in – as it can vary.
Good luck!
– Angel
I am very confused by the part where you sew the hoods together for a lined hood. I can’t seem to understand how to sew both pieces together. help please 🙂
BIG THANK YOU! My daughter (19) and I made the cape on Friday night. She’s wearing it as part of a Little Red Riding Hood costume. Neither of us have any great sewing ability. Nonetheless, it turned out great! Directions were easy to follow. Probably took me almost as long to assemble the pattern as it did to actually sew it. You are a genius!
Hi angel,
I’ve made the cape but extended it to full length for my daughters wedding. It is beautiful!
I’ve made it with ivory fleece lined with duchesse satin and trimmed with faux fur. She is so pleased with it, as am I! Your pattern was really easy to work with especially the tutorial – not bad for a first project! I’m now looking at making the bow wrap to match for the evening- thank you so so much!!!
Tracy x
Tracy
How wonderful – I would love to see a picture of your project!
– Angel
Angel, I do have some pictures, but I don’t know how to upload them.
I would love to show you my lovely cape!
Tracy
Dear Angel,
I’m from Holland and I was wondering about the amount of fabric.
Since we use meters instead of yards, I tried to translate it into meters by using the internet. I think it’s about 1.96 meters so naturally I would get 2.00 meters from the market, but you think that’s about right?
Kind regards,
Sophie
Sophie,
I believe that would be right. That should work.
– Angel
Great pattern! I’m a beginner sewer and was able to do it in one night, and added a lining to the whole cape as well (because I plan on wearing it when I take the dogs out in the winter). I wish it was longer – I used the max size but it still only goes to my waist. But it’s still cozy and looks way better than a snuggie, heheh. One question I have though – any trick to making the shoulders not so boxy? In the picture the cape lays and forms to the shoulders, but on my cape the shoulders create a point and kind of look like it has shoulder pads. I wonder if I didn’t meet the shoulders the right way? *shrug* Any suggestions?
Thanks again for a wonderful pattern!
Hi Mandi, If you email me a picture of the should seam meeting the side seam I might be able to offer some suggestions. But so happy that for the most part you had success!
THANK YOU for putting out this pattern. We are having difficult economic times right now – I already had the fabric, but no money for a printed pattern. It is my tradition to make something for a costume for my kids every year, and I will be able to do it again, thanks to this pattern!
Thank you for the pattern! My daughter and her service dog are going to be Red Riding Hood and The Big Bad Wolf for Halloween this year and this pattern was perfect! I LOVE the hood! It looks so great and was easy to whip together this afternoon. My daughter loves it and it will be so warm for trick-or-treating. Thank you for sharing!!!
I am attempting to make this for my 3 year old as part of her little red riding hood costume. The question I have is if I am not using fleece but another material for the hood pieces do I cut 2 and then flip the pattern over and cut to facing the other direction? Sorry to sound dumb but I am new to this and my material is one sided and I’d think for the pieces to match properly I would need to cut 2 one direction and then 2 the other direction? Does this make any sense?
Hi Shannon,
Yonly need two pieces of the front – the back is one peice. If you cut the fabric on folded fabric – you won’t need to worry about flipping it – just cut out both pieces at once.
I’m so sorry my daughter accidentaly deleted the first part of the message before I sent it. The question I had is if I were to line the entire cape, when would I attavch the lining to the pieces? What would be the easiest way and which sides facing which to make sure I have a clean look ?
I was wondering if you could make one for me because I can’t sew.
I am confused! I printed the pattern. I follow the grid layout but I have extra pieces!
23-30, No idea where I need to put these!
Hi Nellie,
On the second page of the pattern is a Map that will show you where the peices go. It will show you clearly where they are located.
– Angel
Thanks so much for the wonderful video and pattern. I made this for my daughter today and I am a novice at sewing at it was easy to understand. My daughter will be adorable in this cape for Halloween as Little Red Riding Hood.
Hi!
I think that you may have uploaded the wrong “large child” pattern. The large child pattern is the same as the adult pattern (30 pieces), but on the grid the large child pattern only has 22 pieces. Could you please upload the large child pattern?
Best,
Doris
Doris,
The issue has been fixed.
Thank you for posting this. I made a Belle costume for my daughter for Halloween, and now the forecast is calling for 40 degree temperatures and rain. I went out today and picked up some burgundy colored fleece and fake fur trim and soon Belle will have a cape to go over her gown so she doesn’t freeze. So glad you included the shoulder seam, I think that will make it fall nicely around her rather than some of the other capes I’ve seen online.
Thank you so much for this pattern! I couldn’t find red fleece, so used felt. I added four inches in length to the child large for my 14-year-old daughter. It only took a couple hours, and looks great! She’s now all set for a red-riding-hood Halloween.
Thank you so much for offering this FREE pattern! I found a big fleece blanket at Walmart for $2.88, much less than fleece yardage. The finished cape looks really nice and was very quick and easy to make, even for me — I am not a very experienced sewer. I made this for my petite 2.5 yr old and did cut it down a little. I made a smaller hood and then cut the front edge of the cape to match (decrease in circumference). I can send you photos of my little one in her costume. I will post this on my FB page and recommend your site. I love it! You have a ton of talent. Thank you!
Angel,
I wanted to make the small childs cape for my daughter, but I can’t work out how the pattern pieces work.
There are 3 negatives and 6 extender pieces.
In the instructions there are photos of much bigger front and back body pieces.
Hi Rebecca!
The pieces for the cape pattern are much smaller than the adult (in the pictures it’s an adult cape). The cape pattern is for the easy long cape – which isn’t on this page. THey work just the same as in the example – they are just smaller for a kid.
Thank you sooooooo much for posting this pattern!! I just started working on a little red riding hood costume for the Armegeddon convention next year, but had NO IDEA how to make a hooded cape!
Your a lifesaver! And I’m REALLY looking forward to making it and copsplaying in it!!!
Thank you! ☆*:.。. o(≧▽≦)o .。.:*☆
Thanks for the pattern. I’ve just finished outfitting a cast of 17 for a student play with an adapted version of this cape, and they look fab. Watching actors swishing around in them was the funniest thing I’ve seen in a long time 🙂
Wow! I don’t envy you that task!
Hello, there!
Thank you so much for the pattern, I haven’t seen them yey, but I have a question. What ages/sizes would you say the child size is for? See, I have six nieces (ages 3, 4, 6, 7) and I’m not sure if I should use the child large size for the older ones. I don’t think I could measure it on them because I want it to be a Christmas present for them.
Thank you!
Hi Iris,
I would use the child for the 3 and 4 year olds. I would use the child large for the 6 and 7 year olds.
– Angel
Thanks so much for this pattern! I’m making a cloak for a princess who will be riding in a convertible car in a local Christmas parade. I wanted it longer so it could be draped all around her. I used artists sketch paper (the big sheets) to place under the pattern at the bottom and extended the lines around 10 inches. I redrew the circular bottom as best I could by measuring from the original bottom line to a spot 10 inches away and drew a 1″ dash line. I did this every few inches and then connected the dashed lines to form the circular bottom. It might not be the perfect method of redrawing this pattern to be longer but it’s the best I came up with. I sewed a trial run on some ugly cotton and it came out great. Now for the real one on the real fabric! Just wish I knew how to split that back into 3 panels. I think that would save on fabric.
bonjour, excusez moi .mais est ce que je peux mettre votre lien pour les explications de ce modèle sur mon blog sans mettre de tuto. merci de votre réponse
bonne journée
Yes a link to the tutorial is fine. Posting the instructions and pictures to instructions is not allowed. Thank you for your quick reply.
– Angel
Hi! Thanks for the pattern! I found it on “all free sewing” I have very thick long curly hair and have been pondering off and on making a hoodie with an extra large hood so it won’t smush my hair. I tend to kind of ‘sew by the seat of my pants’ but didn’t want to waste time and fabric figuring out the large hood so thank you! Looking forward to making it!
Dear Angel, I assembled the pattern , was looking at it, and I discovered I wasn’t paying attention and also bought 2 1/8 yard for lining it. Would added a mini capelet to the shoulders in the other color I bought be ok, because on the pattern it says not to modify it and say its your own but I didn’t know if you would care or not so I dedided to ask.
Thanks, Zach
Hi Zach,
You are welcome to modify the pattern for personal use – the wording saying not to modify it is to keep people from taking my pattern changing it and then claiming it’s their own design. But you do whatever you want to make your cape work for you! =)
Angel
Thanks a bunch, and thank you fr replying so fast.
-Zach
Oh!!!! I’ve always wanted one of these capes! Not as a costume, but as a “Jane Austen character going to the ball” instead! Thank you so much for the pattern and instructions!!!!!!! You’re the best! 🙂
Hi I’m doing this cape for drama class and my teacher loves it. I just wanted to say thank you. Bye
Hello, thank you for your answer! I have finished the cape for my daughter! It is beautifull!!! The hood was just the perfect size!!!
After the Carnaval, I will send you a photo with the complete costume!
Once again thank you!!
Filipa Romeira
Madeira, Portugal
Hello !
I don’t speak english very well, so… If someone here speaks french, I need some help…
I don’t understand if I have to do every step twice and sew them together, or if I really don’t understand how to do !
But this cape is really nice and i abstolutely want to do it !
Hope some help !
Thank you !
Alison could you tell which step you’re having trouble with specifically? I will try to help or word it a different way.
thanks for this pattern! I am not a sewer, but yet I made this in one evening. Easy and fast – that’s my kind of project!
Thank you.
Thank you so much for this wonderful pattern and tutorial. I made a cloak for my daughter in crushed velvet (sorry!) and it was so easy and turned out beautifully.
Hello! I just finished this cape today, and it looks gorgeous! I made it for a girl who is in a musical with me, but instead of fleece, I used velvet. I also replaced the button or ribbon for a golden clasp, which looked nice with the fabric. Thank you so much for the pattern!
Hi,
Just wondering how wide was the fabric you used? I’m trying to do this on a budget and have worked out that I can get away with 2 meters of this (as they are slightly longer than yards) but just wanted to make sure as the fabrics I’m looking at are only 45 inches wide
The pattern is based on fabric that is 58 inches wide. So you will need to find a fabric that width.
– Angel
hi.how are you?i am not speak english.l love sewing very much and your site.are you learn sew for me??
Thank you very much for the pattern. My 3 year old daughter wanted to be a Little Red Riding Hood for World Book Day. Where all the children at school dress up as a favourite character from a book. I made the hood with a newly bought sewing machine. I also made another little hood for her beloved doll with leftover fabric. She adores them both. More happily she won the Best Costume Prize in her year at school The costume made everybody smile thanks to you!!!
Thank you for an excellent pattern. I have just used it (the middle length) for a toddler who has to appear on stage in her teacher mum’s school as Little Red Riding Hood. It makes her enchanting and magical. – the perfect pattern for a fairy tale.
Thankyou so much for this gorgeous pattern! I only found your website this morning, and finished the cape this afternoon. I did it in bright red satin with a bias binding edge and it looks fabulous! I love the fullness of the hood. I now have a very happy Miss 6 who will be wearing it for her school fairytale parade. Thanks again, Katrina (Sydney, Australia).
Hello,
Thank you for this pattern. I just made three capes in the last couple of days. The first one I made with a velveteen blanket from WM that I got on clearance. It was a child’s size large for my dd. I added a cute button and old fashioned macrame hook closure. I then wanted to improvise with two more capes and tell you how it went. I made two more capes from camo-fleece blankets also clearanced priced that I wanted to fashion from the ones that Princess Leah wore in the Return of the Jedi movie. You should see them!!! I decided to try an easy on cape with hood without front opening ( just put over head). I cut two of the back pieces that you put on fold and then the hood. The measurements of the hood fit perfectly. I sewed the hood bottom skinny pieces together to attach hood and then pinned and sewed to the two “back” pieces that I had attached. There is plenty of room to slip over your head and the cape with the beautiful generous hood looks fantastic. I also added length to the capes. Thank you so much. I can send you a pic if you would like. Blessings. Lori
Hi,
Im thinking of making this cape for a hobbit costume. I was wondering how long the cape was. The hobbits’ cape goes down just below the knees. Could i still use the patten or would i have to extend it?
btw i love the website and crafts!
thanks!
The cape is a half cape so depending on the persons height it hits between the waist and the mid thigh.
Thank you for this amazing free pattern. I made it in an evening for my little granddaughter to wear to a Grimms Fairytale Day at school today. She won ‘Best Costume’ and its really all thanks to you Angel!
As well as the cape I made a full circle red checked skirt, a full circle white lace petticoat and a small matching white apron. So easy but the cape was the main piece which made the whole outfit look so cute.
Little sister (4) now wants a ‘My Little Pony’ costume. Help!!
Sincere thanks again
Judy
Hey. I would like to know how long the cape is supposed to be. Is it to your knees or higher or lower? Thanks!
It’s to the knees.
Thanks,
Angel
Thank you for this beautiful and creative pattern, People have to learn to see the patterns in a 3D way (stop and use your imagination). The instructions are very easy and fun, no need to get upset.
Hi can I just check the seam allowance is 5 inches? Not cm? I’m getting confused as it seems an awfully big seam allowance, why not just cut less material? Thanks.
Oops ignore last comment, I was being silly! That’s what the point is for, 0.5 inches, not 5 inches!! Lol! I am sewing for my wedding so brain is a bit scrambled!! 😀
No worries Dani – good luck with your cape!
Hi!
The pattern is exactly what i was looking for! I’m a french speaker so i have a question: do we have to cut the pieces .5 inch extra for the sewing, or is it already included in the pattern?
I hope my question is clear and my english not too bad 🙂
Thanks for everything,
Delphine
Hi Delphine,
The seam allowance is already in the pattern – so you can just cut out the pattern as it is and start sewing!
Thanks,
Angel
Thanks a lot!
Thanks a lot!
Thanks so much. I just finished my cape. I made it using black fleece and added lace around the bottom. Can’t wait to wear it this weekend at the Renaissance festival!
Hey
Thanks for this pattern, it looks absollutely gorgeous. I really want to have my own. But here is one question. Did anybody find a way to make it longer? Because I would like it to go too my feet.
Hi there,
my free patterns are offered “as is”. I am working on a longer cape that will be out in a few weeks. =)
– Angel
Hi,
I was wondering which style/size you would recommend for the following. A 5’4″ woman, who is a size 2 in adult, or for shirts an extra small/small. Would you make the adult size for someone like that, or the child large ? As they don’t want it to be too big across.
Thanks.
Hi,
I was wondering for a 5’4′ adult woman would you recommend the adult size or child large ? She wears a extra small or small top, and a size 2 pant. Looking for a cape that fits nicely and doesnt have major excess fabric.
Thanks,
Alison
Hi Alison,
I would think the child large would be better on such a petite person. To make sure I would assemble the child’s pattern and hold it up to the person you’re making it for to give you a better idea if the fit will be right for her.
– Angel
Hi, I wanted to make a floor length little red riding hood cape and I am 5′ 9″. So I was wondering if you could tell me the measurement of the 3 different cut out patterns. For example, what are the dimensions of cape cut 1, length, biggest width and littlest width. Thanks!!!!
hi there!!thank you very much for a very usefull tutorial i made two of these “red riding hood” for my own daughter “angel” shes 5y/o..i made a purple one and a blue one..she loves them very much..i do thank you so much for a very nice tutorial you have here…Godbless always to you and your family..
im going to share my link here so that i can show you my work i post them at pinterest.com…
thank you again.
http://www.pinterest.com/pin/26529085278322733/
Hi Gina,
I love the ribbon detailing you added to the cape – very pretty! Thank you for sharing your creation with me!
– Angel
My daughter wants to be a princess with a cape for Halloween. Thank you so much for this pattern. Of course, my daughter picked out a very messy fabric, it’s shedding everywhere. However, when it’s done it will be so nice!
Wonderful pattern, i made the childs size for my super tiny 3 month olds Halloween costume but i lined the inside with a nother felt so its reversible(and will really help in missouri’s winter!) I had to tweek it a bit since the fabric became super thick but it turned out wonderful. It falls below her feet, but its not like shell be walking soon haha. And it even fit me going to my waist at 5’6. Glad that this will last as long as i can take care of it. Thankyou for this excellent pattern
Hello,
I am making the cape for my 18 month-old and love it so far!
Right now I am just stuck at the assembling of the hood to the cape. When I just sew the hood on the cape (right sides touching) aren’t you going to see the place where I sewed when wearing the cape?
Thanks
Can you PLEASE response to comment 154, I just want the basic measurements of the cape so I do not have to print the template out thanks!!!
Love your detailed pattern! Photo, video and detailed instructions – THANK YOU!!! I am tackling this cape for my daughter’s costume of Princess Belle. We live in NY and it will probably be very chilly around Halloween. I was thinking of purchasing online both a velvet material along with a fleece/winterfleece. Do you think this would be too cumbersome and thick to sew this pattern with?
Velvet, can be a warm fabric by itself. You may want to consider lining the cape with a lighter ( but warm) fabric like a flannel.
– Angel
Loved the pattern! I hurt my shoulder and can’t wear jackets, this was a life saver. And super cute too!
Just finished this cape for my daughter. Fantastic pattern and instructions, can’t thank you enough can’t believe I managed to make something that looks so good. I am smiling just watching her in it.
I am having trouble getting page #29 and #30 to print. Am I doing something wrong? The rest of the pattern prints just fine.
Thanks
Hmmm not sure what the deal is… it’s coming up fine – are talking about the physical page number or the pattern page number?
The hood needs to go on as is, but you might consider extending one of the front panels so it can go across the body and open one the side.
Good luck with your project!
Angel
Hi there!
What a great site, thank you for making these patterns free and easy to access and use!
I want to make a cape for my 5’2″ daughter. Should I use the adult or the child large? If I missed this information somewhere, I’m sorry.
Emily
Yes a child large will work!
Hello your pattern is just beautiful and I’m going to attempt to make it for my niece. I’m fairly new to sewing so I hope it comes out nice but my question is which pattern would you recommend for a 13 year old she about 5’3″ and wears a juniors sml/med. would the adult be to big? Or should I use the child large? Thank you you are super creative love all your patterns
Child large will work, I think the adult might drown her.
thanks so much for the pattern, we were in a great hurry, deadline coming up next day, we didn’t find a red riding hood kinda coat anywhere, so we bought a cheap cloak and this pattern helped me sew a hood for it! in great hurry and last minute it was really helpful thank you!! ^^
I love this cape and would like to make it. I tried to pin this page to my Pinterest page but your pin link doesn’t seem to work. I tried several times and it just won’t pin.
Hi,
Thanks so much for this fantastic pattern! I”m going to get started on it today.
A quick question – For the adult size pattern, how much fabric is needed for the caplet (i.e. the medium length)? I don’t want to buy more material than I will need.
Thanks so much!!
Michelle I’m sorry I don’t have that information with me and am away from my main computer. I suggest putting the pattern together and measuring it to gauge the yardage. 🙂
– Angel
Thank you so much for the pattern. My cape turned out very well.
what is the difference in the sizing of the child large and the adult size? I’m assuming this will mostly affect the shoulders.
The shoulder, the cape length and hood are all different.
Thank you so much for your awesome patterns and tutorials. I just made this cape but I fully lined it. It looks amazing, and I think My daughter is going to rock Little Red Riding Hood. I had previously made the pleated skirt out of cotton for her. It looks complicated but was a breeze to make. It too was a great tutorial. You do a fabulous job making easy patterns that look great and have easy to follow directions! Just wanted to stop in and say I appreciate it!
Thank you so much for posting this pattern. You have made a little 7 year old very happy, which makes me very happy!!
Thank you so much for the little red cape what a great pattern!!! its a huge hit! I love all your stuff and the tutorials just amazing! keep up the great work from Thea at ryan’s cottage
I made this for my daughter for her Halloween costume I made it full length however and It was a huge success.. She is about 5’5 I used the child large and it worked great, Thanks
Thanks for the pattern. I used it to make a bridal cape. I made some alterations. I lined the cape as well the hood so it is reversible using white swirl fur and white bridal satin. I used 3 yards of each because I extended the pattern ten inches longer in the satin and thirteen inches longer in the swirl fur and three inches wider in the swirl fur on the front edges and around the hood opening. I stitched matching the edges, so that when I turned it right side out the fur extended 1 1/2 inches beyond the satin for a fur boarder look. I emailed you pictures of it since I don’t see a way to post them here. Thanks so much for sharing your talents.
I am wanting to make this for 11 girls for my churches daycare Christmas play they are doing in 3 weeks. This is all perfect but I don’t need to add a hood. Any specific instructions needed since I don’t need to add the hood? Thank you for providing an amazing pattern with detailed instructions 🙂
Don’t cut the triangles out to line up the hood. You might want to finish the neckline with bias tape or turn it under a half inch and sew a zigzag stitch along the edge to finish the collar and prevent stretching. But it should work without the hood.
I love this pattern, thank you for making it not only free, but SO easy to understand. I made this last winter and my daughter loves wearing her “Pink Riding Hood” on chilly days (not that we get many in AZ!). I just discovered tonight that by changing my printer settings to print 2 pages per sheet of paper, the child sized pattern is now the PERFECT size for a matching 18″ doll cape! I cannot wait to make this for my girl for Christmas!
To make a cape for an 18″ doll (American Girl or Our Generation doll), I used the adult pattern, but printed four pages per sheet (on the print options window). It came out perfect!
I changed this pattern up a bit by giving it added length in the back creating a hi-low hem & drastically cut out the fullness on the back of the hood. I then made it out of ivory satan and lined it with white fleece for a very elegant looking winter wedding day cover up. Nice versatile pattern! Thanks for sharing it.
Love the modification ideas! Thanks Cory!
I made it for my daughter. Thank you for the pattern.
I just made the Child Large pattern for my kindergarten daughter’s “Fairy Tale Day” at school. She looked absolutely precious!!! I’d attach a photo, but I don’t know how :/
Hi Tama,
Just started a flicker group here – http://www.flickr.com/groups/fleecefun/ where you can share your creations.
You are of course welcome to email me just to brag!
– Angel
Hi !!
I just made one for myself. It is the first cloth I make myself. I made it ankle-length in velvet and did a full lining out of polar fabric. Il looks amazing. Thank you for the pattern. I’m glad I found your website, I’m not sure I would have try this without all the explications you give and all the good comments.
Thank you very much, Kisses from France
Hi! Just to let you know that I featured your Riding Hood cape on my blog! Go check it out!
This tutorial is FANTASTIC! I made a cape (corduroy on the top and lined it with quilting weight cotton) and it is absolutely beautiful. I paid for a pattern and didn’t even use it because this one was so professional and exactly what I wanted. Thank you so much. I have two more cape orders (other two daughters!) I better get started on now…! Thank you.
Thank you so much for sharing and especially for making it a free one (I am sometimes able to buy patterns I love, but I do have a tight budget, so awesome)! I am going to give it a go in the next couple of weeks, when it´s done I´ll post a picture 🙂
I would just like to say how awesome you are. My daughter has a princess birthday party to go to and I have been looking for ages for a hooded cloak,cape pattern. I have your site bookmarked in favorites and should have remembered to just come here. Thank you so much for the time and effort you put into your site. Belinda from Australia.
I am a complete novice having never seen anything using a pattern before an I found the Cape pattern and instructions really easy to follow with a great end result, thank-you
Thanks so much for sharing this tutorial. The instructions were really clear and easy to follow. I know it was meant to be made using fleece but I actually used a heavier wool type fabric, gave it a lining and fancy fastenings and now I can wear it all through autumn and winter. So pleased.
Honestly i was looking for something different all you see is short cloaks and they bother me this is a great new stylish and easy way to get i wanted THANK YOU SO MUCH
helppp!! I LOVE this cape and I’ve looked for others but this catches my eye more than the ones I’ve found. I have no idea how to sew nor do I know anyone who can so I was wondering if it’s possible to order one already made? or buy the supplies and pay someone to make it for me? hope to hear back from you!! thanks!
Hi Paige,
I’m sorry I don’t have a shop where I sell already made items. You are welcome to print off the pattern and ask a friend to sew it for you. Also I have heard of people “sewing” it together with a glue gun…but I can’t personally recommend it. So glad you like the design.
Hello! I was wondering what width of fabric you used? I was also wondering if it was possible to use a different fabric (instead of fleece) to make the cape.
Thanks, Chyanne
The width was 58 inches. Yes you can use other fabrics as long as they are wide enough and be sure to finish the edges if they are no a knit.
Good luck with your project!
– Angel
Hello! Thank you for this pattern! It’s surprisingly the only free one I found online, which is strange. Anwho, I had a couple questions about the pattern.
1) Can I use a more stretchy fabric with this? I’m not sure what the type of fabric is specifically but it’s very light and stretchy.
2) Is there a way to omit the hood without the cape looking unfinished?
Hi Meghan,
You could probably use a jersey knit and it would be fine. You could in theory not add the hood and turn the neck section in a half inch and sew down.
Hi Angel! This pattern is by far well worth it’s fame. it was easy to make and looks fantastic!
My only issue is that I decided to be a rebel and use suede cloth and satin lining. Paired with the large hood, it becomes very easy for it to slip off. Besides sewing hairpins on the inside, do you have any recommendations?
Otherwise, thanks so much! 🙂
Hi Jules the comb is about my only recommendation. Maybe a velvet ribbon strip in it to help traction?
Hello,
I am wondering if I could make this cape reversible?? I am trying to figure it out on my own but just got back into sewing recently so I am a bit rusty. I cut out double of the entire pattern, and for the lining of the hood I just used the fabric that I wanted for the reversible part of the cape…How would I line the body of the cape to make it reversible??
Thank you so much for this tutorial!!
Leanne
HI Leanne,
You basically cut out two of the cape. Sew the two capes right sides togther, leaving a space for utning in the bottom back of the cape. Turn it right side out and sew the gap closed.
Hi! Great instructions! I have never made any clothing in my life, but needed this to Complete my halloween costume. My first Meeting With a sewing machine, and it was a great result, no Challenge, and as a man, 40+, and mostly doing mechanical stuff – this was fun!
Thanks a lot for the great instructions!
Best regs.
Geir
I used the pattern to make a full-length felt cloak for my granddaughter’s Halloween costume. I lengthened the pattern by adding an extra 14 inches along the bottom edge. It came out beautifully. Wish there was a way to post a photo so you could see the end product.
Wonderful! What a fun alteration. =) Thanks for sharing.
Hello,
What a brilliant tutorial!
I am attempting this cape for my little girl, I was wondering if adding lining to the cape is possible?
Thank you
Catherine
sorry just seen someone else commented about lining 🙂
I’ve just made one. It looks great and it was easier than I thought it would be.
Thanks
Hi, what is the difference in size between the child and child large? I am making for a 9 year old girl. Thank you!
You will want to make the large for a 9 year old. =)
I just wanted to post a note to say thanks for such a fun, easy, and quick pattern. As others have done, I modified this a little by making it longer – nearly to the floor. My daughter wanted a Harry Potter-esque “cloak” for Christmas and this fit the bill perfectly!
I used the hood-pattern for two costumes (Lord of the Rings, Harry Potter) and it fits perfect.
Thank you so much for sharing!
Thank you for the pattern. My daughter and I have been looking for a cape pattern and really like yours.
Hi! What size should I make for a 5 yo – child or child large? Thanks in advance!
I would go with the child large
I would go with the child large
I am making this pattern with Organza Fabric for a creepy witch costume. I am trying it out tonight. Wish me luck and thanks for the pattern!
Best of luck… Organza – you’re brave!
Thank you so much for making this available and for making the pattern a printable one. Am cosplaying this year as a vampire red riding hood (yes i know) who fights werewolves and was looking everywhere for an easy hood pattern for my mom to make for me. She knows how to make the cape but the hood was giving her some trouble. Yours was easy, fit with the cape pattern she had done out before and was easy to understand. Thank you!
Yay – happy to hear that pattern helped. 🙂
Oh my! I so love the outcome of this pattern. I’m so thankful you got this posted and I can have it for free. It’s very easy and clear instruction to follow.I usually make my daughter’s costume every Halloween. And she is loving this one!
Thank you for the free pattern. I made my granddaughter an awesome reversible cape for her Cindy Lou Hoo costume. I wish I could add a photo. GREAT pattern and instructions.
I love this pattern. I’ve used it for jedi robes, and a last minute little red riding hood Halloween costume, once you get your head around what’s happening, the whole thing can come together in like, an hour. A full length cape is 3.5 to 4 yards of fabric unlined if anyone is curious.
I love your hood patterns! I wanted a hooded circle cloak, but I couldn’t find any that weren’t so pointy. The cloak part is easy, and doesn’t need a pattern as long as you have enough fabric, but the hood really needs a template. I was so happy to find your patterns! I love the shape of the Red Riding Hood Cape, but I prefer the inner border of the Long Hooded Cloak hood, so I used the asymmetrical technique of the Cloak hood with the Cape hood template. It turned out so good! This is only the second garment I’ve sewn, and it’s much more complicated than my first project (a single-layer vest that I finished with bias tape rather than attempt a neat hem). Thank you for your clear directions.
Hi Gina! I am so happy to hear that you’ve discovered the joy of sewing. There is something magical about taking a flat piece of cloth and turning it into something useful. I’m glad to hear that you’ve discovered a hack to make it work for you. You’re welcome, and I wish you the best on your sewing journey!
Hi.
I’ve been trying to find a pattern for a cloak/cape for ages. I like the hood on the red riding good pattern but I like the length of the long hooded cloak. Doo you think it would be possible for me to combine to two patterns? Or would you be able too extend the riding hood cloak easier?
Thanks
Jo
Hi Jo! There’s a secret to all of my capes – the hoods are interchangeable! So you can mix and match with the patterns! Enjoy!
Hello Angel,
Thank you very for the pattern (Red Riding Hood Cape).
Is it inclusive seam allowance or do I have to put it to the pattern?
Best regards from The Netherlands,
it includes it – all my pattern do
Unfortunately, I could not get the pattern. Winzip is no longer free and it required winzip to open the file. I had the trial version of winzip which has since expired. I am retired and pinching pennies.
Hi Angel. I have a question. Can a hood be attached to your bias cut, ruffle front vest pattern? Thanks
It might take a little finagling but after a very brief think on it – I it should work.
Hi Angel. I have a question. I make AG doll clothes. All patterns I have for hooded raincoats have the bottom of the hoods cut straight across. I noticed on human patterns, the hoods have sort of a half circle cut on the bottom of the hood. Could you tell me why and would this give a better fit for doll clothes. Thank you for any help.
There are different methods for attaching the hood and it makes different lines and fit. One isn’t right or wrong it’s just a matter of design and look preference. For doll clothes attaching a hood with a straight line is much easier to sew than a curved neck due to the size.
I downloaded the pattern. It includes the classic hood, but not the updated hood option. How do I access the updated hood pattern (adult size)?
Thank you!
Hi Debra You need to use the first form to get the updated hood.
Thank you for sharing this pattern. I used it to make a green cape for my daughter who dressed up as Will from The Rangers’ Apprentice by John Flanagan for Book Week at school. It worked really well.
Hello!
I just finished the cape for my daughter’s 100 Hundred Days of School Parade, I added some butterflies and a tulle ruffle under the cape, and it came out amazing!
Thank you so much for the pattern, it was wonderfully made and easy to print! You are a genius!
Thank you again!
Thank you so much for this pattern – I ended up using a stretchy sparkly knit fabric for my daughter’s desired “sparkly witch” halloween costume – and she LOVES it. The hood is just the right level of drama for this 7 year old! The video tutorial and pattern were both easy to follow. Thank you again!