
Santa Hat How To
This content contains affiliate links or sponsored elements, read our Disclosure Policy.


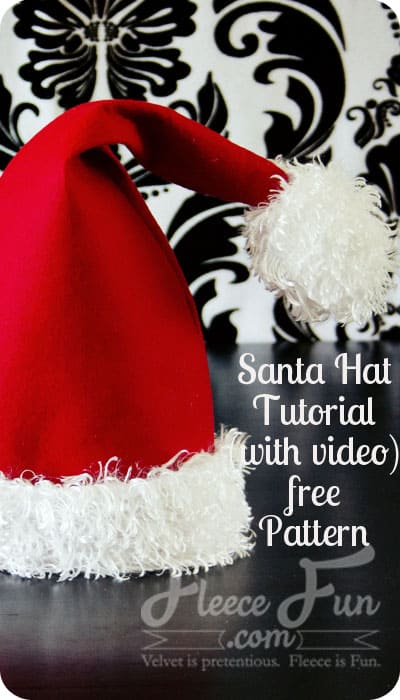
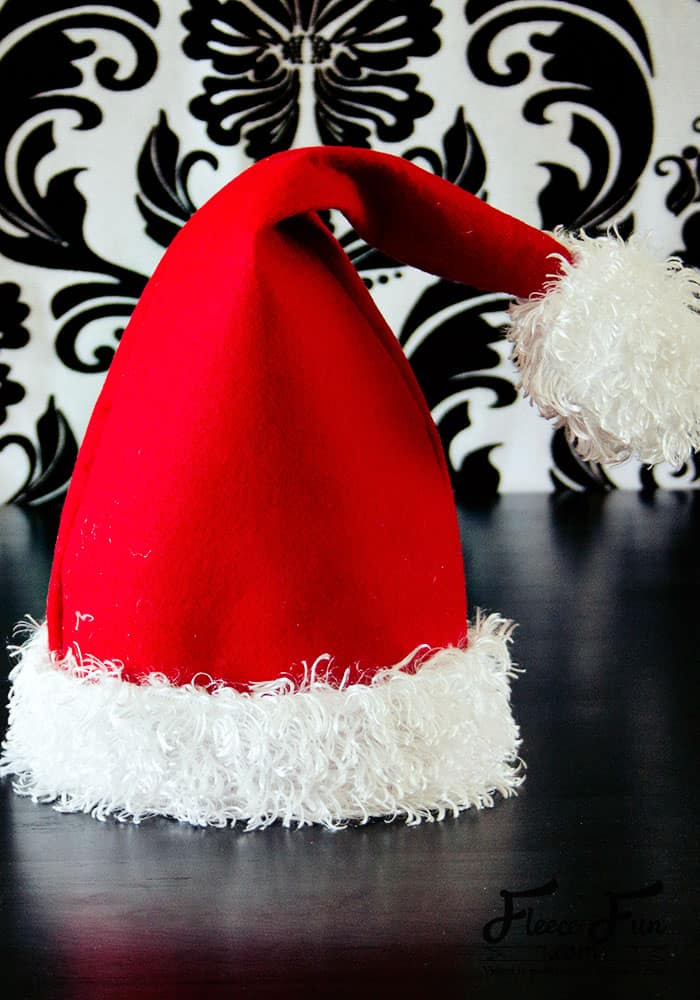
This Santa Hat how to is a snap to make! You can make a cute Santa Hat to bring holiday cheer to all who wear it… or at least a cute picture! Use the “add a jingle bell” option for more Christmas cheer. I have a mini Santa Hat headband version here.

I’ve updated the pattern, but I have left the original tutorial if there are any that prefer it. So there are essentially 2 different patterns of Santa Claus hat available to you. Merry Christmas and Enjoy!
Hate The Ads?
This pattern with video and printable instructions is available in the Makers Studio. The Maker’s Studio is an ad free experience, no video ads, no forms, no zip files, just creating.

YOU WILL NEED:
- A printed out version of this pattern. Get the free pattern by filling out the form here.
- 1/3 yard ( a tad more for the largest size) fleece
- 1/4 yard faux fur or fleece for the brim and ball
- thread, needle
- small amount of batting or fabric scraps
- Jingle bell (optional)
- Sewing Essentials (scissors, pins, etc.)
- Sewing Machine
How do you make a Santa Claus Hat?
Simply download the pattern (form at the end) and follow these step by step instructions and you can make a Santa Claus Hat in the size that you need.
What are Santa Hats made of?
They can be made of many different materials, but traditionally they are made of fleece, faux fur or felt. Fleece is the most comfortable/ easy to use as it doesn’t shed and has some stretch to it, making it more comfortable to wear.
Santa Hat How To Tutorial

Step 1 – Assemble and Cut Out the free Santa Hat Pattern
Print up and assemble the pattern (you can get assembly instructions here . )
There are multiple are multiple sizes to this Santa Hat.
You will need to find the color coordinating line to the size you want to make. Cut the pattern down to that size.
Cut out 1 of the main hat (large triangle) on the fold of doubled fabric.
For the brim piece cut 1 – you should have one long strip. Cut 1 of the topper out of the same material as the brim.
Quick Tip
When cutting on faux fur it’s easier to place the pattern on the WRONG side of the material and cut out.
Step 2 – Begin to make the Ball topper to the Santa Hat
For the ball topper to the Santa hat you will need the piece cut from faux fur, a little bit of batting and a jingle bell (optional but fun). You will also need a needle and thread for some hand sewing.
With the wrong side face up, place the batting and the jingle bell in the center of the topper piece. Using the needle and thread run a basting around the circle (not going around the triangles).
Pull the basting stitch to bring the piece in to a ball with the batting and bell inside. Stitch a few stitches through the triangles to seal the ball and secure with a knot.
Step 3- Sew the Santa Hat together
We’ll start with the brim piece.
Fold it in half so the wrong sides are touching and the fur is on the outside.
Pin the brim along the straight side of the St. Nick hat, the raw edges on the bottom. Sew the brim to the hat with a .5 inch seam allowance.
Next fold the hat in half. Leaving a small (two finger) gap at the top for later, sew the red part of the hat using a .5 inch seam allowance, stopping at the fur brim.
Now it’s time to finish the brim. Turn Right side out.
Sew the brim side, a .5 inch seam allowance,
Step 4 – Add the Topper to the Jolly Old Elf’s Hat
Remember that gap at the top of the Santa hat? Now ti’s time to add the topper.
Tuck the ends (the triangles) into the top of the hat. Turn the hat inside out.
Sew across the top to secure the topper in place. Trim the faux fur ends and turn hat right side out, and flip the brim up.
Fill out the form to get the free pattern
By downloading you are agreeing to pattern terms of use. Click the picture of the pattern envelope to download the .pdf ! Can’t see the form? Try here. Hate the Ads? You can purchase an ad free version of the Pattern here.

Projects for the Perfect Christmas Party
- Modern Christmas Wreath DIY Felt
- DIY Christmas Earrings
- How to Spray Paint a Pre-Lit Christmas Tree
- Christmas Advent Calendar DIY
- Homemade Christmas Tags
- Cozy Christmas Tall Tree Pillow Tutorial
- 6 Ways to Engage Kids This Christmas
- 5 Tips for Outdoor Christmas Decorating
- DIY Santa Hat Headband
- Holiday Bread Wrap
- Mason Jar Cover Gift Idea
Explore More Christmas Projects You’ll Love
- Snowflake Ornament DIY
- Mini Holiday Gift Tags
- Printable Holiday Gift Tags
- Hot Chocolate Printables for Mason Jars
- Felt Fox Ornament DIY
- Felt Lanterns Handmade Ornament
- Mini Top Hat Ornament Tutorial
- Quilted Christmas Table Runner Tutorial
- High Heel Christmas Stocking
- Printable Handmade Gift Planner
Here’s the Santa Hat How To Original video tutorial, written tutorial below:

1 – Assemble and Cut Out the original Santa Hat Sewing Pattern
There are multiple are multiple sizes to this Santa Hat. Fleece there is a little give to the fabric.
Print up the pattern (you can get assembly instructions here . ) Cut out 2 of the main hat (large triangle). For the brim place on end on fold and cut to proper length – you should have one long strip.
Cut two of the topper out of the same material as the brim.
2 – Begin to sew
Taking the two topper pieces, place them right sides together and sew all the way around the ball with a .5 seam allowance. Leave a gap of about an inch at at the bottom where the tab is for turning.
Turn ball right side out. Put a little stuffing or fabric scraps in the ball to give it some fluff.
Also for some extra Christmas cheer place a jingle bell inside the ball (optional).
3 – Sew the Santa hat
Sandwich the topper between the two hat triangle (right side should be facing in). The triangle end of the tipper should line up with the tip of the hat.
Pin the long side of the St. Nick hat, and pin the topper at the top – pushing the main part of the topper out of the way. You just want to sew the triangle tab into the hat – the part you used to turn the topper right side out.
Sew with a .5 seam allowance along the side of the hat from the bottom to the top.
Stuff the topper into the Santa Claus hat – taking care that it won’t catch into the side seam you are about to sew. Pin the other long side of the triangle.
Sew the long side of the triangle from top (being sure only the sew the “tab” part of the topper) to bottom using a .5 seam allowance.
Turn hat right side out and admire your work thus far.
4 – Sew and Add the Brim
Turn under one side (the long side) of the brim and sew – a .25 seam allowance to make a nice finished edge.
Take right sides of brim together and using a .5 seam allowance sew the two short ends together – making a “loop”
Now take your loop and pin it to the inside of your hat, right side of the brim facing wrong side of the hat – line up the seams to make it look nice.
Sew on the brim using a .5 seam allowance. Trim threads, flip up brim and admire your new hat! You just completed the Santa Hat How To.
Download the free pattern, tutorial below!
You can get a free copy of Adobe reader here– it is the ONLY reader I recommend. By downloading you are agreeing to pattern terms of use. Click the picture to download the .pdf ! Fleece Fun’s patterns are free and this site will never ask for your credit card information.

Also Seen As:
Just wanted to thank you for publishing this pattern… my 3 year old has been begging me for a santa hat. We were both excited to see this. I’ve made several patterns from your site and every one has been so easy to print off, assemble and sew. Love it! Keep up the good work. I’m def a big fan…and a fan of fleece now too!
Thanks for this pattern and tutorial from Spain. I needed it for a costume for my son. It’s great.
I just wanted to drop in and say THANK YOU for all your lovely patterns and tutorials. This isn’t the first time I’ll be using this santa hat patter (I’m leaving out the pom and the band and making an elf hat for a Link costume I’m making my daughter!) and it’s so simple and easy to follow, yet results are high quality! I’m excited to use the long cape pattern also, we’re going to be one organised family come halloween!
I’m using your newborn template as a guide for making Santa hats for my pets!
It will make a cute Christmas card! Thank you so much!
Making a Santa hat for my granddaughter play
Thanks for being so generous. Nice to have a wide range of sizes.
Such a life saver! My 8yo told me at bedtime that she neeeeded a black Santa hat to wear for elf day tomorrow at school. My first thought was to check your site for a pattern and now 2hrs later one black Santa hat ready to go 😁
Yay! Awesome mom sewing for the win!
having to make a quick new hat for santa so he can do some rides before christmas
Looking for a cute preemie newborn Santa hat for the NICU this season
This is such a cute and easy project! I can’t wait to try it out at home. Thanks for sharing the tutorial, it’s really helpful.
Love this Santa hat pattern and tutorial! The video is so helpful and easy to follow. Can’t wait to make one for my niece’s Christmas photoshoot. Thanks for sharing!
I absolutely loved this tutorial! The video was so helpful for visual learners like me, and the free pattern is a fantastic bonus. Can’t wait to make my own Santa hat for the holidays—thank you for sharing!
I absolutely loved this tutorial! The free pattern and video made it so easy to follow along. I can’t wait to make a Santa hat for our holiday party. Thank you for sharing such a festive and fun project!
This tutorial is fantastic! I love the clear instructions and the free pattern is such a bonus. Can’t wait to make a cute Santa hat for the holidays! Thank you for sharing!
I absolutely love this Santa hat tutorial! The free pattern is so easy to follow, and the video really helped me with the tricky parts. I can’t wait to make a few for my family this holiday season. Thank you for sharing such a creative and fun project!
I absolutely love this tutorial! The step-by-step instructions are super clear, and the free pattern is such a bonus. I’m excited to start making my own Santa hat for the holidays. Thank you for sharing the video too—it really helps to see the process in action!
I absolutely love this Santa hat tutorial! The free pattern is so easy to follow, and the video makes everything crystal clear. Can’t wait to start making these for the whole family. Thank you for sharing!
I absolutely loved this tutorial! The step-by-step instructions and video made it so easy to follow. The free pattern is a fantastic bonus! I can’t wait to make a Santa hat for my family this holiday season. Thank you for sharing!
Thank you for this adorable Santa hat pattern! The video tutorial was super helpful and made the process so much easier. I can’t wait to make one for my little one. Can’t believe how cute it turned out! 🎅❤️
This Santa hat tutorial is fantastic! The video makes it so easy to follow along, and the free pattern is a generous addition. Can’t wait to make a few for my family this holiday season! Thank you for sharing!
I just finished making the Santa hat using your free pattern and video tutorial! It was so easy to follow, and I love how it turned out. Perfect for the holiday season! Thank you for sharing such a lovely project!
I absolutely love this Santa hat pattern! The video tutorial is super clear and helpful. I can’t wait to make one for myself and for my kids. Thank you for sharing this fun project! 🎅❤️
This tutorial is fantastic! The video makes it so easy to follow along, and the free pattern is such a generous gift. I can’t wait to make some Santa hats for the whole family this holiday season. Thank you for sharing!
This is such a cute tutorial! I love the free pattern and the video makes it so easy to follow along. Can’t wait to make some Santa hats for the holidays! Thank you for sharing! 🎅❤️