
Mini Top Hat Ornament tutorial
This content contains affiliate links or sponsored elements, read our Disclosure Policy.
Today I’m doing something I NEVER do. I’m including the entire tutorial in my blog. It’s my little gift to you . Enjoy!
Today I’ll show you how to make a mini top hat for your tree.

For this project you will need the following: 1/8 yard ( or less I used scraps I had) of fleece or felt The free Fleece Fun .pdf pattern printed on card stock (You can download that here)Tape Spray on Adhesive Glue Gun Ribbon Jingle Bell Small Items to decorate your hat Scissors Marker Small clip


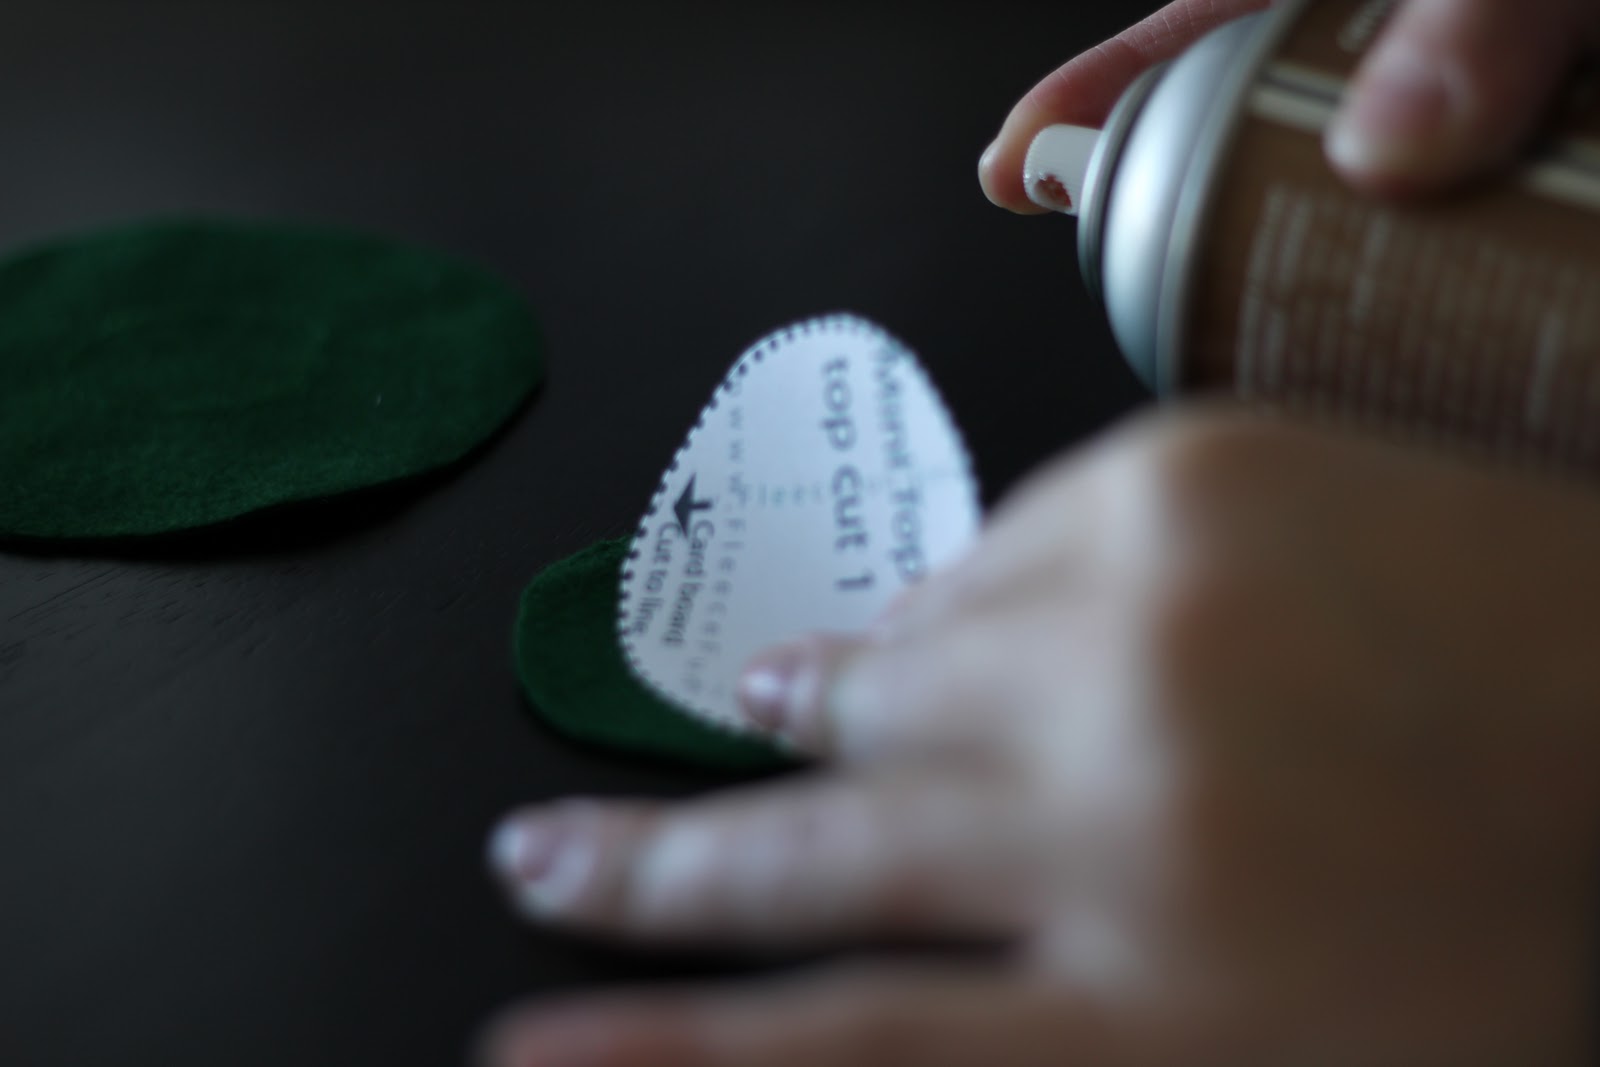
Step 1 You will need to print the pattern onto card stock as the pattern will become part of the hat . Cut out the pattern.

Trace the pattern onto the cloth using a marking pen (or even a regular pen – as long as it doesn’t bleed through the fabric. Be sure to trace the brim once, with a hole in the center.

Then cut down all the pattern pieces to the dotted line. Then trace the brim again using the cute down pattern piece – with no hole in the center this time.

Step 2 You now have four pieces of fabric cut out. set the brim piece that does not have a hole in the center aside.
Spray the back side of the card stock with glue and center on each piece (there should be about a small allowance all the way around – except for the hole in the center of the brim. That should just line up with the fabric.

Using a glue gun, fold over the excess fabric and glue down along all the edges of the pieces with the exception of the brim piece that doesn’t have a hole – set piece aside.

Step 3

Taking the wall piece, gently fold it around so the two ends barely over lap. Glue ends together, be sure to hold it for a while to secure or use a clothes pin or clip to hold it in place. Step 4

Once the wall is secure it’s time to add the top of the hat. Using your glue gun, glue around the the top part of the wall, just barley on the inside place top on glue hold in place to secure for a few seconds

Step 5 Place glue on the bottom of the wall of the hat (lining up the bottom circles) and press firmly onto the brim. You may need to hold this for several seconds to ensure it is well glued.

Tip: Place the seam where you will adding all your decorations or where it will be facing the tree – that way it can be covered. In my example I placed the seam in the very back of the hat. The brim is an oval shape – the sides should be the thinest part of the oval and the brim should be wider at the front and back of the hat.
For extra support tape a few pieces of tape between the brim and the wall of the hat.

Slip in a jingle bell for extra cheer.

Step 6  Using your glue gun, place glue on the brim card board and place remaining piece of the brim on it, sealing off the hat. Then Using glue all along the edge of the brim fold over excess of cloth to finish off.
Note: Excess is already folded over in the example in the picture, but it will make a nicer edge if you do it this way.
Add a couple of clips so you can clip to the tree. Or you can glue ribbon to the top to hang it like a traditional ornament.

Now comes the fun part…. Step 7 This for me is the best part! Add ribbon, tulle, beading, feathers, buttons, brooches, glitter, you name it and make this hat your own. I used a miniature snow flake ornament and ribbon. Old jewelry would work well too. Sky is the limit and your creativity reigns – what will your hat look like? Inspiration ideas for this ornament: Go Elfish – Add a scarf and make it look like an elf has just stopped by! Go Formal – a tree with top hat and bow ties is dressed for any occasion Go Unique – a steampunk themed tree with planes and gears and top hats would unusual Go Dickens – draw inspiration from the greatest Christmas Novella ever written and include elements from Dickens’ time and “A Christmas Carol” to deck out your tree!

Merry Christmas! Angel
Ornaments You’ll Like for Christmas
- Reindeer Felt Handmade Ornament DIY
- Let It Snow Embroidery Hoop Ornament DIY
- Christmas Embroidery Designs Noel Hoop Ornament DIY
- Angel Handmade Ornament DIY
- How to Make a Snowman Ornament
- Felt Elf Tutorial
- You can see all of Handmade Ornament Tutorials on this page
- You can see just my Felt Christmas Ornaments here
Thanks for sharing Angel. These hats are perfect for what I’m working on, but the link isn’t working for the hat pattern. Do you recall the category or name of the original post? I’ve searched for a bit but have come up empty handed.
Thank you.
Hi Nicky –
Sorry for the broken link you can find that pattern here – http://www.fleecefun.com/wp-content/uploads/2012/04/fleece-fun-mini-top-hat-ornament.pdf . the link in the post has been fixed as well.
Thanks for letting me know,
Angel
Just what I was looking for as a Team Ornament. My daughter dances on the Top Hat II Dance Team and I have come up with an ornament for all the dancers for the last couple of years. Thank you for sharing.