
DIY Placemats for the Holidays with Cricut Maker
This content contains affiliate links or sponsored elements, read our Disclosure Policy.


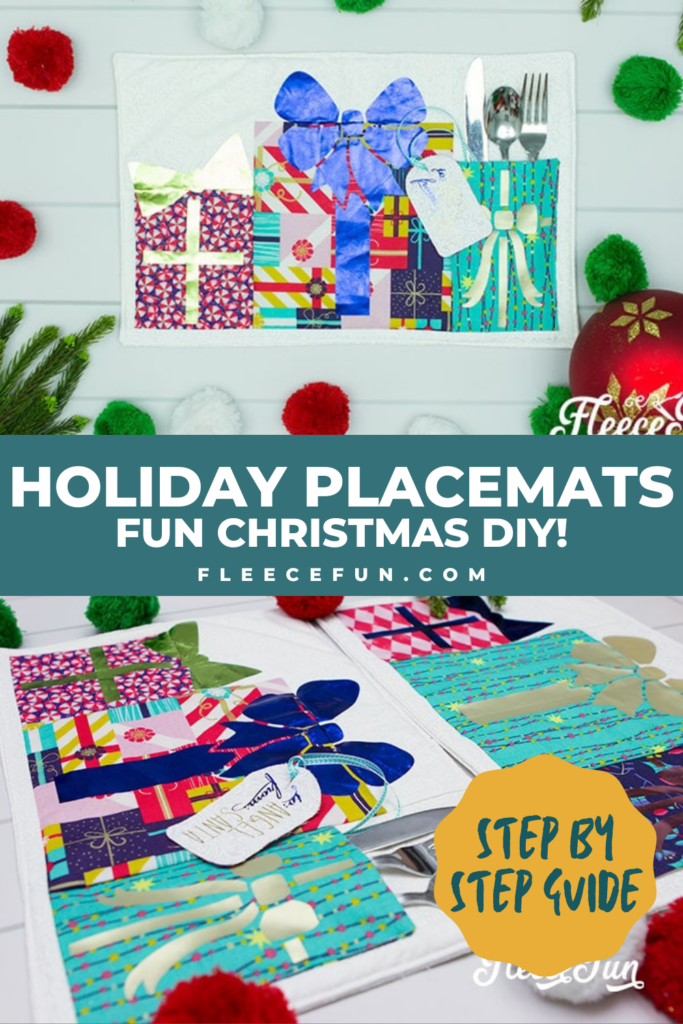
Holiday Sewing Project: These DIY Placemats for the holidays are the perfect addition to your tablescape. Made with lots of different coordinating fabrics this can also be a great scrap buster as well!
This is a sponsored conversation written by me on behalf of Cricut. The opinions and text are all mine. This year I’m hosting Christmas Eve for my family. That means dinner, our traditional talent show, and all around Christmas cheer! To add to the décor I’ve come up with these cute DIY Holiday Placemats that have Christmas Presents on them. I can individualize each place setting with a personalized tag for each guest! The best part is the tags are removable so the placemats can be used year after year for different guests.
There are so many wonderful Christmas themed fabric collections this time of year, and this project is a great way to showcase them. Also if you have some Christmas fabric leftover from a project this is a great way to use up the rest of the fabric!
The same goes for the vinyl in this project. Use the placement feature in the Cricut Design app to use up HTV scraps that are used for the bows on the DIY Holiday Placemats.
YOU WILL NEED:
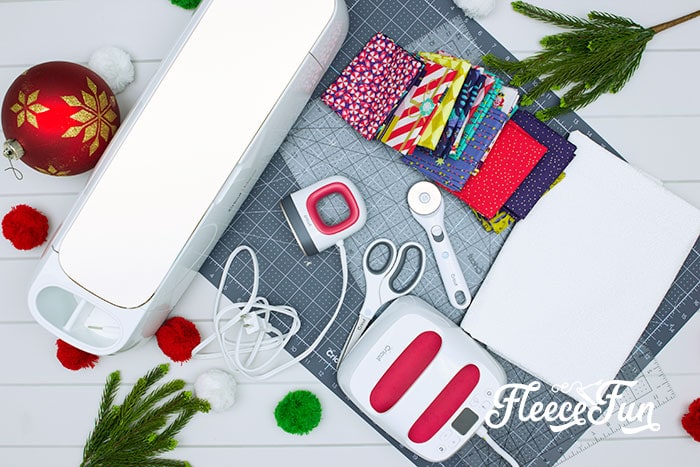
- Cricut Maker
- Rotary blade for the Maker
- Fine Point Blade for the Maker
- Rotary Blade. Ruler and Mat
- This Project File in Cricut Design Space
- Iron On (In Four colors – some of these variety packs work great)
- EasyPress Mini
- EasyPress 6 x 7 or larger
- EasyPress Mat
- 12 x 24 Fabric Mat
- 12 x 12 Standard Grip Mat
- Christmas Fabric in 4 Varieties (This project is designed to work with Fat Quarters)
- 1 1/2 Yards plain white fabric for the background and backing
- 2/3 yard Cotton low loft quilt Backing (like this one)
- Thread
- 1 yard Ribbon
- Sewing Essentials ( Sewing Machine, pins, etc.)
DIY Holiday PLACEMATES Instructions:
Step 1 – Cut out all of the Elements for the DIY Holiday Placemats
This project Yields 4 Placemats. Using the file I have ready to go in Design Space cut out the elements.
You will need to prep 4 sheets of white fabric.
Four sheets of Christmas fabric.
note
The Rectangle will be a little shorter than 24″, but pattern is made so it can be cut out using the shorter fabric. Just be sure to line it up properly on mat.
While you’re cutting out fabric, cut 4 rectangles that are 12″ by 18″, and four rectangles from the low loft batting that are also 12″ by 18″
Using the Cricut Maker with the Rotary Blade, cut out the fabric elements.
Switch to the Fine Point blade and Cut out the iron on elements. Weed the iron on elements and set aside.
Step 2 – Begin Assembly of the front of the holiday Placemat
Organization with this project is important. Set the “Tags” aside, we’ll get to those in a little bit.
Place all the elements in each pile so you can keep them straight.
quick tip
I like to use a clean cookie sheet to lay out pieces on and to keep them from getting wrinkled/lost
Refer to the picture in Design Space to help you see where all the pieces go.
Mix the Christmas fabric so you can get a nice assortment of colors for each mat. For the silverware pocket (the present on the right) there should be two rectangles. I’ve given each element a number so you can refer to this picture to see what I’m talking about. Let’s get sewing!
Step 3 – Start to sew the Christmas Placemat
All seam allowances for the DIY Holiday Placemats are 1/4 inch unless otherwise stated.
Start by sewing rectangle 1 to the left side of rectangle 2.
Press towards the darker fabric. By the way I love using the EasyPress mini for pressing seams – it’s perfect.
Next sew the block you just made to white fabric #3. Press the seam.
Now Sew the 4 ( the large middle present) to 5 ( the white fabric above it). Press the seam.
Now it’s time to make the silverware pocket.
Take fabric 7 and 8 and with right side together sew around 3 sides of the fabric.
Clip the corners turn right side out and press. Set aside for a moment.
Now it’s time to sew each of the columns we made together. Take column 1 (blocks 1,2 and 3) and sew them to column two (blocks 4 and 5) right sides together (see photo). Press.
Now it’s time to add the pocket. Line up the bottom of the pocket with the bottom of the column 2 ( blocks 4 and 5) with the raw edge on the right ( so it is sewn into the seam) place block 6 on top lining it up with the top and bottom, making a “sandwich” with the pocket in the middle. Sew. Press.
Last, let’s sew the long strip (9) to the bottom of all the columns
That’s the front of the Placemat all sewn!
Step 4 – Add Iron-On Design to Your DIY holiday Placemat
I found that this is the easiest time to add the Iron On. Refer to the design space file for the placement of each bow. Using your EasyPress and mat add the bows to the presents.
Step 5 – Quilt the Placemat
Now it’s time to add the back and the batting to the DIY Holiday Placemats! Now there are different ways to finish the mat, and this is the way I chose to.
Make a placemat sandwich. Place the placemat backing so it’s right side up, then place the front of the placemat (right side down – so right sides are touching), then place the batting on top.
Pin, and sew using a 1/2 seam allowance, leaving a 3-4″ gap for turning. Trim the seam allowance down to 1/4 inch.
Clip the corners and turn right side out.
Tuck the fabric from the turning gap in, pin and top stitch around the edge, sewing the turning gap shut. Quilt as desired (I just stitched in the ditch around the presents). Sew the right side of the pocket down by top stitching along the edge.
Step 6 – Create and Attach the Custom Tag
The tag comes together quickly.
Take a white tag and a Christmas fabric tag and place them together WRONG sides touching.
Top stitch all around the tag. Add a small button hole at the end (you could also use a grommet).
Then, add the Iron On to the tag using the EasyPress Mini.
Add a ribbon to the end.
Tuck or safety pin the ribbon to the inside of the silverware pocket.
You just completed the DIY Placemats for the Holidays!
Because of the materials used, they can be washed and reused year after year.
Creative Sewing & Cricut Projects You’ll Love!
- How to Sew a Quilt the Easy Way
- Acorn Template (Free JPEG & PDF)
- DIY Custom Sewing Labels
- Felt Valentine Envelope DIY (No Sew)
- DIY Matching Game
- DIY Birthday Crown (Free PDF & SVG)
- Freezer Paper Stencil for T-Shirts Tutorial
- Tips for Working with Iron-On Mesh
- DIY Tiara (Free Pattern & SVG)
- How to Make a Knight Helmet (Free Template)
More Cricut Projects!
- Cricut Maker for Beginners: Easy Party Decor
- Your Top 3 Cricut Maker Questions Answered
- DIY Pineapple Decor
- Cute Craft Room Trash Can DIY
- See all of FleeceFun’s Cricut Tutorials!